Starting a home grow in New York can feel exciting, but it can also feel confusing at first. Many beginners have simple questions. They want to know if it is legal, how many plants they can grow, what tools they need, how much it may cost, and how long the process takes. They also want clear steps they can follow without getting lost in hard words or expert-level advice. That is why a beginner-friendly guide matters.
A home grow means growing cannabis at home for your own personal use. In New York, this topic has become more important because more adults want to understand what the law allows and how to begin the right way. Some people want to save money over time. Some want more control over how their cannabis is grown. Others are simply curious and want to learn a new skill. No matter the reason, most first-time growers need the same thing: a clear and practical guide that explains the basics from start to finish.
This article is made for beginners. It is not written for expert growers or commercial businesses. It is written for someone who may be starting from zero. You may have never grown any plant before. You may not know the difference between indoor and outdoor growing. You may not know what kind of seeds to buy or how much space you need. That is normal. Learning to grow at home takes time, and every beginner starts with questions.
One of the first things a new grower needs to understand is that growing cannabis is more than putting a seed in soil and waiting. A healthy grow depends on planning, patience, and daily care. Even a small home grow needs attention. Plants need the right amount of light, water, airflow, and space. They also go through different stages, and each stage has different needs. If you skip the planning part, it is easy to make mistakes early.
That is why this guide begins with the basics. It will explain the legal side of home growing in New York in simple terms. Before you buy seeds or equipment, you need to understand the rules. Knowing the legal limits helps you avoid problems later. It also helps you decide how large or small your first grow should be. For most beginners, starting small is the best choice. It is easier to manage, easier to learn from, and less costly.
This guide will also walk through the main setup choices. One of the biggest beginner decisions is whether to grow indoors or outdoors. Both options can work, but they are not the same. Indoor growing gives you more control over the environment, but it often costs more because you need lights and other equipment. Outdoor growing may cost less, but it depends more on weather, season, privacy, and secure space. A new grower should understand these differences before getting started.
Another part of this guide will cover the supplies you may need. Beginners often ask what equipment is really necessary and what is optional. It is easy to feel overwhelmed when you see long shopping lists online. Some guides make home growing sound very technical and expensive. In reality, many beginners do better with a simple setup. You do not need to start with the biggest or most advanced system. You need a setup that fits your space, budget, and skill level.
The article will also explain the main growth stages in a way that is easy to follow. Cannabis plants do not grow the same way from start to finish. They begin as seeds, then become seedlings, then enter the vegetative stage, and later move into flowering. After that comes harvest, drying, and curing. Each step matters. A beginner who understands this full process is less likely to get surprised by timing, plant changes, or care needs.
Harvest timing is another area that confuses many new growers. Some people think the process ends once the plant looks big enough. But growing is not only about reaching harvest. You also need to know when the plant is truly ready and what to do after cutting it down. Drying and curing are part of the process too, and they can affect the final quality. This guide will help make those steps easier to understand.
Just as important, this article will cover common beginner mistakes. New growers often overwater plants, use weak lighting, start with too many plants, or ignore airflow. Some also make legal mistakes because they do not fully understand the rules. These errors can hurt plant health and make the process more stressful. Learning about these problems early can help you avoid them.
The goal of this guide is simple. It is here to help first-time growers in New York start in a smart, careful, and clear way. It will not promise perfect results overnight. Growing cannabis at home takes practice. But when you begin with the right information, the process becomes much easier to understand. With a small legal setup, a realistic plan, and patience, a beginner can build a strong foundation and learn step by step.
Is It Legal to Grow Cannabis at Home in New York?
Home growing is legal in New York for many adults. Under New York rules, adults age 21 and older may grow cannabis at home for personal use. This means a person who meets the age rule can grow cannabis for their own use at their residence, as long as they follow the state’s limits and safety rules.
This is one of the first things beginners want to know. Many people hear that cannabis is legal in New York, but they are not sure whether that also means they can grow it at home. The answer is yes, but only under certain conditions. Home growing is not a free-for-all. It is legal only when the grower follows the law on age, plant count, storage, and personal use.
Who Can Legally Grow Cannabis at Home
The main rule is age. In New York, home cultivation for adult use is allowed only for people who are 21 or older. A person under 21 cannot legally grow adult-use cannabis at home. For medical use, there are special rules that may allow a parent, guardian, or designated caregiver to grow on behalf of a younger patient in some cases, but that is separate from the standard adult-use rule.
For most readers of this guide, the key point is simple. If you are an adult who is at least 21 years old, New York allows you to grow cannabis at home for your own personal use. If you are younger than 21, you should not start a home grow under the adult-use rules.
Personal Use Does Not Mean Business Use
A very important part of the law is that home growing is only for personal use. This means you can grow cannabis for yourself, but you cannot turn your home grow into a business. You cannot legally sell what you grow at home. You also cannot trade or barter it like a product. So even if you grow a good harvest, that does not give you the right to make money from it.
This point matters because many beginners confuse legalization with open commercial use. Legal home growing is not the same as running a licensed cannabis business. New York has a separate system for commercial cannabis cultivation, processing, distribution, and retail sales. Those activities require state licenses and must follow a different set of rules. A home grower does not have those rights just because growing is allowed at home.
Home Growing and Licensed Commercial Cultivation Are Not the Same
It helps to think of home growing and commercial cultivation as two very different things. Home growing is meant for private, personal use. Commercial cultivation is part of the legal cannabis industry and is done by licensed businesses that must meet state rules for production, compliance, and sales. A person growing at home is not a licensed cultivator. That means the person cannot sell to stores, sell to friends, or market the product in any way.
This difference is important for beginners because it shapes how you should plan your grow. A legal home grow should stay small, private, secure, and within the plant limits. It should not be treated like a business project. The goal is personal use, not profit. When people forget this line, they can end up breaking the law even if the plants themselves were legal to grow.
Legal Does Not Mean There Are No Rules
Even though home growing is legal, New York still places clear rules around it. The state says plants must be kept in a secure place and must not be accessible to people under 21. The state also limits how many plants adults can grow. In general, adults 21 and older may grow up to six plants per person, with no more than three mature plants and three immature plants, and there is a maximum of 12 plants per household. These limits are a major part of legal compliance.
Another rule beginners should know is that homegrown cannabis cannot be sold, traded, or bartered. Also, some forms of making cannabis products can be illegal, especially when they involve dangerous or flammable solvents. So while the basic act of growing is legal, the full process still has limits.
Can Local Governments Ban Home Growing?
This is another question many people ask. In New York, local governments may set some rules around cannabis activity, but they cannot fully ban legal home cultivation that state law allows. A town or city may regulate certain local issues, but it cannot erase the statewide right of eligible adults to grow cannabis at home within the law.
That said, people should still be practical. If you rent your home, your lease may include rules about smoking, property use, or damage. If you live in shared housing, you may also need to think about odor, safety, and privacy. These are not always the same as criminal law, but they can still affect whether your grow causes problems where you live. So legal does not always mean hassle-free. It still means you need to plan carefully and respect your living situation.
What This Means for a Beginner
For a beginner, the answer is clear. Yes, you can legally grow cannabis at home in New York if you are 21 or older and you follow the state’s rules. You must keep the grow for personal use only. You must stay within the plant limits. You must keep the plants secure and away from anyone under 21. And you must understand that home growing is not the same as commercial cultivation.
Home growing is legal in New York for adults age 21 and older, but it comes with clear limits. The law allows personal home cultivation, not commercial growing. That means you may grow cannabis for yourself, but you cannot sell, trade, or barter what you grow. You also need to follow the state’s plant limits and keep your grow in a secure place. For beginners, the safest path is to treat home growing as a small, private, personal-use project and make sure every step stays within New York law.
How Many Cannabis Plants Can You Grow in New York?
One of the first questions new growers ask is simple: how many cannabis plants can you legally grow at home in New York? This is an important place to start because the law sets clear limits. If you know the number before you buy seeds or set up your grow space, you can avoid mistakes from day one.
In New York, an adult age 21 or older can grow up to six cannabis plants at home for personal use. But that does not mean any six plants in any stage. The limit is broken into two parts. One adult can grow up to three mature plants and up to three immature plants at the same time. If more than one adult lives in the home, the household limit goes up, but only to a point. A household cannot have more than twelve plants total, which means up to six mature plants and up to six immature plants, even if three or more adults live there.
This rule matters because some beginners hear “six plants” and think that means six large flowering plants plus extra small plants on the side. That is not how the limit works. The law counts both mature and immature plants, and it separates them into categories. You need to stay within both parts of the rule, not just the total number.
What Mature and Immature Plants Mean
A lot of beginners get confused by the words “mature” and “immature.” In simple terms, an immature plant is a younger plant that is still growing and has not fully entered the flowering stage. A mature plant is a plant that is further along and is usually producing flowers or is ready to do so. The mature plant is the one that takes more space, more light, and more daily attention.
This difference is important because the legal limit is not just about size. A small plant is not always ignored under the rules. If it counts as an immature plant, it still counts toward your plant limit. That means you should keep track of every plant in your grow, even the young ones.
For a single adult, the safest way to think about it is this: you can have three younger plants and three more developed plants at the same time. For a two-adult household, you can have up to six younger plants and six more developed plants. But once your home reaches that household cap, you cannot go beyond it, even if more adults live there.
Why the Household Limit Matters
The household limit is very important for people who live with a spouse, partner, family member, or roommate. Many people assume each adult gets a separate full grow. In practice, the home itself has a cap. That means the total number of plants inside that residence cannot go over twelve.
For example, if two adults live together, they may grow up to twelve plants total, with no more than six mature and six immature plants. If three adults live there, the limit is still twelve plants total. The number does not keep rising with each extra adult. That is why everyone in the home should agree on the grow plan before starting. If one person starts plants without telling the others, the household could go over the legal limit without meaning to.
This is also why shared spaces need clear planning. If one adult is already growing six plants and another adult wants to start six more, they need to count the full household total together. Good tracking helps avoid problems.
Why Beginners Should Start With Fewer Plants
Even though the law may allow up to six plants for one adult, that does not mean a beginner should start with six. In most cases, a smaller grow is easier, cheaper, and less stressful.
Each cannabis plant needs regular care. You need to check water, light, airflow, temperature, and plant health. The more plants you have, the more time and attention the grow takes. If you are brand new, six plants can feel like a lot very quickly. Problems such as overwatering, poor lighting, or weak airflow become harder to manage when you are trying to care for too many plants at once.
Starting with two or three plants often makes more sense for a first grow. It gives you room to learn without feeling overwhelmed. You can watch how the plants respond, notice mistakes earlier, and build confidence step by step. A smaller grow also costs less. You may need fewer pots, less soil, fewer nutrients, and a smaller indoor setup. That can make the whole process more realistic for a beginner budget.
Another reason to start small is space. Many beginners do not realize how much room a healthy cannabis plant can take up, especially indoors. A few plants can fill a tent or small room faster than expected. When plants become crowded, airflow drops and plant care becomes harder. That can lead to stress, mold, or weaker growth.
Starting below the legal limit does not mean you are doing less. In many cases, it means you are growing smarter.
Think About the Limit Before You Buy Anything
Before you buy seeds, clones, lights, or pots, it helps to decide how many plants you truly want to manage. Ask yourself how much space you have, how much time you can give each week, and how much money you want to spend. The legal limit tells you the maximum. Your real beginner limit may be lower, and that is fine.
It is better to grow a small number of healthy plants than a large number of struggling ones. New growers often learn more from two strong plants than from six plants that are hard to control. A simple, legal, and manageable start is usually the best path.
In New York, one adult age 21 or older can grow up to six cannabis plants at home for personal use, with a limit of three mature plants and three immature plants. A household can have up to twelve plants total, with no more than six mature and six immature plants, even if more than two adults live there. Beginners should understand that both young and mature plants count toward the legal limit. Even if the law allows more, starting with fewer plants is often the better choice because it is easier to manage, easier to afford, and easier to learn from. For most first-time growers, a small and simple setup is the clearest path to a successful first home grow.
Where Can You Grow Cannabis at Home in New York?
Knowing where you can grow cannabis at home in New York is one of the first things a beginner needs to understand. It is not enough to know that home growing is legal. You also need to know where plants may be kept, who can access them, and what problems may come up if you live in a rental or multi-unit building. These details matter because a legal home grow must follow location and security rules, not just plant count rules.
In New York, home growing is meant for personal use by adults who are at least 21 years old. That means the growing space must be part of a private residence. In most cases, this includes places where people live full time, such as a house, apartment, condominium, co-op unit, or mobile home. In some cases, it may also include certain nearby structures on the same property, such as a garage, shed, or other accessory building. The main point is that the grow must stay connected to the home and remain for personal use only. It is not meant to turn a home into a business or public growing site.
Growing in a House, Apartment, or Other Residence
For many beginners, the most common place to grow is inside the home. A spare room, closet, basement area, or small grow tent inside a private room may be used if the space is secure and controlled. People who live in houses may have more options because they often have extra indoor space or a private yard. People who live in apartments may have fewer choices, but home growing may still be possible if the setup stays private, secure, and within the law.
The type of home you live in affects how easy the process will be. A person in a detached home may have more privacy and more room for indoor or outdoor growing. A person in a small apartment may need to grow in a more limited area and pay closer attention to smell, airflow, and lease rules. Even though both people may be allowed to grow at home, the practical setup can look very different.
Can You Grow in a Rental Property?
Many people ask whether they can grow cannabis in a rented apartment or house. This is an important question because legal state rules and private lease rules are not always the same. A tenant may live in a place where home growing is allowed under state law, but the lease may still contain rules about smoking, property damage, electrical changes, odors, or other activities linked to growing.
This means renters should read the lease carefully before starting. The lease may not use the words “cannabis cultivation,” but it may still include terms that affect a grow setup. For example, a lease might ban strong odors, extra moisture, damage to walls, unsafe wiring, or changes to ventilation. A grow that causes mold, water damage, or electrical risk can become a serious issue even if the tenant stays within plant limits.
Renters should also remember that home growing inside a shared building can create problems if odors travel into hallways or other units. Privacy does not remove the need to be respectful of the property and nearby residents. A beginner should think ahead and choose a setup that is simple, safe, and easy to control.
Can You Grow Outdoors at Home?
Outdoor growing may be possible for some people in New York, but it comes with extra limits and risks. Outdoor plants still need to be part of a private residence and must be kept in a secure place. This means the plants cannot be openly accessible or left where anyone can easily reach them. The grow area should not allow access by people under 21, guests, or members of the public.
For example, a plant sitting in an open front yard would likely create problems because it is too exposed and too easy to access. A better outdoor setup would be a locked and enclosed area on private property, such as a fenced backyard section or a greenhouse with proper security. The goal is to make sure the plants are not just sitting in the open where they can be seen, touched, or taken.
Outdoor growing also brings practical concerns beyond the legal rules. New York weather can be hard on beginner growers. Rain, humidity, wind, pests, and changing temperatures can all affect plant health. A beginner with private outdoor space may still choose to grow outside, but that person needs to think about both security and climate before starting.
What Does “Secure Location” Really Mean?
One of the most important rules is that cannabis plants must be kept in a secure location. For beginners, this phrase can sound vague, so it helps to think about what it means in plain language. A secure location is a place where unauthorized people cannot easily get to the plants. This includes keeping plants away from anyone under 21 years old.
In practice, that may mean using a locked room, locked grow tent, locked shed, or fenced space with a lock. The purpose is not only to protect the plants from theft. It is also to prevent access by minors and to show that the grow is being handled responsibly. A beginner should not place plants in a spot where children, visitors, neighbors, or delivery workers can easily come across them.
Security also means using common sense. A grow should not be left open during the day if people regularly enter the home for repairs, cleaning, or other services. It should not be visible from shared spaces if possible. The safer and more private the setup is, the easier it is to stay within the rules and avoid problems.
Why Privacy Matters in a Home Grow
Privacy is not exactly the same as legality, but it plays a big role in a smooth home grow. A private setup reduces the chance of complaints, unwanted attention, or security risks. This is true for both indoor and outdoor grows. Beginners often focus on lights, pots, and soil, but the location of the grow matters just as much.
A private grow area helps control smell, keeps the process organized, and lowers the risk of theft. It also helps you avoid careless mistakes, such as leaving plants where guests or young family members can reach them. In shared homes, privacy is even more important because several people may move through the same space each day.
A beginner does not need a large home to create privacy. Even a small setup can work well if it is placed in the right area and kept secure. The best space is usually one that is easy to monitor, hard for others to access, and simple to maintain.
Common Location Mistakes Beginners Should Avoid
Many beginners make location mistakes before they even start growing. One common mistake is choosing a place that is easy to use but not truly secure, such as a balcony, open patio, or unlocked spare area. Another mistake is forgetting about how smell, heat, or moisture may affect the living space. A grow area may look fine at first, but if it creates odor problems or moisture damage, it can quickly become a bad choice.
Another mistake is assuming that because a person lives alone, any part of the property is automatically safe to use. That is not always true. A grow still needs to be protected from visitors, minors, and public access. Some beginners also fail to check rental rules before buying equipment, which can lead to wasted money and stress later.
The best approach is to choose a small, private, secure area that fits the home and the grower’s daily routine. A simple setup in the right place is better than a larger setup in the wrong place.
In New York, cannabis may be grown at home for personal use, but the location of the grow matters just as much as the number of plants. Home growing should take place in a private residence, such as a house, apartment, mobile home, or certain structures on the same property. The plants must be kept in a secure location and away from anyone under 21. Renters also need to check lease terms because property rules may still affect what is allowed inside the home. Outdoor growing may be possible, but only if the area is private, secure, and not easy for others to access. For beginners, the safest choice is a small, controlled growing space that is easy to lock, easy to manage, and clearly part of the home.
What Do You Need Before You Start a Home Grow?
Starting a home grow in New York takes more than buying seeds and hoping for the best. Before you begin, you need a simple plan. This will help you avoid waste, reduce stress, and make better choices from the start. Many beginners fail because they rush into the process. They buy too much gear, choose too many plants, or set up a space that does not work well. A good start is not about doing everything at once. It is about building a setup that fits your home, your time, and your budget.
Know the Basic Rules First
Before you buy anything, make sure you understand the legal side of home growing in New York. This matters because your setup should match what the law allows. If you do not know the plant limits or storage rules, you may create problems for yourself before your grow even begins.
You should know how many plants are allowed in your home and who can legally grow them. You should also know that your grow area needs to be secure. This means it should not be easy for children, visitors, or anyone under the legal age to access your plants. Even if you are only growing for personal use, you still need to treat the setup with care.
This step is important because it shapes every choice that comes next. The size of your grow area, the number of pots you need, the kind of light you buy, and even the amount of money you spend all depend on how many plants you plan to grow and where you plan to keep them.
Decide Between Indoor and Outdoor Growing
One of the first big choices is whether you want to grow indoors or outdoors. Both options can work, but they are very different. Your home, your space, and your daily routine will help you decide which one makes more sense.
Indoor growing gives you more control. You can manage the light, temperature, airflow, and humidity more easily. This is helpful for beginners because cannabis plants do better when conditions stay steady. Indoor growing also gives you more privacy. This can be useful if you live close to neighbors or do not have a private yard.
Outdoor growing can cost less at the start because the sun provides light. But outdoor growing depends more on the weather, the season, and the safety of your space. In New York, outdoor growers also need to think about rain, cold nights, humidity, and pests. If your outdoor area is not private and secure, it may not be a good choice.
Think about your living situation. If you live in an apartment, indoor growing may be the better option. If you have a private yard or another safe outdoor area, outdoor growing may be possible. The best choice is the one you can manage well, not the one that seems easier at first.
Choose a Safe and Practical Space
Your grow space does not need to be large, but it does need to work well. You should choose a place that is clean, easy to reach, and simple to control. A spare closet, small room, tent area, or locked corner can work for an indoor grow. For an outdoor grow, you need a space that gets enough sun and can be kept secure.
When picking a spot, think about daily use. You will need to check your plants often. You will water them, look for problems, adjust equipment, and sometimes clean the area. If the space is too hard to reach, too hot, too damp, or too crowded, it will be harder to care for your plants.
It is also smart to think about smell and noise. Indoor grows can create a strong smell, especially later in the grow cycle. Fans and other equipment may also make sound. This may matter if you live with other people or have neighbors nearby. A practical space is not just about where the plants fit. It is also about where you can manage them with the least trouble.
Start With Fewer Plants
Many beginners think growing more plants will give them a better result. In most cases, the opposite is true. Starting with fewer plants is often the smarter choice. It gives you time to learn and makes the process easier to handle.
Each plant needs care. You need to water it, watch for signs of stress, check light distance, and pay attention to growth. If you start with too many plants, small problems can quickly turn into bigger ones. You may also spend more money than needed on pots, soil, nutrients, and equipment.
Starting small helps you focus. You can learn what a healthy plant looks like. You can see how the leaves respond to watering and light. You can notice problems earlier. Once you have one successful grow, it becomes much easier to scale up later.
A small first grow is often the best training. It teaches you the basics without making the process too hard.
Check Your Power, Airflow, and Water Access
Your plants need more than light and soil. They also need a setup that supports healthy growth every day. Before you start, think about power, airflow, and water access.
If you plan to grow indoors, you will likely use a light, a timer, and one or more fans. These all need safe and steady power. You should make sure the area has outlets nearby and that you are not overloading one power source. A messy or unsafe electrical setup can become a serious problem.
Airflow also matters. Plants need fresh air to stay healthy. Good airflow helps reduce heat, lowers the risk of mold, and keeps the growing space from feeling damp and stale. This does not always mean you need expensive equipment, but you do need a setup that lets air move in and out of the space.
Water access is another simple but important point. You will water your plants often, especially as they grow larger. If your grow area is far from a sink or water source, daily care becomes harder. A good grow space should make basic care easier, not harder.
Make a Real Budget
It is easy to underestimate the cost of a home grow. That is why creating a real budget before you begin is a smart step. Your budget should include both startup costs and ongoing costs.
Startup costs may include seeds, pots, soil, lights, fans, timers, and other basic tools. Ongoing costs may include water, electricity, nutrients, replacement items, and possible upgrades. Even a small grow can cost more than expected if you buy things without a plan.
A budget helps you stay focused on what you truly need. It also helps you avoid wasting money on tools or products that sound useful but do not matter much for a first grow. Beginners often do better with a simple, solid setup than with a long list of extras.
Try to keep your first budget realistic. Spend on the things that affect plant health the most. Skip anything that adds cost without solving a clear problem.
Think About the Time You Can Give Each Week
Home growing is not a set-it-and-forget-it project. Plants need regular care. Before you start, be honest about how much time you can give each week. This will help you choose the right setup and avoid falling behind later.
You do not need to spend all day with your plants, but you do need to check them often. You will need time to water, inspect leaves, adjust lights, manage airflow, and keep the area clean. There will also be times when you need extra attention, such as early growth, flowering, or when a problem shows up.
If your schedule is very busy or changes often, it may be better to keep your grow small and simple. A setup that fits your routine is more likely to succeed than one that looks impressive but asks too much from you.
Build a Beginner Checklist Before You Buy
A simple checklist can keep you organized before you spend money. This checklist should include your legal plant count, your chosen grow space, access to power, airflow, access to water, and your total budget. It should also include how many plants you plan to start with and whether you are growing indoors or outdoors.
This checklist does not need to be long. Its job is to help you confirm that your plan makes sense. It can stop you from buying supplies too early or forgetting something important. A clear plan at the start can save time, money, and stress later.
Before you start a home grow in New York, take time to plan the basics. Learn the rules, choose between indoor and outdoor growing, and find a safe space that fits your home. Start with fewer plants so you can learn the process without feeling overwhelmed. Make sure your area has power, airflow, and easy access to water. Set a real budget and be honest about how much time you can give each week. A simple and careful start gives beginners the best chance of a healthy, manageable, and legal home grow.
Should Beginners Choose Indoor or Outdoor Growing?
One of the first choices a new grower in New York must make is whether to grow cannabis indoors or outdoors. This decision matters because it affects cost, setup, daily care, privacy, and how much control you have over the growing process. Both options can work, but they are not equal in every situation. What works well for one beginner may not work well for another.
Indoor growing means you grow your plants inside a controlled space, such as a grow tent, spare room, closet, or other indoor area. Outdoor growing means you grow plants outside, usually in a backyard, garden area, or another private outdoor space that meets New York rules. Each method has benefits and limits. For a beginner, the best option often depends on available space, budget, and how much control the person wants over the environment.
Indoor Growing Gives You More Control
Indoor growing is often easier for beginners who want a more controlled setup. When you grow indoors, you control the light, temperature, airflow, and humidity. This can make it easier to keep conditions steady. Cannabis plants usually do better when the environment stays within a healthy range. Indoors, you are not depending on the weather. You do not have to worry about heavy rain, sudden cold nights, strong wind, or long wet periods.
This control can help a beginner learn the basics more clearly. If a problem happens, it may be easier to identify the cause. For example, if a plant looks weak indoors, you can check the light, water, temperature, and feeding routine. Outdoors, weather can make problems harder to understand. A new grower may not know if the issue came from heat, rain, pests, or poor soil.
Indoor growing also gives more privacy. This is important in New York, especially for people who live in cities or close to neighbors. An indoor grow is easier to keep out of public view. It is also easier to keep secure, which matters because homegrown cannabis must be kept away from people under 21 and in a secure place. A grow tent with a lock or a private room can help meet this need.
Another benefit of indoor growing is that it can happen at almost any time of year. Since you create the environment yourself, you do not have to wait for outdoor growing season. This means a beginner can start when ready, not only during spring or summer.
Indoor Growing Usually Costs More
Even though indoor growing offers more control, it usually costs more to start. A beginner indoor setup often needs a grow light, timer, fan, pots, soil or other growing medium, and some type of ventilation. Some growers also buy a tent, thermometer, hygrometer, and nutrients. All of this adds to the starting cost.
Indoor growing also has ongoing costs. Lights use electricity. Fans and ventilation systems may run for many hours each day. This can raise power bills. If a grower wants better equipment, the cost can rise even more. For this reason, indoor growing can feel expensive for someone who wants the lowest-cost option.
Indoor spaces also need regular attention. Plants indoors depend on the grower for almost everything. If the light schedule is wrong, growth can slow down. If airflow is poor, plants may become weak or develop mold problems. If heat builds up, the grow space can become stressful for the plant. This does not mean indoor growing is too hard for beginners. It just means indoor growing requires planning and daily care.
Outdoor Growing Can Cost Less
Outdoor growing can be a good choice for beginners who have a private and secure place outside. Sunlight is free, so outdoor growers do not need to buy expensive grow lights. Fresh air is already available, and large outdoor spaces can give roots more room to grow. In many cases, this makes outdoor growing cheaper at the start.
A beginner who grows outdoors may only need basic items such as soil, containers or garden beds, water, nutrients, and simple tools. This can make the setup feel more affordable. For someone with a backyard or private land, outdoor growing may seem simpler because nature provides light and airflow.
Outdoor plants can also become large if they have enough space, sunlight, and healthy soil. This can be appealing to growers who want a more natural method. Some people also find outdoor growing easier because there is less equipment to manage each day.
Outdoor Growing Depends on New York Weather
The biggest challenge with outdoor growing in New York is the climate. New York does not have the same long, steady growing season as warmer states. Spring can stay cool for a while. Summer may be hot and humid. Fall can bring rain, moisture, and lower temperatures. These changes can affect plant health, especially for beginners who are still learning.
High humidity can raise the risk of mold and mildew. Too much rain can stress plants or damage flowers near harvest time. Cold nights early or late in the season can slow growth. Strong wind can also harm plants if they are not protected. Outdoor growers must work with the season instead of controlling it.
New York beginners also need to think about security and visibility. Outdoor plants must be kept in a secure place and should not be easy for others to access. This can be harder in a shared yard, open property, or busy neighborhood. A plant that is too visible may create legal or practical problems. Outdoor growing works best when the person has a private area that can be locked, fenced, or otherwise secured.
Indoor Growing Often Fits Apartment Life Better
For beginners who live in apartments, condos, or homes without private yards, indoor growing is usually the better option. Most city growers do not have a safe outdoor area that meets legal and practical needs. A balcony may not offer enough privacy or security. Shared spaces are also risky because other people can access them.
Indoor growing gives apartment dwellers a way to grow in a smaller area. A compact grow tent can fit in a spare corner, closet, or small room. This setup can help keep the grow private, contained, and easier to manage. It also protects the plants from outdoor weather, which is helpful in a state like New York.
Still, apartment growers must think about space, airflow, and smell. Even a small grow needs proper planning. The area should have safe electrical access, enough room for air movement, and a way to keep the space clean and secure.
Outdoor Growing May Work Well for Private Homes
For beginners who live in a private home with a yard, outdoor growing may be a realistic option. A person with a secure backyard may find outdoor growing more affordable and less equipment-heavy. This can be a good entry point for someone who wants a simple setup and has enough privacy.
Even so, outdoor growers still need to plan carefully. The plants need good sun exposure, healthy soil, and protection from excess moisture and pests. The grow area should also stay out of reach of minors and should follow New York rules. Outdoor growing is not just placing a plant outside and hoping for the best. It still takes daily care, observation, and patience.
Which Option Is Better for Most Beginners?
For most beginners, indoor growing is often the easier choice if the goal is control, privacy, and a more predictable learning experience. It is especially useful for people in apartments or urban areas. Indoor growing costs more, but it allows beginners to manage the environment more closely and reduce weather-related problems.
Outdoor growing can still be a strong option for beginners who have private outdoor space and want a lower-cost setup. It can be simple in some ways, but it also brings challenges that the grower cannot fully control. In New York, the changing weather makes outdoor growing less predictable than indoor growing.
The best choice depends on where you live, how much you want to spend, and how much control you want over the growing process. Indoor growing gives more control, better privacy, and more stable conditions, but it costs more and needs more equipment. Outdoor growing can cost less and use natural sunlight, but it depends heavily on New York weather and requires a secure private space. For beginners in apartments or busy neighborhoods, indoor growing is usually the better fit. For beginners with a secure yard and enough sunlight, outdoor growing may work well. In either case, starting small is often the smartest way to learn.
What Equipment Do You Need for a Simple Beginner Indoor Setup?
Starting an indoor cannabis grow in New York can feel like a big project at first. Many beginners think they need a long list of expensive tools. The truth is much simpler. A basic setup can do the job well if each item has a clear purpose. The goal is not to build a perfect grow room on day one. The goal is to create a clean, controlled space where plants can grow well from seedling to harvest.
A simple beginner indoor setup usually includes a grow tent, lights, a timer, pots, soil or another growing medium, fans, ventilation, a thermometer or hygrometer, watering tools, and basic nutrients. Each part helps control the plant’s environment. When these pieces work together, the grow becomes easier to manage.
Grow Tent
A grow tent is one of the most helpful tools for an indoor grow. It creates a small, enclosed space where you can control light, airflow, temperature, and humidity. For a beginner, this makes the growing process much easier. Instead of trying to manage a whole room, you only need to manage the space inside the tent.
Grow tents also help keep the setup neat and private. The reflective material inside the tent helps light reach the plants more evenly. This can improve plant growth without needing extra equipment. A tent also makes it easier to hang lights and fans in the right places.
A small tent is often the best choice for a first grow. It is easier to control and costs less to run. A beginner does not need a large space to learn. In many cases, a small setup leads to better results because the grower can watch each plant more closely and fix problems faster.
Grow Lights
Light is one of the most important parts of indoor growing. Outdoors, the sun does this job. Indoors, the grow light takes its place. Without a good light, plants may stretch too much, grow weak stems, and produce poor results.
For beginners, LED grow lights are often the easiest option. They are simple to use, energy efficient, and do not produce as much heat as some older types of lights. That matters because too much heat can stress plants and make the grow space harder to control.
The light should match the size of the tent. A light that is too weak may not support healthy growth. A light that is too strong for a small space may create too much heat or stress young plants. The light also needs to hang at the correct height above the plant canopy. If it is too close, leaves may burn. If it is too far away, plants may not get enough energy.
Good lighting matters at every stage. Seedlings need gentle light. Plants in the vegetative stage need strong, steady light to build leaves and stems. Flowering plants need the right amount of light and darkness to develop buds well.
Timer
A timer may seem like a small item, but it plays a big role in keeping the grow consistent. Cannabis plants respond strongly to light schedules. A timer turns the grow light on and off at the same time every day. This helps avoid mistakes that happen when a grower tries to do it by hand.
In the vegetative stage, plants usually need long periods of light each day. In the flowering stage, many indoor growers switch to an even light and dark cycle. A timer keeps this routine steady. If the light schedule changes too often, the plants may get stressed. Consistency is one of the keys to a healthy indoor grow.
Pots and Containers
Plants need containers with enough space for roots to grow. Pots may look simple, but they affect drainage, root health, and plant size. A good pot should allow extra water to drain out instead of sitting at the bottom. If roots stay too wet for too long, the plant may develop problems.
Beginners often start with small containers for seedlings and move to larger ones later. Some growers place seeds directly into their final pots. Both methods can work if the plant is handled carefully. Fabric pots are a common choice because they allow airflow around the root zone and help reduce the risk of roots staying too wet.
The size of the pot should match the size of the plant and the space in the grow tent. A small tent with too many large containers can become crowded. Crowded plants often have poor airflow and less light reach.
Soil or Growing Medium
The growing medium is what holds the roots in place and helps deliver water and nutrients. For most beginners, soil is the easiest choice. It is familiar, simple to use, and more forgiving than some other methods. A good quality soil made for container growing can help a new grower avoid many early problems.
Other growers use coco coir or hydroponic systems, but these often need closer control over water and nutrients. For a first grow, simple soil is usually the better path. It lets beginners focus on the plant’s basic needs without adding too much complexity.
The medium should not stay too wet for too long. Good drainage and proper watering are important. A heavy, packed medium can limit root growth and slow plant development.
Fans and Air Movement
Indoor plants need moving air. In nature, plants grow with wind and fresh air around them. In a grow tent, fans help copy that environment. A small fan can move air around the leaves and stems, which helps strengthen the plant and reduce stale air.
Air movement also lowers the chance of mold and mildew. Still, damp air can lead to problems, especially when plants become larger and bushier. A fan helps keep the environment healthier by reducing wet spots and improving air flow between plants.
The fan should not blast the plants too hard. Strong direct wind can dry out leaves or stress the plant. Gentle, steady movement is enough.
Ventilation
Ventilation works together with fans, but it has a different job. A fan moves air inside the tent. Ventilation removes old air and brings in fresh air. This helps control heat, humidity, and odor.
Grow lights and plants both affect the tent environment. Over time, heat can build up. Humidity can also rise, especially during watering and later plant growth. A ventilation system helps move this air out so the space stays more balanced.
Many beginner setups use an exhaust fan connected to the tent. Some setups also include a carbon filter to help reduce odor. This can be useful for privacy and for keeping the space more discreet.
Thermometer or Hygrometer
Plants grow best when the environment stays within a healthy range. A thermometer measures temperature. A hygrometer measures humidity. Many devices do both. These tools help the grower understand what is happening inside the tent.
Without these readings, it is hard to know if the space is too hot, too cold, too dry, or too damp. A plant may show signs of stress, but by then the problem may already be affecting growth. A simple meter gives early warning and helps the grower make better decisions.
This is one of the easiest ways to avoid guesswork. A beginner does not need advanced equipment, but basic temperature and humidity readings are very useful.
Watering Tools
Watering sounds easy, but it is one of the most common areas where beginners make mistakes. Good watering tools can help control how much water is given and where it goes. A simple watering can or squeeze bottle is often enough for a small setup.
The goal is to water evenly without flooding the pot. Young plants need less water than large ones. The plant’s stage, pot size, and room conditions all affect how often watering is needed. A slow, careful approach works better than rushing.
Some growers also use trays under the pots to catch extra water. This helps keep the tent cleaner and prevents spills from building up around the setup.
Basic Nutrients
Cannabis plants need nutrients to grow well, especially once they move beyond the seedling stage. These nutrients help support leaf growth, root development, and flower production. For beginners, simple nutrient products are often the best choice.
It is easy to think that more nutrients will lead to faster growth, but too much can harm the plant. Overfeeding is a common mistake. A light feeding schedule is usually safer than a strong one. It is better to start small and adjust based on how the plant responds.
Not every soil setup needs nutrients right away. Some soils already contain enough food for the early stage. Over time, though, plants will need extra support. Keeping the feeding plan simple helps beginners avoid confusion.
Why a Simple Setup Is Often Better
Many new growers feel pressure to buy the best and most expensive tools right away. But a complicated setup can create more problems than it solves. More gear means more things to monitor, adjust, and fix. For a first grow, simple is often smarter.
A basic setup teaches the grower how the plant responds to light, water, air, and nutrients. These lessons matter more than having advanced tools. Once the grower understands the basics, it becomes easier to improve the setup later.
Starting small also helps control cost and reduces stress. A beginner is more likely to succeed with a manageable setup than with a large, complex indoor garden. Learning one step at a time often leads to better results.
A simple beginner indoor setup does not need to be fancy. It needs to be functional, clean, and easy to manage. A grow tent gives control over the space. Lights replace the sun. A timer keeps the schedule steady. Pots and soil support the roots. Fans and ventilation help manage airflow, heat, and humidity. A thermometer or hygrometer helps track the environment. Watering tools make daily care easier, and basic nutrients support healthy growth.
For a first indoor grow in New York, the best setup is usually a small one with only the essentials. This gives beginners a better chance to learn the process, avoid major mistakes, and build confidence before trying anything more advanced.
How Much Does It Cost to Start a Home Grow in New York?
Starting a home grow in New York can cost a little or a lot. It depends on the type of grow you choose, the size of your setup, and the tools you buy at the beginning. For most beginners, the total cost is easier to manage when they start small. A simple grow with one to three plants usually costs much less than a larger setup, and it is also easier to control.
The good news is that you do not need the biggest or most expensive equipment to get started. Many first-time growers spend too much money too early. They buy extra gear before they understand what they really need. A better plan is to begin with the basic items, learn how the process works, and improve your setup over time.
Indoor Growing Usually Costs More at the Start
Indoor growing often has the highest startup cost. This is because indoor growers need to create the right environment inside the home. The plant does not get natural sunlight, fresh outdoor airflow, or weather conditions that help it grow. Because of that, the grower has to provide those things with equipment.
One of the biggest costs in an indoor grow is the light. Good lighting is very important because it affects how well the plant grows from seedling to harvest. Cheap lights often cause weak growth and poor results. A beginner may spend a fair amount on a quality grow light, but this is one area where it helps not to cut corners too much.
Another common cost is the grow tent. A tent helps control the growing space. It can help with light control, airflow, smell, and temperature. It also helps keep the grow more private and organized. Some beginners try to grow in an open room to save money, but a tent often makes the process easier.
Ventilation is another key cost. Indoor plants need moving air. They also need help with heat and smell control. Many growers buy an inline fan, ducting, and sometimes a carbon filter. These items can raise the startup price, but they help create a healthier growing space. Without good airflow, plants may struggle, and the room may become too hot or humid.
Other indoor costs include pots, soil or another growing medium, a timer for the light, small fans, a thermometer, and a hygrometer to track temperature and humidity. These may seem like small purchases, but together they add up.
Outdoor Growing Can Cost Less, but It Still Needs Planning
Outdoor growing is often cheaper than indoor growing because the sun provides the light. This removes one of the biggest indoor costs. Outdoor growers also may not need a tent, indoor fan system, or extra electric lighting. That can make outdoor growing feel like the low-cost choice.
Still, outdoor growing is not free. A beginner will still need pots or planting beds, quality soil, nutrients, watering tools, and basic supplies for plant care. Outdoor growers may also need fencing, locks, or privacy screens if they need to keep the grow secure and out of reach of others.
In New York, security matters. If the grow area is not secure, that can create legal and safety problems. So even though outdoor growing may have lower equipment costs, some growers still spend money making sure the space is private, safe, and easy to manage.
Weather is another factor. Rain, strong wind, pests, and changing temperatures can damage plants. Because of this, outdoor growers may need simple protective materials or support tools. These extra needs can increase the overall cost.
Startup Costs and Ongoing Costs Are Not the Same
It helps to think about costs in two groups. The first group is startup costs. These are the things you buy before the grow begins. The second group is ongoing costs. These are the things you keep paying for while the grow is active.
Startup costs usually include lights, tents, fans, pots, soil, seeds, timers, and basic tools. This is often the largest one-time spending stage, especially for indoor growers. Once the setup is built, many of those items can be used again in future grows.
Ongoing costs are the regular expenses that continue after planting. These may include electricity, water, nutrients, replacement soil, pH products, and new seeds for the next cycle. Indoor growers often notice higher electric bills because lights and fans may run for many hours each day. Outdoor growers may have lower power costs, but they still need to pay for water, nutrients, and plant care supplies.
This is why it is important to budget for more than the first shopping trip. Some beginners think only about the first purchase, then feel surprised by the extra costs that come later. Looking at the full grow cycle gives a more realistic picture.
A Small Beginner Setup Can Help Control Costs
The easiest way to lower costs is to start with fewer plants. A small grow is easier to manage, easier to watch, and usually cheaper. With fewer plants, you need less soil, fewer pots, less nutrient solution, and often a smaller grow space.
A beginner with one to three plants can still learn every stage of the process. That includes germination, seedling care, vegetative growth, flowering, harvest, drying, and curing. Starting small gives you room to make mistakes without wasting too much money.
It also helps you avoid buying equipment that is too large for your needs. Some people buy a setup built for many plants, then discover they only have time to care for a few. That can lead to wasted money and extra stress.
What Beginners Should Expect to Spend
A beginner outdoor grow may cost less overall if the grower already has access to a safe outdoor space. A simple outdoor setup may only require the basics, such as soil, pots, seeds, nutrients, and watering tools. In many cases, this can be kept within a modest budget.
A beginner indoor grow often costs more because the setup requires more gear. Even a simple indoor grow usually needs a light, tent, fan, timer, and other support tools. The total can rise quickly if the grower chooses larger or higher-end equipment.
That said, spending more does not always mean better results. A smart beginner budget focuses on the most important items first. Good lighting, basic airflow, quality soil, and a manageable number of plants often matter more than fancy extras.
The cost of starting a home grow in New York depends on whether you grow indoors or outdoors, how many plants you start with, and how simple or advanced your setup is. Indoor growing usually costs more at the start because you need lights, a tent, and airflow equipment. Outdoor growing may cost less, but it still requires soil, supplies, and a secure space. It is also important to think about both startup costs and ongoing costs, since expenses continue after planting begins. For most beginners, the best choice is to start small, buy only what is needed, and focus on learning the process before spending more.
What Type of Seeds or Starter Plants Should Beginners Choose?
Choosing the right seeds or starter plants is one of the most important first steps in a home grow. Many beginners focus on lights, soil, and pots, but the grow really begins with the genetics. If you start with the wrong type of seed for your skill level, space, or setup, the process can become harder than it needs to be. That is why first-time growers in New York should take time to understand their options before they plant anything.
Beginners usually have two ways to start. They can start from seeds, or they can start from young plants, which are often called starter plants or clones. Both can work, but each option has strengths and limits. The best choice depends on how much control you want, how fast you want to begin, and how comfortable you are with the early stages of plant care.
Starting From Seeds
Seeds are a common choice for beginners because they are easy to store, easy to transport, and simple to start at home. They also give growers more variety. A person can choose from many strains with different growth patterns, smells, effects, and growing times. Starting from seed also lets the plant grow from the very beginning in your own environment. This can help the plant adapt well to the space where it will live.
There are three main seed types that beginners should know: regular seeds, feminized seeds, and auto-flowering seeds. These names can sound technical at first, but the differences are easy to understand once they are broken down clearly.
Regular Seeds
Regular seeds are the most natural type of cannabis seed. Each seed has a chance of becoming either a male plant or a female plant. This matters because most home growers want female plants. Female plants are the ones that grow the buds people want to harvest. Male plants do not produce the same kind of harvest. Instead, they produce pollen. If a male plant releases pollen near a female plant, the female plant may start making seeds instead of putting more energy into bud growth.
For a beginner, this can create a problem. If you start with regular seeds, you may spend time, money, and effort growing plants that you later have to remove. For example, if you plant four regular seeds, there is no guarantee all four will be female. Some may turn out male, which means less usable harvest and more work. You also need to learn how to spot plant sex early enough to prevent pollination.
Because of this, regular seeds are often not the easiest choice for first-time growers. They are useful for breeders and experienced growers who want a more traditional growing process, but they can add extra steps for someone who is just learning.
Feminized Seeds
Feminized seeds are usually the easiest choice for beginners. These seeds are bred to produce female plants almost every time. That means a grower does not need to worry as much about male plants showing up and affecting the crop. This makes planning much easier, especially in a small home grow where every plant counts.
For someone in New York starting with a limited number of plants, feminized seeds can make a lot of sense. If the law limits how many plants you can grow, you do not want to waste space on plants that will not produce the buds you want. Feminized seeds help reduce that risk. They also make the grow simpler because the beginner can focus on learning watering, lighting, and feeding instead of trying to identify and remove male plants.
Another reason feminized seeds are beginner-friendly is that they work well in both indoor and outdoor grows. They are available in many strains, so beginners can still choose plants that fit their space and goals. Some strains stay short and compact, which may be better for small indoor setups. Others grow larger and may work better outdoors if the space is private and secure.
Auto-Flowering Seeds
Auto-flowering seeds are another popular option for beginners. These plants are different because they do not wait for changes in light schedule to begin flowering. Instead, they start flowering based on age. In other words, once they reach a certain point in life, they move into the flowering stage on their own.
This can make the grow feel simpler, especially indoors. A beginner does not need to manage light cycles in the same way as with standard photoperiod plants. Auto-flowering plants also tend to grow faster. Many are ready to harvest in less time than traditional plants. For someone who wants a quicker grow, this can be appealing.
Auto-flowering plants are often smaller too. That can be helpful in apartments, closets, tents, or any space where height is limited. Their smaller size can also make them easier to hide from view and easier to manage for first-time growers.
Still, auto-flowering seeds also have limits. Because they move fast, there is less time for the plant to recover from mistakes. If a beginner overwaters, underfeeds, or stresses the plant early, the plant may not have enough time to bounce back before flowering begins. With standard feminized photoperiod plants, growers usually have more control over when the plant flowers, so they can fix problems before that stage starts. With auto-flowering plants, the clock keeps moving.
That is why auto-flowering seeds are beginner-friendly in some ways, but not always forgiving. They are simple in terms of timing, but they require steady care from the start.
What About Starter Plants or Clones?
Some beginners may think about starting with a young plant instead of a seed. A starter plant or clone is a small plant taken from a mother plant. It is already alive, already growing, and already female if it came from a female source. This means the grower skips the germination and early seedling stage.
That can sound easier, and sometimes it is. A clone lets the beginner start with a plant that is already established. It can save time and remove some of the uncertainty that comes with seeds. If the clone is healthy, the grow may get off to a faster start.
But clones also come with a few concerns. First, they can bring pests or disease if they come from an unhealthy source. Second, they may have a harder time adjusting to a new environment if they were grown under different conditions before coming into your home. Third, not every beginner has easy access to clean, healthy starter plants.
For these reasons, many new growers still prefer seeds, especially feminized seeds, because they offer a fresh start and more control.
Which Option Is Best for a First-Time Grower?
For most beginners, feminized seeds are the best place to start. They offer a good mix of simplicity, control, and reliability. The grower is more likely to end up with female plants, which means less waste and less guesswork. They also give beginners time to learn without the pressure of an automatic flowering clock.
Auto-flowering seeds can also work well for beginners who want a smaller plant and a faster harvest. They are a solid choice for growers with limited space or for those who want a simpler schedule. Still, they are often best for people who can give steady care from day one.
Regular seeds are usually the least beginner-friendly option because they add extra uncertainty. They are not wrong to use, but they often make the first grow more complex than it needs to be.
The type of seed or starter plant you choose can shape your whole growing experience. Regular seeds can produce male or female plants, so they are less simple for beginners. Feminized seeds are often the easiest choice because they are bred to grow female plants, which makes planning easier and reduces risk. Auto-flowering seeds are also beginner-friendly in some ways because they flower on their own and often stay smaller, but they give growers less time to correct mistakes. Starter plants can help you skip the seed stage, but they may bring problems if they come from a poor source. For most first-time home growers in New York, feminized seeds are the safest and simplest way to begin.
How Do You Germinate Seeds and Start Seedlings?
Starting cannabis seeds the right way can make the rest of the grow much easier. This stage may look simple, but it is very important. A healthy start gives your plant a better chance to grow strong roots, a thick stem, and healthy leaves. A weak start can slow the plant down and lead to problems later.
For beginners, the goal is not to rush. It is to give the seed a stable place to wake up, grow a root, and become a healthy seedling. This means paying attention to moisture, warmth, light, and gentle handling.
What Germination Means
Germination is the process that begins when a seed starts to grow. Inside the seed is a young plant waiting for the right conditions. Once the seed gets enough moisture and warmth, it begins to open. A small white root comes out first. This root is the first sign that the seed is alive and growing.
After that, the seed can be planted into soil or another growing medium. Soon, the stem rises above the surface and the first small leaves appear. These first leaves are not the true cannabis leaves yet, but they help the plant begin its early growth.
For beginners, it is helpful to remember that germination does not need complicated tools. The seed mainly needs moisture, warmth, and care. Too much water, too much handling, or poor temperatures can slow things down or stop the seed from growing.
Choosing Healthy Seeds Before You Begin
Good germination starts with good seeds. If a seed is old, damaged, or weak, it may not sprout well. Healthy cannabis seeds are often dark brown, gray, or tan, and many have a hard shell with a slight pattern. Some healthy seeds may look lighter than others, so color alone is not a perfect test, but the shell should feel firm.
If a seed looks cracked, soft, pale, or crushed, it may not grow. Beginners often get better results when they start with quality seeds from a trusted source. It is also smart to start with a few extra seeds in case one or two do not sprout.
Before germination, keep seeds in a cool, dark, dry place. Heat, sunlight, and moisture can damage them before you even begin.
A Simple Way to Germinate Seeds
One of the easiest ways to germinate cannabis seeds is the paper towel method. This method is popular because it lets you see when the seed opens and when the root appears.
To do this, place the seeds between two damp paper towels. The towels should be moist, not soaking wet. Then place the towels on a plate or inside a container that can hold moisture. Keep the seeds in a warm, dark place. Many growers check them once or twice a day.
The seed usually opens within a few days, though some may take longer. Once a small white root appears, the seed is ready to plant. At that point, it should be moved carefully into its growing medium.
Another simple method is to plant the seed directly into moist soil. Some beginners like this because it avoids moving the seed after it opens. The soil should be lightly moist and not packed too tightly. The seed is placed shallowly under the surface and kept warm until it sprouts.
Both methods can work well. What matters most is giving the seed the right amount of moisture and warmth without drowning it or drying it out.
How Deep to Plant a Germinated Seed
When the root appears, the seed should be planted gently. The hole should be shallow. About half an inch deep is often enough. If the seed is planted too deep, the young sprout may struggle to reach the surface. If it is too shallow, the seed may dry out.
Place the seed with care and cover it lightly. Do not press the soil down too hard. Young roots need soft space to grow. After planting, the medium should stay lightly moist, but not soaked.
At this point, patience matters. Some seedlings break through the surface fast, while others take a little more time. Digging into the soil to check the seed can damage it. It is better to wait and keep the environment steady.
What Seedlings Need in Their First Days
Once the sprout appears above the soil, it enters the seedling stage. This is when the plant is small, delicate, and very easy to stress. The first few days are about stability.
Seedlings need gentle but steady light. If the light is too weak, the seedling may stretch too much and grow tall and thin. If the light is too strong or too close, it may stress the plant. Beginners often do best with a simple grow light placed at a safe distance above the seedling.
Seedlings also need warmth. They usually do best in a mild, stable temperature. If the room is too cold, growth may slow down. If it is too hot, the seedling can dry out or become weak. A stable environment helps the plant focus on growing roots and leaves.
Moisture is also important, but this is where many beginners make mistakes. Seedlings do not need large amounts of water. Their roots are still small. If the growing medium stays too wet, the roots may struggle to get oxygen, and the seedling may weaken. The surface should not be bone dry, but the plant should never sit in soggy soil.
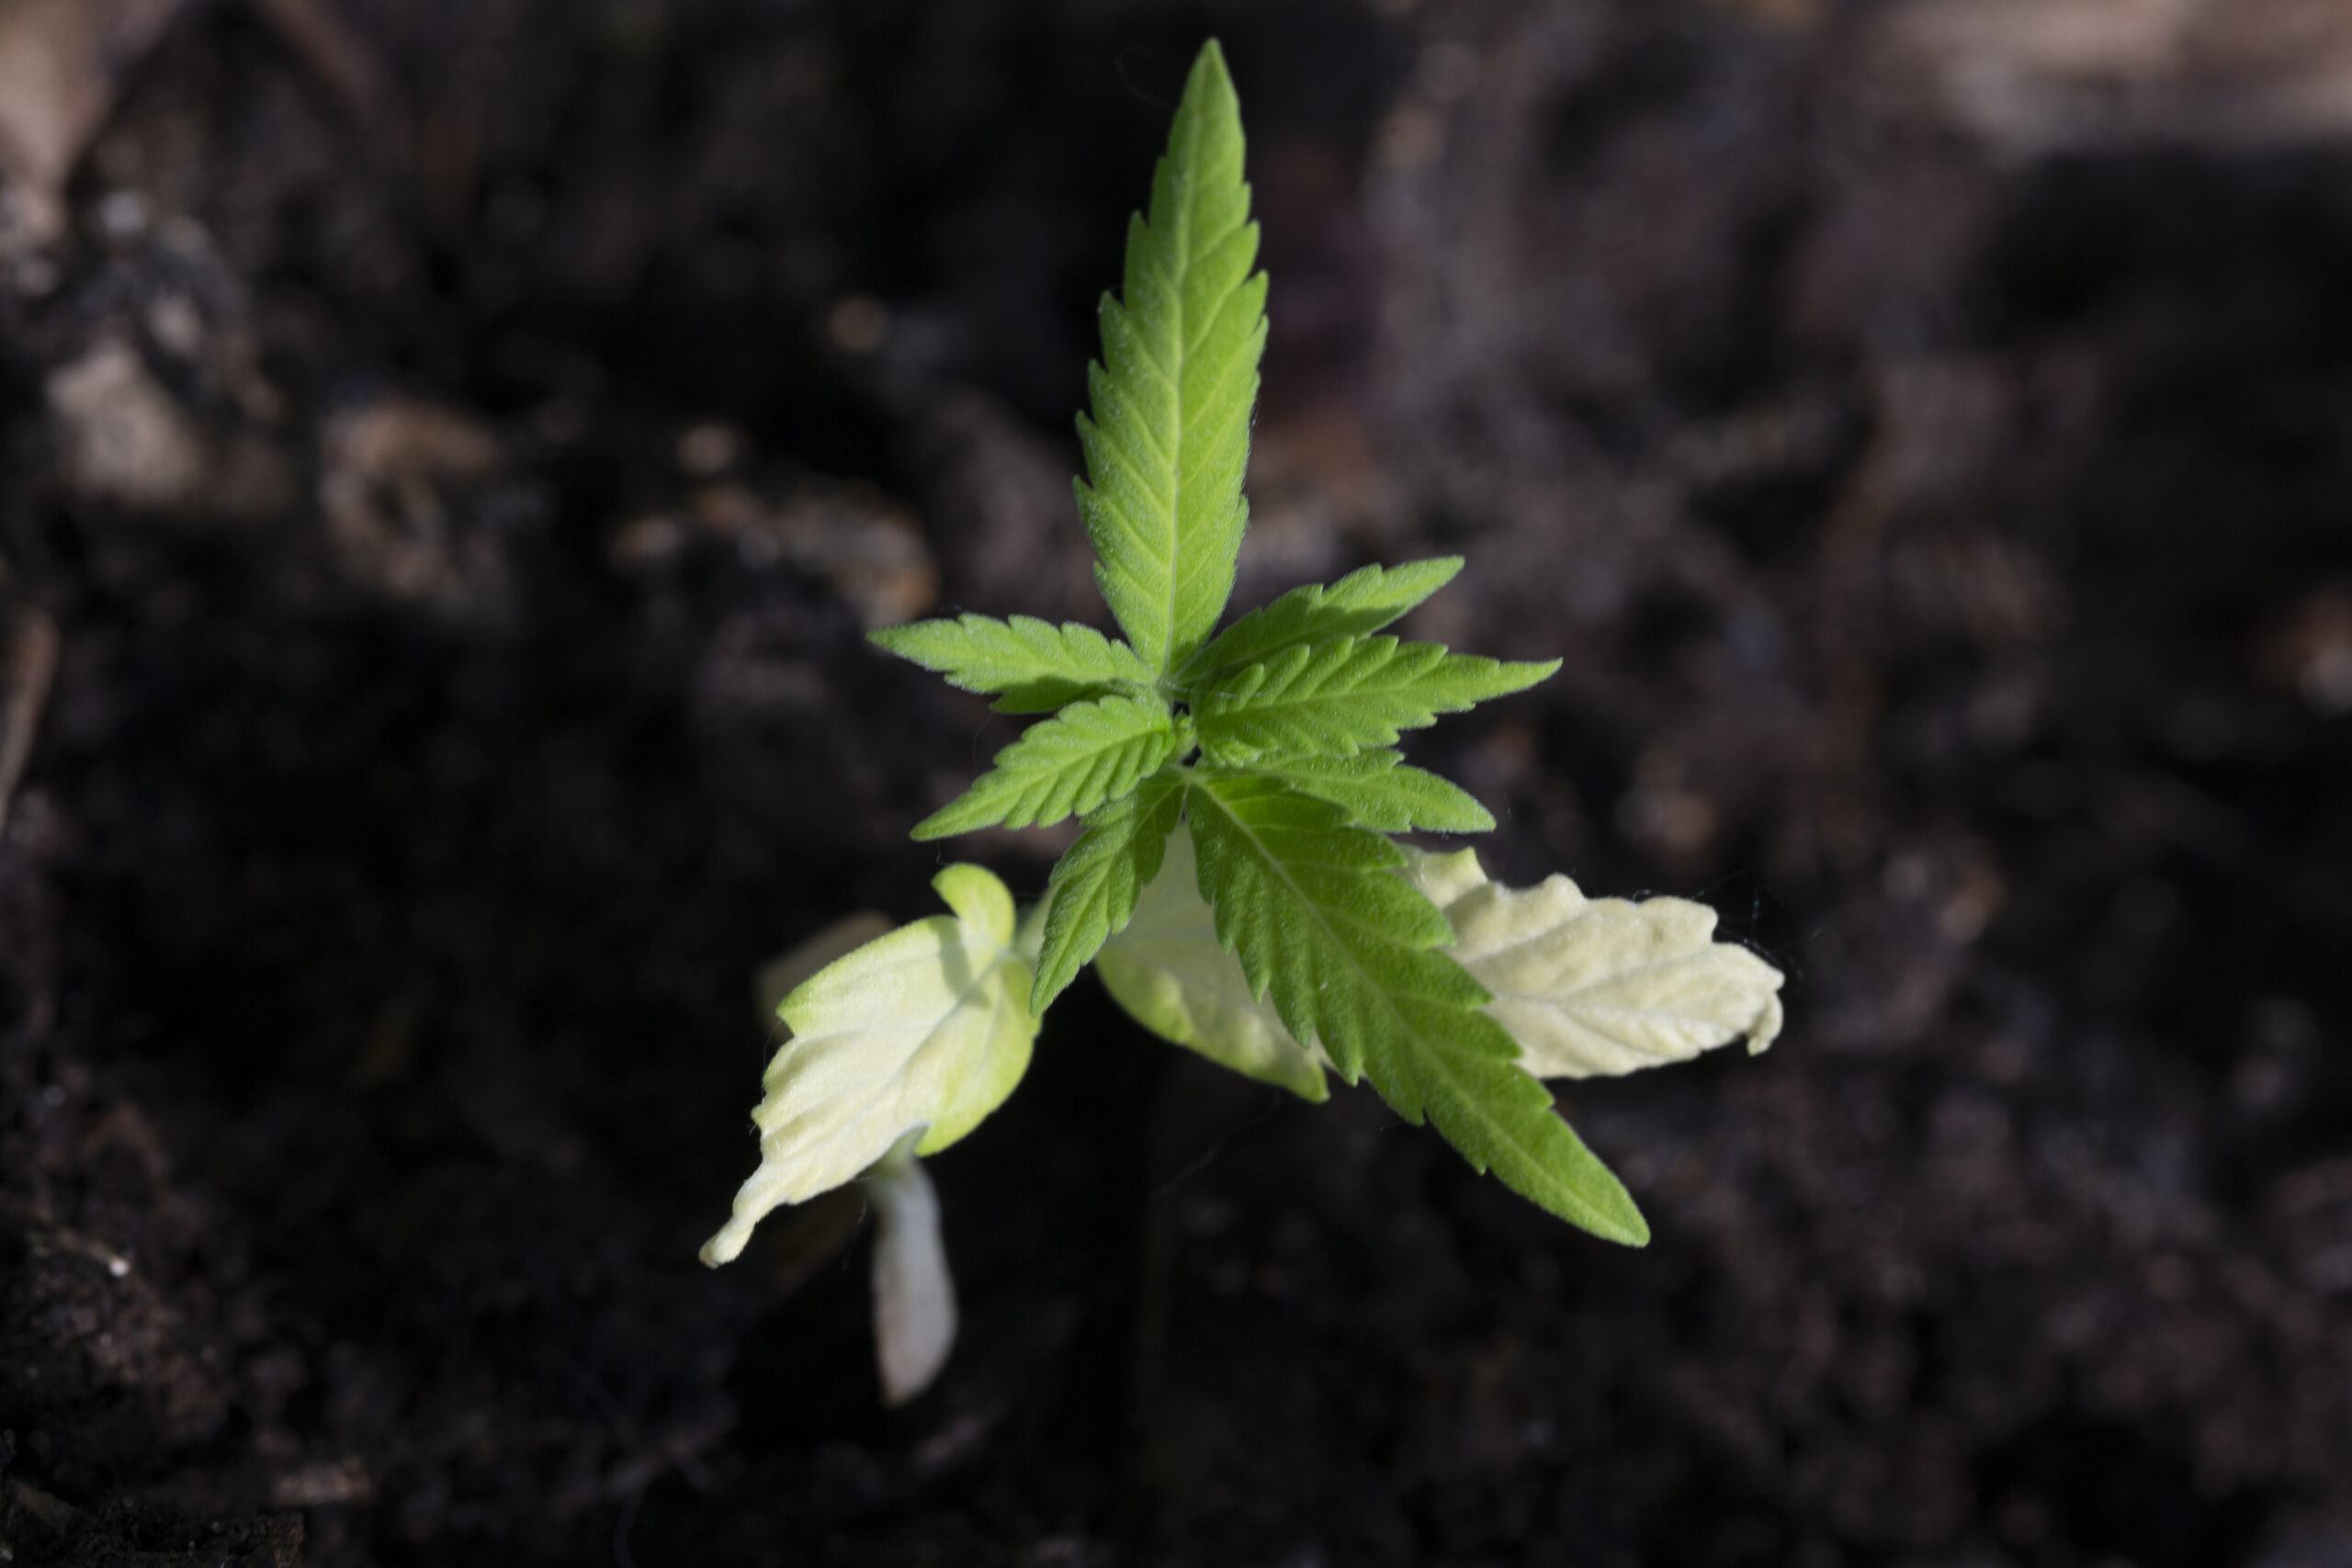
Signs of a Healthy Seedling
A healthy seedling usually has a short stem, small green leaves, and a fresh, upright look. It should not look pale, droopy, or bent over for long periods. The stem should slowly become stronger as the plant grows.
The first round leaves, called cotyledons, come out first. After that, the plant begins to produce its first true leaves. These look more like the classic cannabis leaf shape. This is a good sign that the plant is moving into stronger early growth.
Healthy seedlings grow at a steady pace. They may still be small, but they should look alive and balanced. New growers sometimes worry if growth seems slow in the first days. That is normal. At this stage, the plant is putting a lot of energy into its roots.
Common Early Mistakes Beginners Make
One of the biggest mistakes is overwatering. Many beginners think more water means faster growth, but too much water can harm a seedling. Wet soil with little airflow can cause root problems and weak growth.
Another common mistake is poor lighting. A seedling that does not get enough light may stretch upward too fast, making the stem long and weak. This can cause the plant to fall over or grow poorly later.
Some beginners also handle seedlings too much. Touching the root, moving the seed often, or digging in the soil to check progress can damage the plant. Seedlings are fragile, especially in the first days.
Planting seeds too deep is another issue. This can delay sprouting or keep the seedling from reaching the surface. Using very hot or very cold conditions can also stress the seed and slow growth.
Finally, many beginners try to feed nutrients too early. Most seedlings do not need strong feeding right away, especially if they are in a good soil mix. Too many nutrients at this stage can burn the young plant and cause more harm than good.
Germinating cannabis seeds and starting seedlings is all about creating the right conditions and keeping things simple. The seed needs moisture, warmth, and time to open. Once the root appears, it should be planted gently in a lightly moist growing medium. After the sprout comes up, the seedling needs soft light, stable warmth, and careful watering.
This stage may seem small, but it shapes the rest of the grow. A healthy seedling has a much better chance of becoming a strong plant later. For beginners in New York, the best approach is to start slow, avoid common mistakes, and focus on steady care instead of quick results.
How Do You Care for Cannabis Plants During the Vegetative Stage?
The vegetative stage is the part of the growing process when your cannabis plant focuses on getting bigger and stronger. This is the stage after the seedling period and before flowering begins. During this time, the plant grows more leaves, more stems, and a wider root system. It uses this stage to build the structure it will need later when it starts making buds.
For beginners, this stage is very important. A healthy vegetative stage often leads to a better flowering stage. If the plant becomes weak, stressed, or unhealthy now, it may stay small or produce less at harvest. That is why good daily and weekly care matters so much.
What the Vegetative Stage Means
In the vegetative stage, the plant is not yet focused on producing flowers. Instead, it is using its energy to grow taller, grow wider, and make strong branches. You will often notice faster growth during this stage than during the seedling stage. Leaves become larger, stems get thicker, and the plant begins to look more full.
This is the time when the plant needs a stable environment. It does best when light, water, air, and nutrients are kept steady. Big changes or poor care can slow growth and create stress. A stressed plant may droop, turn yellow, grow too slowly, or develop weak stems.
Many beginner growers think this stage is simple because there are no buds yet. In truth, this is one of the most important parts of the whole grow. The stronger your plant becomes now, the better prepared it will be for the next stage.
Light Schedule During Vegetative Growth
Light is one of the biggest factors in vegetative growth. Cannabis plants need a long period of light each day in this stage. Indoor growers often use a schedule of 18 hours of light and 6 hours of darkness. Some growers use 20 hours of light and 4 hours of darkness, but 18 and 6 is one of the most common beginner choices because it gives strong growth while still giving the plant a daily rest period.
If your grow is indoors, keep the light schedule steady. Try not to change it often. Plants respond best when they know what to expect each day. Use a timer so the light turns on and off at the same time. This helps prevent mistakes and keeps the plant growing in a stable pattern.
The strength and distance of the light also matter. If the light is too weak, the plant may stretch too much and become tall and thin. If the light is too close, the leaves may show stress or burn. A healthy plant under the right light often looks compact, green, and balanced.
Outdoor growers do not control the sun the same way indoor growers do. Instead, outdoor plants stay in the vegetative stage during the part of the season when days are longer. In New York, this usually means strong vegetative growth happens through late spring and much of summer before the daylight hours begin to shorten.
Watering the Right Way
Watering is one of the most common problems for beginners. Many new growers give their plants too much water because they want to help them grow faster. In most cases, too much water causes more harm than too little.
Cannabis plants do not need wet soil all the time. The roots need both water and air. When the soil stays too wet, the roots can struggle to breathe. This can slow growth and lead to drooping leaves, root problems, or other health issues.
A better approach is to water thoroughly, then wait until the top layer of soil starts to dry before watering again. The pot should feel lighter when the plant is ready for more water. This method helps the roots grow well and encourages a healthier plant.
The amount of water depends on the size of the plant, the size of the container, the type of soil, and the temperature of the grow area. A small plant in a large pot will need less water at first. A bigger plant with many leaves may need water more often. Learning to read the plant and the soil is part of becoming a better grower.
Airflow and Fresh Air Matter
Good airflow helps cannabis plants stay healthy during the vegetative stage. Air movement supports stronger stems and lowers the chance of mold, mildew, and stale air. Even though the plant is not flowering yet, airflow still plays a major role in its growth.
Indoor growers usually use one or more fans to keep air moving around the plants. The breeze should be gentle, not too strong. You do not want the leaves shaking hard all day. The goal is to create a steady flow of air that helps the plant grow in a healthy environment.
Ventilation also matters. Plants use carbon dioxide from the air and release oxygen. In a closed grow space, the air can become stale if it is not exchanged. A simple ventilation setup helps bring in fresh air and remove warm, old air. This can help control heat and humidity too.
Outdoor growers may naturally get airflow from wind, but they still need to think about plant spacing and location. If plants are too crowded or placed in an area with very little air movement, moisture can stay on the leaves too long. That can lead to problems later.
Why Spacing Is Important
Spacing gives each plant room to grow. During the vegetative stage, cannabis plants often become wider and bushier. Leaves and branches spread out as the plant gets stronger. If plants are too close together, they may block each other’s light and reduce airflow.
Crowded plants can create several problems. Lower leaves may not get enough light. Air may not move well between the plants. Moisture may build up in dense areas. All of this can lead to slower growth and a higher risk of disease or stress.
Each plant should have enough room for its leaves to expand without pressing hard against another plant. Good spacing also makes it easier for you to water, inspect, and care for each one. You can notice issues faster when you can clearly see the whole plant.
For beginners, fewer plants with better spacing are often easier to manage than many plants packed into one small area. Starting small helps you focus on plant health and learn the process without feeling overwhelmed.
Basic Feeding During the Vegetative Stage
Cannabis plants need nutrients to grow, just like other plants. During the vegetative stage, they usually need more nitrogen than they will later in flowering. Nitrogen supports leaf and stem growth, which is why it is so important during this stage.
If you are using quality soil, it may already contain some nutrients for the early part of vegetative growth. After that, the plant may need extra feeding. Many beginner nutrient products are made with simple directions for different growth stages. It is best to start light rather than heavy. Too much feeding can burn the plant and create more problems than too little.
A healthy feeding routine should support steady growth, not force it. Deep green leaves, strong stems, and regular new growth often show that the plant is doing well. If leaves begin to turn yellow, curl, or develop burnt tips, the plant may be reacting to watering issues, feeding problems, or both.
It is also important to pay attention to pH if you are feeding nutrients. If the pH is off, the plant may not take in nutrients well even when those nutrients are present. This can confuse beginners because they may add more fertilizer when the real problem is nutrient lockout caused by poor pH balance.
Weekly Care and Observation
During the vegetative stage, it helps to check your plants every day and review their progress each week. Daily checks can help you notice drooping, leaf color changes, pest issues, dry soil, or heat stress before the problem gets worse. Weekly care lets you step back and look at the plant’s overall size, shape, and growth rate.
A good routine helps. Look at the leaves. Check the soil. Make sure the light is working properly. Feel the airflow in the room. Look for signs of healthy new growth at the top of the plant. Small habits like these can prevent bigger problems later.
New growers often make mistakes when they keep changing things too fast. If a plant seems slightly off, do not rush to change light, food, water, and temperature all at once. Try to identify the most likely cause and adjust one thing at a time. Slow, careful changes are easier for the plant and easier for you to track.
Why This Stage Sets Up the Rest of the Grow
The vegetative stage is where the plant builds its foundation. Strong roots, healthy leaves, thick stems, and good branch development all begin here. A plant that grows well in this stage is more likely to handle flowering with less stress.
When growers skip the basics during vegetative growth, the problems often appear later. A weak plant may struggle to support heavy buds. Poor airflow may lead to health issues. Weak lighting may create a thin plant with poor structure. Overwatering may slow down root growth. Each part of care during this stage has a direct effect on the next stage.
This is why patience matters. The goal is not just fast growth. The goal is healthy growth. A strong, stable plant is more important than a plant that grows too quickly under poor conditions.
Caring for cannabis plants during the vegetative stage means focusing on steady, healthy growth. The plant needs a stable light schedule, careful watering, good airflow, enough space, and basic feeding support. This stage is when the plant builds the strength it needs for flowering later on. For beginners, the best approach is to keep things simple, watch the plant closely, and avoid doing too much at once. If you give the plant the right care during this stage, you create a much better chance for a healthy and successful grow from start to finish.
How Do You Move Cannabis Plants Into the Flowering Stage?
The flowering stage is the part of the grow when the plant starts to focus less on making new stems and leaves and more on making buds. For many beginners, this stage feels exciting because it is when the plant begins to look more like what they expected. It is also a stage that needs more care and patience. Small mistakes during flowering can affect the size, smell, and quality of the final harvest.
To move a cannabis plant into the flowering stage, the grower needs to understand what tells the plant it is time to flower. This depends on whether the plant is growing indoors or outdoors. It also depends on the type of plant. Most beginner growers in New York will be working with photoperiod plants, which flower based on the amount of light and darkness they get each day.
How Flowering Starts Indoors
Indoor growers control the plant’s environment. That means they also control when flowering begins. During the vegetative stage, many growers give cannabis plants long periods of light each day. Once the plant is big enough and healthy enough, the light schedule is changed to trigger flowering.
For most indoor photoperiod plants, flowering starts when the plant gets 12 hours of light and 12 hours of complete darkness each day. This change tells the plant that the seasons are shifting and that it is time to reproduce. In nature, this would happen as summer ends and fall gets closer.
The dark period must be consistent. Even a small amount of light during the 12 hours of darkness can confuse the plant. This can slow down flowering or cause stress. In some cases, light leaks can lead to poor bud growth or other problems. That is why indoor growers should make sure the grow tent or grow room stays fully dark during the off hours. Timers are very helpful because they keep the light schedule steady every day.
Before switching to flowering, the plant should already be healthy. A weak plant will usually not improve just because the light cycle changes. It is better to make sure the plant has strong roots, healthy leaves, and good overall growth first. Once flowering begins, the plant has less time to recover from problems.
How Flowering Starts Outdoors
Outdoor growers do not need to change the light schedule by hand. Nature does that on its own. As the days get shorter and the nights get longer, outdoor cannabis plants begin to move into the flowering stage.
In New York, this usually happens later in the summer as daylight starts to decrease. The exact time can vary a little depending on the strain, the local weather, and the growing conditions. Because outdoor growers depend on the season, timing matters. If a plant starts too late or faces poor weather during flowering, it may not finish as well as it could.
Outdoor flowering can be harder to manage because the grower cannot control the weather. Rain, humidity, cool nights, and strong winds can all affect the plant during this stage. This is one reason why growers in New York need to pay close attention as flowering begins. Wet conditions can raise the risk of mold and bud rot, especially as the buds become thicker.
Outdoor plants must also stay secure and out of public view. Since flowering plants often become larger and smell stronger, growers need to make sure the area remains private and safe.
What Changes During the Flowering Stage
Once flowering begins, the plant starts to change in visible ways. One of the first signs is the appearance of small flower sites where branches meet the main stem. Over time, these areas develop into buds. The plant may also stretch, which means it can grow taller in the early part of flowering. This is normal, and beginners should expect some plants to nearly double in size after the switch.
The smell often becomes stronger during flowering. This can surprise first-time growers, especially indoors. Good airflow and proper ventilation matter even more now. Many indoor growers use a carbon filter to help manage odor. Even if a beginner wants a simple setup, they should still plan for the smell before flowering starts.
Leaf color and growth patterns may also change. During the vegetative stage, the plant focuses on fast green growth. During flowering, the energy shifts toward bud production. The plant still needs healthy leaves, but the grower’s focus changes from building plant size to supporting flower development.
Nutrient Needs During Flowering
Cannabis plants do not need exactly the same feeding plan during every stage of growth. In the vegetative stage, they usually need more support for leaf and stem growth. In the flowering stage, the plant’s needs shift.
Many growers move to bloom nutrients once flowering starts. These products are made to support bud growth. Still, beginners should be careful not to overfeed. Too much fertilizer can stress the plant and cause leaf problems. It is often safer to start with a lighter feeding schedule and adjust slowly if needed.
Watering also still matters. Some beginners think flowering plants need much more water just because they are making buds. That is not always true. Overwatering is still a common mistake. The best approach is to check the soil or growing medium and water when the plant actually needs it. Good drainage remains important through the whole flowering period.
Why Patience Matters in Flowering
Flowering is not instant. After the light change indoors, or after seasonal changes outdoors, the plant needs time to respond. Buds do not fully form in just a few days. In the early part of flowering, the plant may look like it is changing slowly. That is normal.
Beginners often make mistakes because they become impatient. They may change nutrients too quickly, water too often, or try to fix a problem that is not really a problem. It is better to stay steady and watch the plant closely. Healthy flowering takes time.
This stage is also when growers should avoid major stress. Sudden environment changes, poor airflow, missed watering, extreme heat, or light leaks can all hurt bud development. A calm and stable grow space usually leads to better results.
Simple Signs to Watch for During Flowering
As flowering continues, growers should pay attention to the plant every day or two. They should watch for steady bud development, healthy leaves, and signs of stress. Yellowing leaves, drooping, mold, or burned leaf tips may mean something needs to be adjusted. A stronger smell is normal, but a bad or rotten smell is not.
Growers should also keep an eye on temperature and humidity. High humidity can be risky during flowering because dense buds can trap moisture. Good air movement helps lower that risk. Indoors, fans and ventilation help a lot. Outdoors, plant spacing and weather awareness are important.
If the plant stays healthy and the grower stays patient, flowering will continue until harvest time gets closer.
Moving cannabis plants into the flowering stage means helping the plant shift from leafy growth to bud production. Indoor growers do this by changing the light schedule to 12 hours of light and 12 hours of darkness each day. Outdoor growers rely on the natural shortening of daylight later in the season. During flowering, plants often stretch, produce a stronger smell, and begin forming buds. They also need steady care, proper airflow, careful feeding, and patience. For beginners in New York, the key is to keep conditions stable, watch the plant closely, and avoid rushing the process.
How Long Does It Take to Grow Cannabis From Seed to Harvest?
One of the most common questions new growers ask is how long it takes to grow cannabis at home from seed to harvest. The short answer is that it usually takes a few months, not just a few weeks. For most beginners in New York, a full grow can take about three to six months from the day a seed is started to the day the dried flower is ready to use. The exact timeline depends on the type of plant, the growing method, the setup, and how healthy the plant stays during each stage.
It helps to think of the growing process as a series of steps. Each step takes time, and each one matters. A beginner who understands this timeline is less likely to rush the process or get worried when the plant does not grow fast enough.
Germination Stage
The first stage is germination. This is when the seed begins to open and send out its first small root. In many cases, germination takes about one to seven days. Some seeds sprout quickly, while others take longer. Healthy seeds usually germinate faster than old or weak seeds.
During this stage, the seed needs warmth, moisture, and care. It should not be too wet or too dry. If conditions are poor, the seed may fail to sprout or may take much longer. Beginners sometimes make the mistake of checking the seed too often or handling it too much. That can slow the process down or damage the root.
Once the seed opens and the root appears, it is ready to be placed into the growing medium. That is the point where the seed begins its life as a seedling.
Seedling Stage
The seedling stage usually lasts about two to three weeks. This is the early growth stage when the young plant forms its first small leaves and starts building a stronger root system. At this point, the plant is still delicate. It needs gentle care, enough light, proper moisture, and a stable environment.
Seedlings grow slowly at first. This is normal. A new grower may think the plant is stuck, but in many cases the plant is using energy to build roots before it puts on more growth above the soil. Good light is very important here. Weak light can make seedlings stretch too much and become thin and weak.
This stage may last longer if the plant is stressed by too much water, poor drainage, weak light, or sudden temperature changes. A healthy seedling stage sets up the rest of the grow, so it is worth taking your time and not rushing ahead.
Vegetative Stage
After the seedling stage, the plant enters the vegetative stage. This is the stage when the plant grows taller, wider, and fuller. Leaves, stems, and branches develop quickly during this time. For many home growers, this stage lasts about four to eight weeks, though it can be shorter or longer depending on the grower’s plan.
Indoor growers have more control over this stage. They can keep a plant in the vegetative stage longer by giving it more hours of light each day. This allows the plant to get larger before flowering starts. Outdoor growers have less control because the plant follows the natural season.
Beginners often ask how long the vegetative stage should be. The answer depends on space, plant type, and goals. A small grow setup may require a shorter vegetative stage so the plant does not outgrow the space. A grower who wants a bigger plant may allow more time. Still, beginners often do best with a moderate timeline rather than trying to grow the largest plant possible.
If the plant becomes stressed during this stage, the total grow time can increase. Problems such as overwatering, lack of airflow, nutrient issues, or poor lighting can slow growth. A plant that is healthy and stable in this stage will move more smoothly into flowering later on.
Flowering Stage
The flowering stage is when the plant starts producing buds. For many photoperiod cannabis plants, this stage lasts about eight to ten weeks, though some strains may finish sooner and others may take longer. This is one of the longest and most important parts of the grow.
For indoor growers, flowering usually begins when the light schedule changes to give the plant equal periods of light and darkness each day. For outdoor growers in New York, flowering begins as the natural daylight hours shorten later in the season.
Many beginners expect buds to be ready quickly once flowering starts, but this stage takes patience. Early flowers are small, and the plant still needs several more weeks to mature. During this time, the buds get denser, the smell becomes stronger, and the plant changes in appearance week by week.
Rushing harvest is a common beginner mistake. A plant may look close to ready before it truly is. Waiting for proper maturity usually leads to better results. That is why the flowering timeline should be understood as a full stage, not just the final week before harvest.
Auto-Flowering vs. Photoperiod Timelines
The type of cannabis plant also changes the total grow time. Auto-flowering plants usually finish faster than photoperiod plants. Many auto-flowering plants can go from seed to harvest in about eight to twelve weeks total. That makes them attractive to beginners who want a faster process.
Photoperiod plants usually take longer. A beginner home grow with photoperiod plants often takes about three to five months from seed to harvest, and sometimes longer if the vegetative stage is extended. These plants give the grower more control over size and timing, but they also require more planning.
Auto-flowering plants may be faster, but speed does not always mean easier. Because they move through their life cycle on a fixed schedule, they have less time to recover from mistakes. A problem early in growth can affect the final result more strongly. Photoperiod plants may be slower, but they can give beginners more room to correct problems before flowering begins.
Drying and Curing Also Take Time
Many first-time growers think harvest day is the finish line. In truth, there are still two important steps left after the plant is cut down. These are drying and curing.
Drying usually takes about seven to fourteen days. During this time, the cut plant or trimmed buds slowly lose moisture. If drying happens too fast, the flower can become harsh and lose quality. If drying happens too slowly in poor conditions, mold can become a risk.
After drying comes curing. Curing often takes at least two to four more weeks, and some growers continue longer for better results. During curing, the buds are stored carefully so the remaining moisture spreads evenly. This can improve smell, flavor, and smoothness.
So even after harvest, the grow is not truly done. A grower who includes drying and curing in the timeline will have more realistic expectations and a better final product.
What Can Make the Timeline Longer
Several factors can extend the growing timeline. Poor lighting can slow plant growth. Overwatering can stress roots. Nutrient problems can weaken the plant. Cold temperatures, weak airflow, pests, and poor timing can all delay progress.
Genetics also matter. Some strains naturally grow faster, while others need more time. Indoor and outdoor conditions are not the same, and even two plants grown from seed at the same time may not finish on the exact same day.
This is why beginners should not focus only on the calendar. It is better to watch the plant’s development and learn the signs of each stage. The plant itself will show when it is moving forward well and when it needs more time.
From seed to harvest, cannabis usually takes several months to grow. Germination may take up to a week, the seedling stage often lasts two to three weeks, the vegetative stage usually lasts four to eight weeks, and flowering often takes another eight to ten weeks for photoperiod plants. Auto-flowering plants may finish faster, often in about eight to twelve weeks total. After harvest, drying and curing add more time before the flower is truly ready. For beginners in New York, the most important thing to remember is that growing cannabis is a process that rewards patience. A healthy plant grown slowly and carefully will usually give better results than one rushed from start to finish.
How Do You Know When It Is Time to Harvest?
Knowing when to harvest is one of the most important parts of growing cannabis at home. If you harvest too early, your plant may not reach its full size, strength, or smell. If you harvest too late, the plant may lose some of the qualities you want. For a beginner, this part can feel hard at first because the plant may look almost ready for several days or even longer. That is why it helps to learn a few simple signs and check your plants with care.
Look at the Pistils First
One of the easiest signs to watch is the pistils. Pistils are the thin, hair-like parts that grow from the buds. When the plant is still young in the flowering stage, these hairs are usually white. As the plant gets closer to harvest, many of these hairs begin to change color. They often turn orange, brown, or a darker shade than before.
This change can help you see that the plant is moving toward maturity. Still, pistils should not be the only thing you use to decide harvest time. Some plants may change hair color earlier or later than others. A plant may also have some white hairs and some darker hairs at the same time. That is normal. In general, if most pistils have darkened and started to curl inward, the plant may be close to ready.
Beginners often make the mistake of cutting the plant as soon as they see a few dark hairs. That is usually too soon. It is better to look at the whole bud and wait until the change is more advanced. Use pistils as an early clue, not as the only test.
Check the Trichomes Carefully
The best way to judge harvest time is by looking at the trichomes. Trichomes are the tiny crystal-like glands on the buds and nearby leaves. They hold many of the compounds that affect smell, flavor, and strength. To see them clearly, most growers use a small magnifier, pocket microscope, or jeweler’s loupe.
At first, trichomes look clear. This usually means the plant is still not ready. As the plant matures, the trichomes turn cloudy or milky. This is often the stage when many growers choose to harvest. Later, some trichomes may turn amber. This shows the plant is moving past peak ripeness.
For beginners, a simple way to think about it is this: clear trichomes usually mean too early, cloudy trichomes often mean ready, and too many amber trichomes may mean the plant is becoming overripe. Many growers look for mostly cloudy trichomes with some amber ones mixed in. That balance often gives a good result.
When checking trichomes, look at the buds and not only the sugar leaves. The small leaves around the buds can mature faster than the bud itself. If you look only at the leaves, you may think the plant is ready before it really is.
Watch for Other Signs of Maturity
Pistils and trichomes are the most useful signs, but they are not the only ones. A mature plant often shows a few other changes too. The buds may look fuller, denser, and more swollen than before. The smell may become stronger. Some leaves, especially larger fan leaves, may begin to yellow as the plant nears the end of its life cycle.
These signs can support what you already see in the pistils and trichomes. They help you understand that the plant is reaching the end of flowering. Still, they should not replace close inspection. A strong smell or yellow leaves alone does not always mean harvest time has arrived. The plant may still need more days or even another week or two.
Why Harvesting Too Early Is a Problem
Many first-time growers get excited and harvest too soon. This is a very common mistake. A plant that looks close to ready may still be building bud weight and developing more fully. If you cut it too early, the buds may be smaller, lighter, and less developed.
Early harvest can also affect the final smell and flavor. The plant needs time to finish its natural process. When it is rushed, the end result may feel weaker or less balanced. This can be disappointing after spending months growing the plant.
Patience matters a lot at this stage. A few extra days of careful checking can make a big difference. It is often better to wait and keep watching than to rush and regret it later.
Why Harvesting Too Late Can Also Cause Problems
Waiting too long can also change the final result. As the plant continues to age, more trichomes may turn amber. This does not always ruin the crop, but it can change the effect, smell, and overall quality. Buds may also begin to lose some freshness if left too long on the plant.
Late harvest can also raise the risk of mold or bud rot, especially if the room is too humid or if outdoor weather becomes wet and cool. This is a serious concern in New York, where fall weather can sometimes be damp. A plant that stays outside too long may face more stress from rain, cold nights, or moisture trapped inside thick buds.
This is why growers need to balance patience with timing. You want to give the plant enough time to mature, but not so much time that quality starts to drop or weather causes damage.
What Happens Right After Harvest
Harvesting the plant is not the final step. After cutting the buds, you still need to trim, dry, and cure them. These steps affect the final quality just as much as the growing stage.
Trimming means removing extra leaves from the buds. Some growers trim right after cutting, while others wait until after drying. The goal is to clean up the buds and remove plant material that is not needed.
Drying is the next step. Freshly cut buds hold a lot of moisture. They need to dry slowly in a cool, dark place with good airflow. If buds dry too fast, they may become harsh. If they dry too slowly or stay too wet, mold can grow. Many growers dry buds for about a week or more, depending on the room and the size of the buds.
After drying comes curing. Curing means placing the dried buds in sealed jars and opening them regularly at first to let out extra moisture. This slow process helps improve smell, flavor, and smoothness. It also helps the buds become more stable for storage. Many beginners forget that even after harvest, the plant still needs careful handling to reach its best quality.
The best way to know if cannabis is ready to harvest is to check the pistils and, more importantly, the trichomes. Darker pistils and mostly cloudy trichomes are strong signs that the plant is getting close. Clear trichomes usually mean it is too early, while too many amber trichomes may mean the plant has gone past its best moment. Bud size, smell, and leaf color can also help, but they should support your decision, not make it for you. Harvesting too early can reduce quality and yield, while harvesting too late can affect freshness and raise the risk of mold. After harvest, trimming, drying, and curing are still important parts of the process. For beginners, the key is simple: watch closely, be patient, and do not rush the final step.
What Are the Most Common Beginner Mistakes in a New York Home Grow?
Starting a home grow in New York can feel exciting, but many beginners make the same mistakes in the first few weeks and months. These mistakes can slow plant growth, lower quality, reduce yield, or lead to legal problems. The good news is that most of them can be avoided with a simple plan and careful daily habits. A beginner does not need to do everything perfectly. It is more important to stay consistent, start small, and understand what the plant needs at each stage.
Starting With Too Many Plants
One of the most common mistakes is trying to grow too many plants right away. New York may allow adults to grow a certain number of plants at home, but that does not mean a beginner should start at the legal limit. Each plant needs time, space, light, water, and regular care. If a new grower starts with too many plants, it becomes harder to notice problems early.
A small grow is easier to manage. It is easier to water correctly, check leaves for signs of stress, and keep the area clean. A first-time grower who starts with one to three plants often learns faster than someone who tries to handle a full garden on day one. Fewer plants also mean lower startup costs and fewer mistakes to fix at once.
Overwatering the Plants
Overwatering is one of the biggest problems for beginners. Many people think more water will help the plant grow faster, but too much water can harm the roots. Cannabis roots need both water and air. If the soil stays too wet for too long, the roots cannot breathe well. This can lead to slow growth, drooping leaves, yellowing, and even root rot.
A new grower should learn to water only when the plant needs it. One simple way is to check the top layer of soil. If it still feels wet, it is usually too soon to water again. Another common method is lifting the pot. A dry pot feels much lighter than a wet one. This simple habit can help prevent a lot of early problems.
Using Weak or Poor Lighting
Light is one of the most important parts of a home grow, especially indoors. Beginners often use lights that are too weak or place the lights too far from the plants. When that happens, plants may stretch too much, grow thin stems, and develop slowly. Poor lighting can affect the entire grow from start to finish.
A healthy plant needs enough light to build strong stems, full leaves, and good flower development later on. This does not always mean buying the most expensive light, but it does mean choosing a light made for plant growth and using it correctly. Indoor growers should also pay attention to light schedule. Plants need the right amount of light and darkness during different stages. If the light is poor, even a healthy seed may never reach its full potential.
Ignoring Airflow and Ventilation
Another beginner mistake is focusing only on light and water while forgetting about airflow. Plants need moving air and fresh air to grow well. Without proper airflow, the grow space can become too hot, too humid, or too still. This can lead to weak stems, mold, mildew, and pest problems.
A simple fan can help strengthen plants and move air around the room or tent. Good ventilation also helps control heat and moisture. This matters even more during flowering, when thick buds can trap moisture and become damaged by mold. A beginner does not need a complex setup, but the grow space should never feel closed off, damp, or stale.
Feeding Too Much Too Soon
Many beginners want fast growth, so they give plants too many nutrients too early. This can burn the plant and cause more harm than good. Signs of overfeeding can include leaf tip burn, curling, dark green leaves, and slowed growth. Once nutrient problems begin, they can be hard to correct.
Young plants usually need very little feeding at first, especially if they are growing in quality soil that already contains nutrients. It is better to start with a mild feeding plan and increase only if the plant shows that it needs more. New growers should remember that it is easier to add more nutrients later than to remove too much after the damage is done.
Skipping pH Checks
Many beginners do not think about pH, but it plays a big role in plant health. Even if the grower gives the right nutrients, the plant may not be able to use them if the pH is too high or too low. This can cause nutrient lockout, where the plant looks sick even though food is present in the soil or water.
When pH is off, leaves may turn yellow, show spots, or grow poorly. Some growers think the answer is more fertilizer, but that often makes the problem worse. Checking the pH of water and growing medium can help prevent confusion and stress. It is a small step, but it can make a big difference in keeping plants stable and healthy.
Failing to Keep the Grow Area Secure
In New York, home growers must also pay attention to safety and legal rules. A common mistake is treating the grow area too casually. Plants should be kept in a secure place and away from people under 21. This is not only a legal issue but also a safety issue. A grow area should be controlled, private, and not easy for others to enter without permission.
Security also includes safe use of equipment. Lights, cords, timers, and fans should be set up carefully to reduce fire risk and electrical problems. Water should never spill near outlets or power strips. A clean and secure grow space protects the plants, the people in the home, and the grower’s legal standing.
Breaking New York Home Grow Rules
Some beginners focus so much on learning how to grow that they forget the legal side of home cultivation. This can create serious problems. A common mistake is growing more plants than allowed. Another is assuming that homegrown cannabis can be sold or traded. In New York, home grow is for personal use. Selling homegrown cannabis is not allowed.
It is also important to understand where growing is allowed and how harvested cannabis should be stored. Staying within the law is part of being a responsible grower. A successful home grow is not only about healthy plants. It is also about following the rules from seed to harvest.
Most beginner mistakes in a New York home grow come from trying to do too much, too fast, or without enough planning. Starting with too many plants, overwatering, using poor lighting, ignoring airflow, feeding too much, skipping pH checks, and failing to secure the grow area can all hurt the final result. Legal mistakes, such as going over plant limits or trying to sell homegrown cannabis, can create even bigger problems. For most beginners, the best path is to keep things simple. Start with a small number of plants, check them often, make slow changes, and stay within New York law. A careful and patient approach gives new growers the best chance to learn and improve with each grow cycle.
Can You Store, Use, or Share Homegrown Cannabis in New York?
Once your plants are harvested, it is important to know what New York law allows and what it does not allow. Many beginners focus on growing, but the rules after harvest matter too. Storage, possession, use, and sharing all have limits. Knowing these rules can help you avoid simple mistakes.
What You Can Keep at Home
In New York, adults age 21 and older can keep up to five pounds of trimmed cannabis at their private residence or on the grounds of that residence if it came from legal home cultivation. This means your homegrown harvest does not have to fit within the smaller amount allowed for carrying in public. The larger home limit is meant for personal storage at home, not for public use or sale.
This rule is important because home growing can produce more cannabis than a person may carry outside the home. A successful grow can give you a harvest that lasts for months. Because of that, proper storage matters. Keeping your cannabis at home in a secure place helps you stay within the law and protects the product from damage.
A good storage area should be cool, dry, and dark. Heat, light, air, and moisture can reduce quality over time. Many growers use sealed glass jars or other airtight containers after the drying and curing process is complete. The goal is to protect the cannabis from mold, too much dryness, and loss of smell and strength. Even though the law focuses on legal possession, safe storage is also a practical issue for quality and safety.
What You Can Carry Outside the Home
The amount you can store at home is different from the amount you can carry in public. In New York, adults 21 and older can carry and transport up to three ounces of cannabis and up to 24 grams of cannabis concentrate within the state. If you leave home with more than that amount, you may create a legal problem even if the cannabis came from your own plants.
This means you should separate home storage from travel or transport rules. A person may legally keep more at home, but the public possession limit still applies once they take cannabis outside the residence. Beginners should understand this difference clearly. “I grew it myself” does not remove public possession limits.
It is also important not to cross state lines with cannabis. Even if cannabis is legal in another state, crossing state borders with it is still illegal. New York allows home growing for personal use, but that does not change federal rules about transporting cannabis across state lines.
Can You Share Homegrown Cannabis?
This is where many people get confused. In New York, adults 21 and older may share cannabis with another adult 21 and older without compensation, as long as the amount stays under the legal possession limit. The key idea is that no money, service, trade, or hidden exchange can be involved.
That means true sharing may be legal, but selling is not. You cannot sell your homegrown cannabis. You also cannot trade it for something else, barter it, or attach it to another sale. For example, giving someone cannabis because they bought another item from you is not legal. New York also makes clear that “gifting” tied to another purchase or service is illegal.
For beginners, the safest rule is simple: homegrown cannabis is for personal use, and any transfer to another adult must be a real no-payment share within legal limits. Once money, favors, or business activity enter the picture, the situation changes.
Safe Storage Matters
Legal storage is not only about how much you can keep. It is also about where and how you keep it. New York requires that homegrown cannabis and cannabis plants be kept in a secure place and not be accessible to people under 21.
This matters after harvest just as much as it matters during the grow. If you have children, teens, or frequent visitors in your home, loose storage is a bad idea. A locked cabinet, locked room, or another secure storage setup can help reduce risk. Edibles and concentrates should be treated with even more care because they may be easier to mistake for regular food or other products.
Safe storage also helps prevent theft. A large harvest can attract unwanted attention if it is not stored carefully. Good storage protects your cannabis, protects other people in the home, and helps show that you are taking reasonable steps to follow the law.
Using Homegrown Cannabis Responsibly
Adults 21 and older may use cannabis in a private home and in some places where tobacco smoking is allowed, but there are important limits. It is illegal to use cannabis in a motor vehicle, and it is also illegal to drive while impaired. Cannabis use is also banned in places where tobacco smoking is prohibited, and state parks and some public outdoor spaces have extra restrictions.
For home growers, this means your harvest should be used with care and within legal settings. Just because you legally grew it does not mean you can use it anywhere. It also does not mean other property owners must allow its use. For example, landlords may not refuse to rent to someone only because they use cannabis, but they may still ban smoking or vaping on their property in some cases.
Home Processing Rules
Some home growers want to do more than dry and cure their harvest. They may want to make butter, oils, or other cannabis products. New York allows some home processing, but the use of flammable materials is prohibited. That means methods involving butane, propane, alcohol, or similar dangerous materials are not allowed for home use because of the fire and safety risk. Safer methods such as heat, water, or fermentation are allowed instead.
This is an important point for beginners. Home growing does not mean home extraction with risky chemicals is legal. Drying, curing, and basic non-flammable preparation are very different from making high-risk concentrates.
After harvest, New York allows adults 21 and older to keep up to five pounds of trimmed homegrown cannabis at home, but only up to three ounces and 24 grams of concentrate may be carried in public. Homegrown cannabis may be shared with another adult 21 and older only when there is no payment, trade, or hidden exchange involved. It cannot be sold, bartered, or tied to another sale. It should be stored in a secure place away from anyone under 21, and any home processing must avoid flammable materials. For beginners, the best approach is simple: store your harvest safely, keep public possession within legal limits, never sell it, and treat homegrown cannabis as a personal-use product under New York law.
Conclusion
Starting a home grow in New York can feel like a big project at first, but it becomes much easier when you break it into clear steps. The most important thing is to begin with the basics. Before you buy seeds, soil, lights, or pots, make sure you understand the rules in New York. Home growing is allowed for adults who meet the legal age requirement, but it must stay within the state’s plant limits and personal-use rules. That means your grow should be small, private, secure, and meant only for your own use. It is also important to keep plants and harvested cannabis away from anyone under 21. When you begin with the law in mind, you build your grow on the right foundation.
After that, the next step is choosing a setup that fits your home, your budget, and your skill level. Many beginners make the mistake of trying to do too much at once. They may want to grow the maximum number of plants right away or buy too much equipment before they understand what they really need. A better plan is to start small. A simple grow is often the best grow for a beginner. A few healthy plants are easier to manage than many stressed plants. A small setup also gives you room to learn without feeling overwhelmed. You can always improve or expand later after you have finished one full grow and know what works for you.
Your choice between indoor and outdoor growing also matters. Indoor growing gives you more control. You can manage the light, temperature, and airflow more easily. This can help beginners who want a more steady environment. Outdoor growing can cost less in some cases, but it depends more on the weather, the season, and the amount of secure space you have. In New York, this is an important point because the climate is not always easy for cannabis plants. A beginner should choose the option that feels most realistic, not just the one that seems cheapest or fastest.
It also helps to understand that each stage of growth needs care and patience. Germination and the seedling stage may look simple, but these early days are very important. Young plants are delicate. Too much water, weak light, or rough handling can slow them down or damage them. The vegetative stage is when plants build strength, leaves, and stems. This is the time when steady watering, enough light, and good airflow help the most. Then comes the flowering stage, when plants begin to produce buds. At this point, growers need to watch the plants closely, stay patient, and avoid making sudden changes. Every stage builds on the one before it, so good habits early in the grow often lead to better results later.
Another key lesson for beginners is that growing does not end at harvest. Many people focus only on getting to the point where they can cut the plant, but drying and curing matter too. If you rush the final steps, you can hurt the smell, taste, and overall quality of the cannabis. Good results come from the full process, not only from the growing stage. That is why patience matters from the first seed all the way to the final jar.
Beginners should also remember that mistakes are part of learning, but some mistakes are easier to avoid than others. Overwatering is one of the most common problems. So is giving plants too many nutrients too soon. Poor lighting, weak airflow, and trying to manage too many plants at once can also cause trouble. Legal mistakes matter too. Going over the plant limit or trying to sell homegrown cannabis can create serious problems. A careful beginner pays attention not only to plant health, but also to legal compliance and safe storage.
In the end, the best way to start a home grow in New York is to keep it simple, stay patient, and focus on learning. You do not need the biggest setup or the most advanced tools to begin. You need a clear plan, a legal and secure space, a manageable number of plants, and the willingness to care for them step by step. When you take the time to learn the process, avoid common mistakes, and follow New York rules, your first grow can be a strong and useful learning experience. A successful beginner grow is not about doing everything at once. It is about doing the basics well, staying consistent, and building confidence with each stage of the process.
Research Citations
New York State Office of Cannabis Management. (2024). Home cultivation is now legal in New York State.
New York State Office of Cannabis Management. (2024, February 16). Part 115 amendment: Adult-use personal cultivation regulations.
New York State Office of Cannabis Management. (2026). Adult-use information.
New York State Office of Cannabis Management. (2026). Adult-use.
New York State Office of Cannabis Management. (2026). Landlords.
New York State Office of Cannabis Management. (2022, October 12). Medical cannabis home cultivation guide.
New York State Office of Cannabis Management. (2022, October 5). Personal home cultivation of medical cannabis regulations: Frequently asked questions.
New York State Office of Cannabis Management. (2021). Marihuana Regulation and Taxation Act (MRTA) & the public comment process.
Cornell Hemp. (2026). New York State Cannabis sativa L. production manual.
Harvest New York. (2024, July 9). NYS Cannabis sativa L. guidebook.
Questions and Answers
Q1: What are the legal requirements to start a home grow in New York?
Adults 21 and older can grow cannabis at home for personal use. Each adult may grow up to 6 plants, with a maximum of 12 plants per household. Plants must be kept in a secure, private location and out of public view.
Q2: Do you need a license to grow cannabis at home in New York?
No license is required for personal home growing if you follow state rules. However, growing for commercial purposes does require a license.
Q3: What equipment do you need to start a home grow?
Basic equipment includes grow lights, pots, soil or growing medium, nutrients, ventilation fans, and a timer. Indoor growers may also need a grow tent.
Q4: Should beginners grow cannabis indoors or outdoors in New York?
Indoor growing offers more control over light, temperature, and humidity. Outdoor growing is less expensive but depends on seasonal weather and location.
Q5: What type of cannabis seeds should beginners choose?
Beginners often choose feminized seeds because they produce female plants, which grow usable buds. Autoflower seeds are also popular because they grow faster and require less light control.
Q6: How long does it take to grow cannabis at home?
The full process usually takes 3 to 5 months. This includes germination, vegetative growth, flowering, and harvest.
Q7: What is the best soil or medium for home growing?
High-quality potting soil is the easiest option for beginners. Some growers use coco coir or hydroponic systems, but these require more knowledge and care.
Q8: How much light do cannabis plants need?
During the vegetative stage, plants need about 18 hours of light per day. During flowering, they need about 12 hours of light and 12 hours of darkness.
Q9: How often should you water cannabis plants?
Watering depends on the plant size and environment. Most plants need watering every 2 to 3 days, but the soil should be allowed to dry slightly between watering.
Q10: How do you know when to harvest cannabis?
Plants are ready to harvest when the buds are dense and the small hairs (pistils) darken. Growers often check trichomes with a magnifier; cloudy or amber colors signal readiness.