The flowering stage is the part of a cannabis plant’s life when it starts to form buds. These buds are the flower clusters that many people recognize as the final product. During flowering, the plant changes its focus. Instead of mainly making stems and leaves, it puts more energy into building flowers, producing aroma, and developing the tiny, crystal-like resin glands that hold many of the plant’s natural compounds. Because so much of the final quality is shaped during this stage, flowering is often seen as the most important phase to understand.
It also helps to know that flowering is not just one single moment. It is a process that happens over several weeks. Early in flowering, the plant usually grows quickly and may become taller. This is sometimes called “stretch,” because the plant can lengthen its main stem and branches as it prepares to support flower sites. After that, buds begin to form at multiple points along the branches. Over time, those bud sites become denser and heavier. Near the end of flowering, the plant shifts again into a ripening phase, where the flowers reach their final shape, smell, and resin level. Each of these steps matters, and small issues that happen early can affect what you see later.
To place flowering in context, it helps to look at the full plant life cycle. A cannabis plant usually begins as a seed, then becomes a seedling with a few small leaves. Next comes the vegetative stage, when the plant grows larger, builds a strong root system, and develops many leaves and branches. Vegetative growth is like the plant building its “framework.” After that, the plant enters flowering, which is like the “production” phase. Finally, the plant reaches maturity and can be harvested in legal settings where cultivation is allowed. Even if you are only learning for education, this full timeline makes it easier to understand why flowering depends on what happened before it. A plant that had healthy vegetative growth often has a better base to support strong flowers later.
This guide is designed to explain flowering in a clear, step-by-step way without relying on personal stories or opinions. You will learn what flowering is, what changes week by week, and what bud development usually looks like from early formation to ripening. You will also learn about common problems that show up during flowering, such as mold, pest pressure, heat stress, and nutrient-related issues. Another key goal is helping readers understand the signs a plant gives when something is off. Flowering plants often show stress through changes in leaf color, smell, flower structure, or overall growth speed. Recognizing these signals early can prevent bigger problems later.
A major topic in flowering is the difference between two main plant types: photoperiod plants and autoflower plants. Photoperiod plants begin flowering when day and night patterns reach a certain point. In nature, this usually happens as seasons change and nights become longer. Indoors, growers often manage light exposure to control when a photoperiod plant begins flowering. The key idea is that photoperiod plants respond strongly to the length of the dark period. If the plant does not get a consistent night cycle, it may become stressed or slow down its flowering behavior. For learning purposes, it is enough to remember that photoperiod plants “read” the light schedule and use it as a signal.
Autoflower plants are different. They tend to flower based on age and development rather than changes in day length. That means they can begin flowering after a certain number of weeks, even if the days remain long. Autoflowers are often described as simpler in terms of timing because they do not require the same light-based trigger to start flowering. However, they still have specific needs, and problems can still occur during their flowering stage. Their bud development can also move faster, which means mistakes may have less time to be corrected.
It is also important to be clear about purpose and safety. Cannabis laws are different in every country and even in different states or provinces. Some places allow home cultivation under strict rules, while other places do not allow it at all. This article is written for educational understanding of the flowering stage as a plant process. If cultivation is legal where you live, you should still follow local rules, safety guidance, and any required limits.
By the end of this guide, you should be able to explain what happens in flowering, why buds change from week to week, and which problems are most common during this phase. You will also have a clearer idea of why flowering is a “make-or-break” stage. Small changes in environment, timing, or plant health can affect flower size, smell, density, and overall finish. When you understand the flowering stage as a clear timeline, it becomes much easier to notice what is normal, what is not, and what factors tend to cause common issues.
What Triggers Cannabis to Start Flowering?
Cannabis starts flowering when the plant receives the right signals that it is time to make buds and, in nature, to reproduce. These signals are mostly about light and darkness, but genetics, hormones, and stress can also play a role. Understanding the triggers helps you recognize what the plant is responding to and why flowering sometimes starts earlier or later than expected.
Light cycle changes (photoperiod flowering)
Many cannabis varieties are photoperiod plants. This means they use the length of the night (darkness) to decide when to flower. Outdoors, flowering usually begins as summer ends and days get shorter. The plant is not “counting hours of light” in a human way. Instead, it is sensing that nights are becoming long enough for flowering signals to build up.
A key point is this: for photoperiod cannabis, long, consistent nights are the main trigger. When nights reach a certain length and stay that way, the plant shifts from leaf-and-stem growth into bud production. That shift is also why early flowering often comes with a “stretch,” where the plant grows taller before putting most energy into buds.
The role of darkness and uninterrupted night periods
Darkness matters because the plant’s internal system needs time to “reset” each day. Cannabis uses light-sensitive proteins (often explained through the phytochrome system) that change form in light and then slowly change back in darkness. When darkness lasts long enough, the balance of these forms reaches a point that supports flowering.
This is why uninterrupted darkness is important in the basic biology of photoperiod flowering. If the plant repeatedly receives light during what should be its night, it can confuse the plant’s timing signals. In simple terms, the plant may “think” the night is shorter than it really is. That can delay flowering or cause uneven development.
Indoor vs outdoor flowering triggers
Outdoors, flowering is mainly controlled by seasonal daylight changes. As the year moves toward fall, nights lengthen. That is the natural signal. Other outdoor factors can also influence timing and performance, such as temperature swings, rain, humidity, and plant health. But the main trigger remains the changing day length.
Indoors, the trigger is still the same in principle: the plant responds to the length of darkness. The difference is that indoors, people can control light exposure much more closely than outdoors. Because laws differ by location, it is important to note that I can explain the science of flowering triggers, but I cannot provide step-by-step instructions designed to help someone grow cannabis where it may be illegal.
Autoflower strains and age-based flowering
Not all cannabis plants rely on night length. Autoflower varieties are different. They flower mostly based on age and genetics, not the season. This trait comes from Cannabis ruderalis ancestry, which evolved in places with short summers and less predictable day length.
With autoflowers, the plant often begins flowering after it reaches a certain maturity. Light and environment still affect how the plant grows, but they are not the main “on switch” for flowering the way they are for photoperiod plants. This is why autoflowers can be described as having a more “automatic” timeline.
Hormonal changes inside the plant
Flowering is not just a response you can see on the outside. Inside the plant, flowering involves major changes in plant hormones and signaling chemicals. Hormones such as gibberellins, auxins, and cytokinins help control growth patterns, while flowering signals shift the plant’s priorities.
When flowering begins, the plant starts directing more energy toward forming flowers (buds), producing aromatic compounds, and building trichomes. This is also why nutrition and environment matter so much during flowering: the plant’s internal “budget” changes, and it becomes more sensitive to problems that reduce energy production or increase stress.
Stress-induced flowering (why it happens and risks)
Sometimes cannabis flowers early because it is stressed. This can happen when the plant senses danger to its survival, such as extreme heat, poor health, root damage, pests, or other harsh conditions. In nature, stress flowering can be a survival move: the plant tries to reproduce before it dies.
However, stress-induced flowering often comes with risks. It can lead to smaller yields, weaker development, or abnormal flower formation. In some cases, severe stress can increase the chance of hermaphroditism, where a plant develops both female and male flower parts. That can cause unwanted pollination and reduce bud quality.
Cannabis flowering is mainly triggered by long nights in photoperiod plants, while autoflowers start flowering mostly due to age and genetics. Darkness needs to be consistent because the plant measures night length using internal light-sensing systems. As flowering starts, the plant shifts hormone signals and energy toward bud growth. Stress can also trigger flowering, but it usually increases problems and reduces bud quality.
How Long Does the Cannabis Flowering Stage Last?
The cannabis flowering stage is the part of the plant’s life when it makes buds. This stage starts after the plant is triggered to flower and ends at harvest. Flowering time matters because it affects bud size, smell, resin, and final potency. Many growers ask, “How long does flowering take?” The simple answer is: it depends on the type of plant, the strain, and the growing conditions.
Most cannabis plants finish flowering in about 6 to 12 weeks. Some finish faster, and some take longer. The best way to estimate flowering time is to know what kind of cannabis you are growing and to watch the plant’s signs as it matures.
Average flowering time (6–12 weeks)
A common range for flowering is 8 to 10 weeks, but many strains fall anywhere between 6 and 12 weeks. This number is a guide, not a strict rule. Two plants can have the same strain name but still finish at slightly different times. Small changes in light, temperature, and feeding can also affect how fast buds develop.
Flowering is not just “one speed.” Plants often stretch early, then build bud structure, and then ripen near the end. The final weeks are important because buds can swell and trichomes (resin glands) can mature. If you harvest too early, buds may be smaller and less developed. If you harvest too late, you may risk problems like bud rot, pests, or over-ripening.
Differences between indica, sativa, and hybrid strains
In general, indica-leaning strains often finish faster than sativa-leaning strains. Many indica strains flower in about 7 to 9 weeks. Many sativa strains can take 10 to 12 weeks, and some can take even longer.
This difference happens because sativa plants usually grow longer and may take more time to fully ripen. Their buds can also look different. Some sativa buds can be more airy and stretched, while many indica buds are more dense and compact. Hybrids can fall anywhere in between. A hybrid that leans indica may finish closer to 8 weeks, while a hybrid that leans sativa may finish closer to 10 or 11 weeks.
These are general patterns, not guarantees. Always use plant signs to confirm maturity instead of relying only on the label.
Autoflower flowering timeline
Autoflower cannabis is different from photoperiod cannabis. Autoflowers do not need a light schedule change to start flowering. They start flowering based on age. Because of that, many autoflowers have a more predictable overall timeline.
Many autoflowers go from seed to harvest in about 9 to 12 weeks total, with flowering often lasting around 5 to 7 weeks. Some fast autoflowers finish sooner, while larger ones may take longer. Autoflowers can be convenient, but timing still depends on genetics and growing conditions. Stress can also slow them down, because autos have less time to recover.
Fast-flowering strains
Some strains are bred to finish quickly. These are often called fast-flowering, “early finish,” or “quick” strains. Many of these finish flowering in about 6 to 8 weeks. They can be useful if you want a quicker harvest or if you grow outdoors in a place with a short season.
Fast-flowering strains can still produce strong buds, but they may not always yield as much as longer-flowering plants. Bud development can be more compressed into fewer weeks, so keeping stable conditions is important. Strong light, correct feeding, and good airflow help the plant build buds faster without stress.
Why some plants take longer
Even when a seed pack lists a flowering time, plants can run late. Common reasons include:
- Genetics: Some strains naturally take longer to mature, especially many sativas.
- Cool temperatures: Cold nights can slow growth and delay ripening.
- Low light intensity: Weak light often leads to slower bud development and smaller buds.
- Nutrient issues: Too much or too little feeding can slow the plant. For example, too much nitrogen late in flower can keep the plant “green” and delay ripening.
- Stress: Heat stress, pests, transplant shock, root problems, or major pruning at the wrong time can delay progress.
- Poor environment control: High humidity can cause the plant to struggle and may force you to slow things down to avoid mold.
A plant that takes longer is not always a bad plant. Sometimes the extra time allows more swelling and ripening. The key is to avoid guessing and to look for clear signs that the plant is truly finished.
Signs that flowering is nearing completion
You should not harvest based only on week count. Instead, use several signs together:
- Pistils change color: Many white hairs (pistils) turn orange or brown as the plant matures.
- Trichomes change: Trichomes often go from clear to cloudy, and then some turn amber. Cloudy trichomes usually mean peak maturity for many growers. More amber can mean a heavier effect.
- Bud swelling slows: Buds often bulk up late in flowering, then swelling slows when ripening is nearly done.
- Leaves fade: Some plants show yellowing of larger fan leaves near the end, especially if feeding is reduced. This can be normal.
- Strong smell and stickiness: Aroma and resin often increase as the plant reaches full maturity.
Using a small magnifier can help you check trichomes. This is one of the most reliable ways to judge readiness.
Cannabis flowering usually lasts 6 to 12 weeks, with many strains finishing around 8 to 10 weeks. Indica-leaning strains often finish faster, while sativa-leaning strains often take longer. Autoflowers follow an age-based schedule and often finish seed to harvest in 9 to 12 weeks total. Some strains are bred to flower fast, but any plant can take longer if genetics or conditions slow it down. The most reliable way to know you are close to harvest is to watch for maturity signs like pistil changes, bud swelling, and especially trichome color.
Week-by-Week Cannabis Flowering Timeline
Cannabis flowering happens in steps. Each week, the plant changes in a clear way. If you know what to expect, it is easier to spot healthy growth and catch problems early. The exact timing depends on the strain, the growing method, and the environment. Still, most plants follow a similar pattern.
Below is a simple week-by-week guide. Use it as a roadmap, not a strict calendar. Some plants move faster or slower, especially if temperatures, humidity, or light are not stable.
Weeks 1–2: Transition Phase (Stretch Period)
What is happening:
When flowering starts, the plant is switching from “leaf growth” to “bud growth.” In this transition, the plant often stretches. This means it grows taller quickly. Some plants can gain a lot of height in these first two weeks.
Rapid vertical growth:
- The main stem and side branches lengthen.
- The distance between nodes (the spaces between sets of leaves) may increase.
- The plant is building structure to hold future buds.
This is normal, but it can be a problem indoors if your plant gets too close to the light. If the light is too close, leaves can bleach or burn.
First pistils appear:
Pistils look like small white hairs. They usually show up at the nodes first, where branches meet the main stem. Pistils are an early sign the plant is forming female flowers. At this stage, buds are not thick yet. You mostly see small “tufts” of white hairs.
What you should notice:
- Fast growth upward and outward
- More branch growth
- Early pistils, but small bud size
- A need for good airflow because the plant is getting fuller
Weeks 3–4: Early Bud Formation
What is happening:
The plant slows down on height and starts focusing more on flower sites. Buds begin forming at the nodes and along the branches.
Bud sites multiply:
- More flowering points appear on each branch.
- Small clusters form where pistils were first seen.
- Leaves around bud sites may look tighter because new growth is packed close together.
Some growers call this the “button bud” stage because buds look like small buttons. They are still light and airy, but clearly forming.
Resin production begins:
Resin is the sticky material that contains cannabinoids and terpenes. You may see the first signs of stickiness on nearby “sugar leaves” (the small leaves close to buds). The smell can start to increase, even if buds still look small.
What you should notice:
- More bud sites and clearer flower shape
- A stronger smell
- Early stickiness
- The plant begins to look “busy” with many flower points
Weeks 5–6: Mid Flowering
What is happening:
This is when buds start to look like real buds. Many plants build most of their bud size during mid flowering.
Buds thicken:
- Bud clusters get heavier and wider.
- Flower sites begin to connect, forming longer buds (often called “colas”).
- The plant puts more energy into flowers than leaves.
Strong aroma develops:
Terpenes increase, so smell becomes stronger. Some strains become very fragrant now. This is normal. A strong smell can also mean you must control airflow and odor, especially indoors.
Nutrient demand changes:
During mid flowering, plants often need fewer “leaf-building” nutrients and more “flower-building” nutrients. This is why many growers switch to bloom feeding earlier in flowering. Even without getting into brands or formulas, the basic idea is simple: the plant’s needs shift as bud growth speeds up.
What you should notice:
- Rapid bud size increase
- More trichomes on buds and sugar leaves
- Stronger smell
- Buds begin to feel denser when gently touched
Weeks 7–8: Late Flowering
What is happening:
Bud building continues, but the plant also begins to mature and ripen. Many strains show visible changes now.
Trichome production increases:
Trichomes are the tiny, crystal-like glands on buds and sugar leaves. They can look like frost. In late flowering, trichomes often increase in number and become more noticeable. This is one reason buds can look “sparkly” under light.
Pistil color changes:
Many pistils stop being bright white. They may turn orange, brown, or red, depending on the strain. Some pistils may curl inward. This is a common sign the plant is moving toward harvest time, but it is not the only sign.
What you should notice:
- Buds look frosty and sticky
- Pistils begin changing color
- Growth slows compared to mid flowering
- The plant may drink water differently than before
Weeks 9–12: Final Ripening (Strain Dependent)
What is happening:
Not all strains go this long, but many do. This phase is about finishing and ripening, not just getting bigger.
Bud swelling:
Buds may still get larger, but changes can be slower. Some strains “swell” in the final weeks, meaning buds gain weight and density. This swelling can be easy to miss day to day, but noticeable over a week.
Trichome color shift (clear → cloudy → amber):
Trichomes change as the plant ripens. You usually need a magnifier to see them clearly. In simple terms:
- Clear often means the plant is not fully mature yet.
- Cloudy often means peak maturity for many growers.
- Amber often means a more “late” harvest effect, depending on goals.
Different strains show different patterns. Also, trichomes on sugar leaves can change faster than trichomes on the buds themselves, so it is best to check the bud surface.
Preparing for harvest:
As the plant finishes, you may see:
- Slower water use
- Leaves yellowing as the plant uses stored resources
- Buds feeling firm and heavy
- Fewer new white pistils appearing
Some leaf color change late in flowering can be normal, but sudden damage, spots, or mold is not normal and should be handled fast.
Cannabis flowering follows a steady path: first the plant stretches (weeks 1–2), then it builds early buds and starts resin (weeks 3–4), then it puts on major bud size and smell (weeks 5–6), and finally it ripens with heavy trichomes and changing pistils (weeks 7–12). By tracking these week-by-week changes, you can tell if your plant is on schedule, spot issues earlier, and make better choices as harvest gets closer.
How Do Cannabis Buds Develop During Flowering?
Cannabis buds form and grow during the flowering stage. This is the time when the plant shifts its energy away from making new leaves and stems and starts building flowers. These flowers are what many people call “buds.” Bud development follows a clear pattern. If you understand what is happening inside the plant, it is easier to spot normal changes and also easier to notice problems early.
The role of pistils and calyxes
When flowering starts, you will usually see small white hairs at new growth points. These hairs are called pistils. Pistils are part of the female flower. Their job in nature is to catch pollen. In home growing, pistils are helpful because they are an early sign that the plant is flowering.
Under and around the pistils are small tear-shaped parts called calyxes. The calyx is the main building block of the bud. As flowering continues, more calyxes form and stack together. This stacking is what makes buds look thicker over time. A bud is not one single flower. It is a cluster of many calyxes grouped closely together, with pistils coming out from many spots.
As weeks pass, pistils often change color. They usually start white, then turn cream, orange, red, or brown. This color change can be a sign the bud is maturing, but it is not the only sign. Some strains keep white pistils late into flowering, especially if the plant is stressed or if it keeps growing new flower parts.
Trichome development and resin production
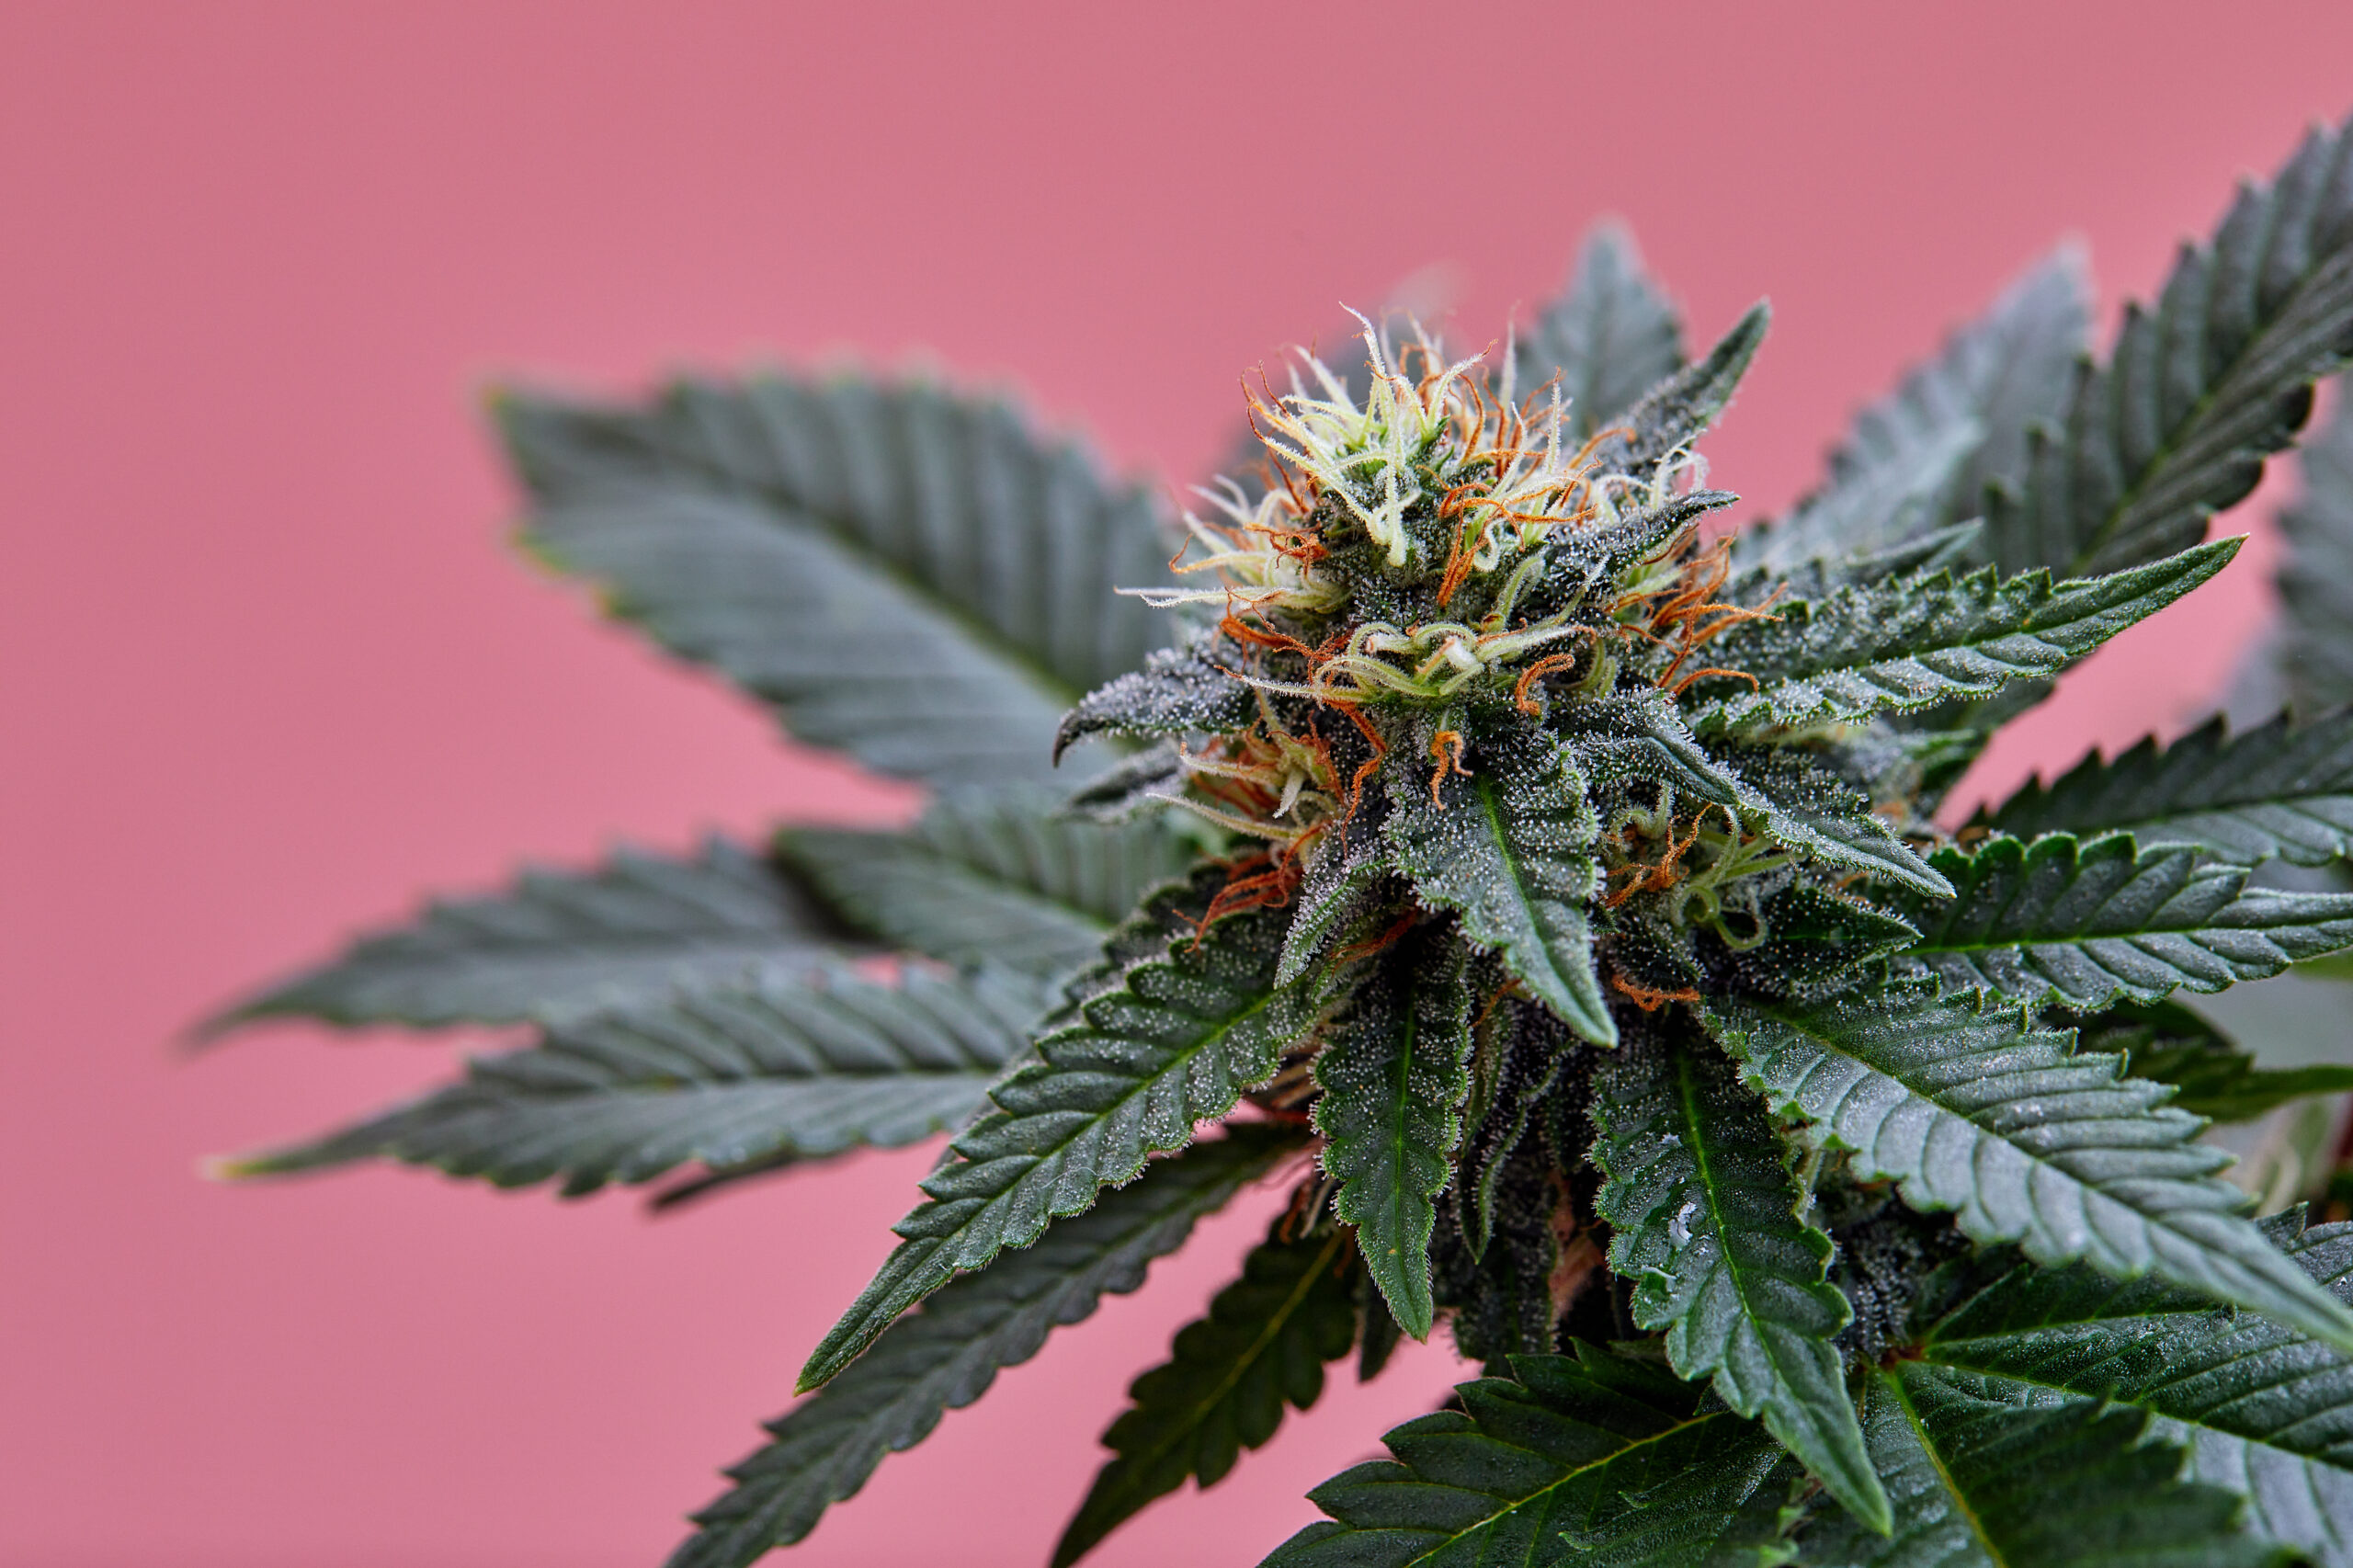
As buds form, the plant begins making trichomes. Trichomes are tiny, crystal-like glands that cover the buds and nearby leaves. They look like frost or sugar. Trichomes produce resin. This resin contains cannabinoids and terpenes.
Trichomes do not appear all at once. Early in flowering, you may only see a light “shine.” Then, the buds begin to look more sticky and sparkling. Trichomes also change as they mature. They often start clear, then become cloudy or milky, and later may turn amber. Many growers use trichome color as one of the best signs for harvest timing because it gives a closer look at maturity than pistil color alone.
Resin production can be influenced by the plant’s health and environment. When the plant has steady light, stable temperature, and proper humidity, it can focus on building strong buds and healthy trichomes.
THC and cannabinoid formation
Cannabinoids are natural compounds made by the cannabis plant. THC is one well-known cannabinoid, but it is not the only one. Cannabinoids form inside the trichomes as flowering moves forward. In simple terms, the plant is building more resin and “filling” that resin with active compounds over time.
This is one reason why harvesting too early can lead to weaker results. Early buds may look formed, but the trichomes may not be fully developed. Late in flowering, the buds often gain more resin, stronger smell, and fuller shape. That said, waiting too long can also change the final result, because the trichomes keep aging.
Bud stacking process
“Bud stacking” is when calyxes build on top of each other and buds start to look like solid columns. This usually becomes more noticeable around the middle to late flowering weeks. In early flowering, buds often look like small buttons at the nodes. Later, those small buds begin to connect and thicken.
Bud stacking depends on both genetics and growing conditions. Some strains naturally stack tightly and make dense buds. Others produce looser buds with more space between calyxes. Even with the same strain, stress can slow stacking. Common causes include too much heat, weak light, poor airflow, and nutrition problems.
Environmental factors that influence bud density
Bud density means how compact and heavy the bud is. Several environmental factors influence this:
- Temperature: High heat can cause buds to stay airy and can reduce resin. Cool nights late in flowering may help some strains, but extremes can stress the plant.
- Humidity: High humidity raises the risk of mold and can also reduce bud quality. Lower humidity in late flowering often helps buds finish strong and reduces rot risk.
- Airflow: Good airflow helps control humidity and supports healthy growth. Still air can lead to mold and weak development.
- Plant health: A plant fighting pests, disease, or nutrient issues will often produce smaller, looser buds.
- Root health: Strong roots support strong flowers. Poor drainage, overwatering, or root damage can limit bud growth.
When these factors are stable, the plant can keep building calyxes and trichomes without interruption.
Light intensity and bud structure
Light is one of the biggest drivers of bud growth. The plant uses light to make energy, and that energy is used to build flowers. If light is weak, buds often stay small and airy. If light is strong and well-placed, buds usually grow larger and denser.
Light intensity also affects where the best buds form. Top buds closest to the light often become the biggest. Lower buds may stay smaller because they receive less light. This is why canopy management matters. A more even canopy helps more bud sites get useful light.
Light distance also matters. If a light is too close, it can cause light stress or bleaching on top buds. If it is too far, it may not provide enough intensity. The goal is strong, even light without heat damage.
Cannabis buds develop through a step-by-step process during flowering. Pistils appear first, then calyxes stack together to form the bud shape. Trichomes grow across the buds and produce resin, where cannabinoids and terpenes build over time. Bud stacking and density depend on genetics, but they are also strongly shaped by the environment. Stable temperature, proper humidity, good airflow, healthy roots, and strong light intensity all help buds grow larger, denser, and more mature. When you know what to look for each week, you can support the plant better and catch problems before they reduce bud quality.
What Nutrients Does Cannabis Need During Flowering?
During the flowering stage, a cannabis plant changes how it grows. In the vegetative stage, the plant focuses on making stems and leaves. In flowering, it focuses on building buds. Because the plant’s job changes, its nutrient needs also change. If you feed the same way you did in veg, you may get problems like weak buds, burnt leaf tips, or slow growth.
Below are the key nutrient needs during flowering, explained in a simple, practical way.
Shift from Nitrogen to Phosphorus and Potassium
Cannabis uses three main nutrients the most: nitrogen (N), phosphorus (P), and potassium (K). You will see these as N-P-K on fertilizer labels.
- Nitrogen (N) supports leafy growth. In early flowering, the plant still needs some nitrogen, but usually less than in veg. Too much nitrogen late in flower can cause very dark green leaves, leafy buds, and slower bud ripening.
- Phosphorus (P) supports flower formation and root function. During flowering, the plant uses phosphorus to help build and power new growth at bud sites.
- Potassium (K) supports overall plant health, water movement, and sugar production. Potassium helps the plant move nutrients and water through its tissues. It also supports strong flower development and can help the plant handle stress better.
A common approach is:
- Early flowering: reduce nitrogen slightly, increase phosphorus and potassium.
- Mid to late flowering: keep nitrogen lower, while phosphorus and potassium stay more important.
You do not want to “overdo” phosphorus or potassium. More is not always better. Overfeeding can lock out other nutrients and cause leaf damage.
Why Micronutrients Still Matter
Even though N-P-K gets most of the attention, micronutrients and secondary nutrients are also important in flowering. These include:
- Calcium (Ca): helps build strong cell walls and supports steady growth. A lack of calcium can cause weak new growth and spotting on leaves.
- Magnesium (Mg): helps the plant use light energy because it is part of chlorophyll. Low magnesium can cause yellowing between leaf veins, often starting on older leaves.
- Sulfur (S): supports protein building and overall plant function. It is usually present in many base nutrients, but some mixes can be low.
Micronutrients like iron, manganese, zinc, copper, boron, and molybdenum are used in tiny amounts, but they still matter. If your pH is off, these nutrients can become unavailable, even if they are in your feed.
Feeding Schedule Adjustments
A good feeding schedule depends on your growing method (soil, coco, hydro), your plant size, your strain, and your environment. Still, there are simple rules that help most growers:
- Start flowering feeding gradually. When you switch to a bloom nutrient, do not jump to a high dose right away. Plants need time to adjust.
- Feed based on plant response. Watch leaf color, tip burn, and overall vigor. Healthy plants look steady, not overly dark or overly pale.
- Avoid constant heavy feeding. Many problems come from giving too much too often. If your plant is already stressed, heavy feeding usually makes it worse.
- Watering matters as much as nutrients. Overwatering can reduce oxygen in the root zone and slow nutrient uptake, even if the food is correct.
If you are using bottled nutrients, follow the basic chart, but treat it as a starting point. Your plant is the real guide.
Signs of Nutrient Deficiency in Flowering
Deficiencies can show up because you are not giving enough nutrients, because the pH is wrong, or because there is salt buildup that blocks uptake.
Common deficiency signs in flowering include:
- Nitrogen deficiency: lower leaves yellow first and may drop off. Some yellowing late in flower can be normal, but strong yellowing early can be a problem.
- Phosphorus deficiency: slow growth, dull or dark leaves, and sometimes purple stems or leaf coloring (this can also be genetics or cold).
- Potassium deficiency: leaf edges may look burnt or scorched, and leaves may curl. Bud growth can slow.
- Calcium deficiency: brown spots, weak new growth, and leaf damage on newer leaves.
- Magnesium deficiency: yellowing between veins on older leaves, while veins stay green.
The key is to look for patterns. A few spots on one leaf is not always a deficiency. But if the same symptom spreads, you should act.
Overfeeding Risks
Overfeeding is one of the most common flowering problems. It can cause:
- Nutrient burn: leaf tips turn brown and crispy, often starting with bright yellow tips.
- Salt buildup: leftover fertilizer salts collect in the growing medium and make it harder for roots to absorb water and nutrients.
- Nutrient lockout: too much of one nutrient can block others. For example, too much potassium can interfere with calcium and magnesium uptake.
If you think you are overfeeding, the best first step is usually simple: reduce the dose and make sure your watering routine is correct. In severe cases, you may need to flush the medium with plain pH-balanced water to remove excess salts.
Flushing Before Harvest
“Flushing” means watering with plain, pH-balanced water near the end of flowering. People do it for different reasons, but the practical goal is usually to reduce extra fertilizer salts in the medium and help the plant finish cleanly.
Basic flushing guidance:
- When to flush: often in the last 7–14 days, depending on your method and nutrients.
- How to flush: use plain water with correct pH, and allow good runoff if you are in containers.
- What to expect: the plant may fade (leaves yellow) as it uses stored nutrients. Some fade late in flower is normal.
If your plant is still building buds strongly late in flower, do not flush too early. You want the plant to have enough nutrition to finish bud development.
In flowering, cannabis needs a different nutrient balance than in veg. Nitrogen usually goes down, while phosphorus and potassium become more important for bud growth. Calcium and magnesium still matter and can cause major problems if they run low. A smart feeding plan is steady and careful, not aggressive. Watch for deficiency signs, avoid overfeeding, and keep watering and pH consistent so the roots can absorb what the plant needs. In the final stretch, flushing can help reduce excess salts and support a smoother finish before harvest.
What Is the Best Light Schedule for Flowering Cannabis?
Light is one of the biggest drivers of cannabis flowering. The plant uses light and darkness as signals. When the signal is correct, the plant shifts from making leaves and stems to making flowers (buds). If the signal is wrong, flowering can slow down, stop, or become uneven. That is why a good light schedule matters so much.
The 12/12 light cycle explained
For most photoperiod cannabis plants, the most common flowering schedule indoors is 12 hours of light and 12 hours of darkness, often written as 12/12. This schedule copies what happens outdoors when days get shorter near the end of summer. When the plant “reads” longer nights, it begins flowering.
A typical 12/12 schedule might look like this:
- Lights on: 7:00 a.m. to 7:00 p.m.
- Lights off: 7:00 p.m. to 7:00 a.m.
The exact times do not matter as much as the consistency. Pick times you can keep every day. Many growers choose light hours that match when they are awake, so they can check the plants and equipment more easily.
Some people try different schedules like 11/13 or 10/14 to push flowering faster. These can work in certain cases, but they also reduce the total daily light the plant receives. Less light can mean smaller yields. For most growers, 12/12 is the simplest and most reliable choice.
Why complete darkness is important
Darkness is not just “rest time.” For flowering cannabis, darkness is part of the trigger. During the dark period, the plant completes internal processes that support bud growth. If the dark period is interrupted, the plant can get confused.
Even small light leaks can cause problems, especially over time. Common sources of light leaks include:
- LEDs from power strips, fans, or timers
- Light coming under a door
- Light from a window, streetlamp, or hallway
- Cracks in a tent zipper or vent opening
If light enters during the “night” period, the plant may:
- Flower more slowly
- Produce airy buds
- Show stress signs like curling leaves
- In some cases, develop male parts (hermaphroditism), which can lead to seeds
To protect the dark period, aim for total darkness. A simple test is to sit in the grow space during lights-off for a few minutes. If you can see your hand clearly, it is not dark enough. Cover or move any light sources. Use blackout material if needed.
LED vs HPS lighting considerations
The light schedule works with both LED and HPS, but the lights behave differently.
LED lights are popular because they:
- Use less electricity for the same brightness
- Run cooler than HPS
- Can be placed closer to the canopy in many setups
- Often provide a full spectrum that supports flowering
HPS lights (high-pressure sodium) are also common in flowering because they:
- Produce strong intensity and good penetration
- Have a warm spectrum that many people associate with dense buds
- Can work well in larger rooms
The biggest difference for schedule planning is heat. HPS lights create much more heat. If your room overheats, your plants may suffer and you may need stronger ventilation. Some growers run lights at night when the air is cooler. That helps keep temperatures stable. LEDs still create heat, but usually less, so temperature control is often easier.
No matter which light you use, the main rule is the same: keep 12 hours on and 12 hours off, without interruptions.
Light leaks and flowering interruption
Light leaks do not always cause obvious damage right away. Sometimes the plant looks “fine,” but buds stay small or take longer to ripen. Other times, the plant may stretch more than expected or start growing new leaves from the buds.
To reduce light leak risks:
- Use a quality grow tent or seal your room carefully
- Tape over bright LEDs on equipment
- Use a timer with a battery backup if power flickers are common
- Avoid opening the grow space during the dark period
- If you must enter, use a very dim green headlamp (still not ideal, but better than white light)
Also, make sure your timer is accurate. A timer that drifts over days can slowly change the light cycle. That can stress plants too. Digital timers are often more precise than cheap mechanical ones.
Light intensity and distance
The light schedule is about hours, but intensity and distance affect how much energy the plant gets during those hours. If the light is too weak, buds may be small or airy. If the light is too strong or too close, leaves can bleach or burn.
General tips:
- Follow the light maker’s hanging height suggestions
- Raise the light if you see bleaching at the top leaves
- Lower the light slowly if plants stretch too much and seem to want more light
- Keep an even canopy so all top bud sites get similar light
If you have a dimmer, many growers increase intensity gradually during early flowering and then hold steady. Sudden big changes can stress plants.
Outdoor flowering daylight cycles
Outdoor cannabis flowers when days naturally shorten. You cannot control sunrise and sunset, but you can plan around them. Outdoor flowering depends on:
- Your location (latitude)
- The season
- The strain and how sensitive it is to day length
Plants usually start flowering when nights become long enough for the strain. Some strains flower earlier, and some later. Weather also matters. Cloudy weeks reduce light and can slow bud growth. High humidity and rain during flowering can increase mold risk, so airflow and spacing become important outdoors.
Some outdoor growers use light at night in early season to prevent flowering too soon, or use blackout covers to force earlier flowering. These are more advanced methods. For many home growers, the best approach is choosing a strain that fits the local season length.
For photoperiod cannabis, 12 hours of light and 12 hours of darkness (12/12) is the best and most reliable flowering schedule. The dark period must be uninterrupted, because even small light leaks can slow flowering, reduce bud quality, and increase stress problems. Both LED and HPS lights can work well, but heat control is often easier with LEDs. Along with a steady schedule, you should manage light intensity and distance to avoid weak buds or light burn. Outdoors, flowering follows natural day length changes, so strain choice and seasonal timing are key. When the schedule is stable and the “night” is truly dark, the plant can focus on building healthy, mature buds.
How Can You Tell When Cannabis Is Ready to Harvest?
Knowing when cannabis is ready to harvest is one of the most important steps in the whole grow. If you harvest too early, buds may be smaller and less developed. If you harvest too late, the plant may lose some freshness and the buds can feel heavier and more sedating. The goal is to harvest when the buds are fully formed and the plant has finished most of its ripening work.
Below are the main signs growers use. You do not need to rely on only one sign. It is best to check several signs together.
Pistil color change
Pistils are the small hair-like strands that stick out from the buds. Early in flowering, pistils are usually white and straight. As the plant matures, many pistils darken and curl inward. They may turn orange, rust, brown, or red, depending on the strain.
A simple way to use pistils as a guide is to watch for a clear shift from “mostly fresh white hairs” to “many darker, curled hairs.” When a large portion of pistils have changed color and curled, it often means the plant is moving into the final ripening stage.
However, pistils are not a perfect harvest signal by themselves. Pistils can darken early if the plant is stressed, if buds are handled a lot, or if the plant is dealing with heat, pests, or dry air. Some strains also keep pushing out new white pistils even when the buds are close to done. This is why pistils should be used as a clue, not as the only answer.
Trichome inspection with magnification
Trichomes are tiny resin glands on the buds and nearby leaves. They look like small crystals or frost. Trichomes matter because they hold most of the cannabinoids and terpenes that affect smell, flavor, and effects.
To check trichomes correctly, you need magnification. A small handheld jeweler’s loupe or a digital microscope helps you see the trichome heads. When you look, focus on the trichomes on the bud itself, not the sugar leaves. Sugar leaves often change faster than the bud and can mislead you.
When you inspect trichomes, you are watching the color and clarity of the trichome heads. This is one of the most reliable ways to judge harvest timing.
Clear vs cloudy vs amber trichomes
Trichomes usually move through three main stages:
- Clear trichomes: These look like glass. Clear trichomes often mean the buds are still developing. Harvesting when most trichomes are clear usually leads to weaker results and less mature buds.
- Cloudy (milky) trichomes: These look white or foggy. Cloudy trichomes often signal peak maturity for many strains. Buds are usually at their best balance when most trichomes are cloudy.
- Amber trichomes: These look golden or brownish. Amber trichomes appear later in ripening. More amber often means a heavier, more relaxing effect for many people.
A common approach is to harvest when most trichomes are cloudy, with some amber mixed in. If you prefer a brighter, more uplifting effect, you might harvest earlier with fewer amber trichomes. If you prefer a stronger body-heavy effect, you might wait longer for more amber. The exact mix can vary by strain, so it helps to take notes each grow.
Bud firmness
As buds mature, they usually get denser and feel firmer when you gently squeeze them. Early buds can feel soft and “fluffy.” Later, they tend to feel thicker and more solid because the calyxes swell and stack.
Bud firmness is helpful, but it is also influenced by genetics. Some strains naturally produce airy buds even when fully mature. Also, buds can feel less firm if the plant has poor light, weak airflow, or high heat. So, use firmness as a supporting sign, not the only one.
When checking firmness, be gentle. Rough handling can damage trichomes and reduce quality.
Final flush timing
A “flush” usually means giving plain, pH-balanced water instead of nutrients near the end of flowering. Many growers do this to reduce excess nutrients left in the growing medium. Some growers believe it improves smoothness and flavor. Others focus more on correct feeding and proper drying and curing. No matter your view, the flush is a timing tool many people use.
If you flush, do not start too early. The plant still needs nutrients to finish bud building. Flushing too soon can slow ripening and reduce yield. Many growers flush close to harvest, often around the last one to two weeks, depending on the setup and the type of medium used.
A practical way to time a flush is to base it on trichomes and overall plant maturity. When trichomes are mostly cloudy and the plant is clearly in late flowering, a flush may fit your plan. Watch the plant’s color and health. Leaves often fade late in flowering, but severe yellowing too early can be a sign you started the flush too soon or the plant is underfed.
Effects of early vs late harvest
Harvest timing changes the final result.
- Early harvest risks: Buds may be smaller, less dense, and less aromatic. Trichomes may still be clear. Effects may feel weaker or “unfinished.”
- Late harvest risks: Buds can become overripe. Trichomes may have a high amber percentage. Effects may feel heavier and more sedating. In some cases, waiting too long can increase the chance of bud rot or mold, especially in high humidity.
- Balanced harvest: Many growers aim for mostly cloudy trichomes with some amber, plus buds that feel firm and look fully formed. This often gives a strong mix of potency, flavor, and yield.
To tell when cannabis is ready to harvest, use several signs together. Watch pistils as a general clue, but rely more on trichomes for accuracy. Use magnification to check trichome heads on the buds, and look for the shift from clear to mostly cloudy, with some amber if you want a heavier finish. Also check bud firmness and overall ripeness, and time any final flush so the plant can still finish building buds. When you combine these checks, you can harvest with more confidence and get better quality, better yield, and more consistent results.
Common Problems During Flowering
Flowering is a high-demand stage for many plants. The plant is trying to build flowers, protect seeds, and produce aromatic compounds. Because so much energy is going into flower growth, problems can show up fast. Many issues also look similar at first, so it helps to know the main categories: mold and fungi, nutrition problems, light and heat stress, pests, and reproductive problems.
Bud rot (Botrytis)
Bud rot is a type of mold that attacks dense flowers. It often starts deep inside a flower where it stays damp and has little airflow. The mold can spread quickly, and it can ruin a large part of the crop before you notice it.
Common warning signs:
- Flowers that suddenly look brown or gray in one spot
- Leaves near the flower that turn yellow and die for no clear reason
- A soft, mushy texture inside the flower
- A musty or “rotting” smell
Why it happens:
- High humidity for long periods
- Poor airflow inside a thick canopy
- Water sitting on flowers (from misting, rain, or condensation)
- Flowers packed tightly, trapping moisture
Bud rot matters because it is not just a quality issue. Mold can be unsafe to breathe in, especially for people with asthma or weak immune systems.
Powdery mildew
Powdery mildew is a fungus that looks like white or light gray dust on leaves. It can also spread onto flowers. It often shows up when airflow is weak and the air is humid, but it can also happen when conditions swing from dry to humid.
Common warning signs:
- White, powder-like spots on leaf tops
- Spots that spread into larger patches
- Leaves that look dull, curled, or weakened over time
Why it happens:
- Humid air and poor circulation
- Crowded plants and shaded leaves
- Big temperature swings between day and night
Powdery mildew can reduce plant strength and lower flower quality. It can also spread to nearby plants if conditions stay the same.
Nutrient burn
Nutrient burn happens when a plant gets more fertilizer salts than it can handle. During flowering, people sometimes increase feeding too quickly, or the plant’s water balance changes and makes nutrients more concentrated at the roots.
Common warning signs:
- Leaf tips turning brown and crispy (“burnt tips”)
- Dark, shiny leaves
- Leaves curling downward in some cases
Why it happens:
- Feeding too strong or too often
- Build-up of salts in the growing medium
- Poor drainage or irregular watering patterns
Nutrient burn is a stress problem. Even mild burn can slow growth and reduce the plant’s ability to finish flowering well.
Nutrient deficiencies
Deficiencies happen when the plant cannot access the nutrients it needs. This can be from not having enough nutrients in the soil, but it can also happen when nutrients are present yet “locked out” due to pH problems or root stress.
Common warning signs:
- Yellowing between leaf veins
- Older leaves fading first (often a mobile nutrient issue)
- Brown spots that spread
- Weak stems or slow flower development
Why it happens:
- Low nutrient supply in the medium
- Root problems (damage, lack of oxygen, disease)
- pH outside the plant’s preferred range
- Overwatering that limits root oxygen
Because many deficiency signs overlap, it is important not to guess based on one leaf. Look for patterns: which leaves are affected first, how fast it spreads, and whether new growth looks healthy.
Light burn
Light burn is stress from too much light intensity or light being too close. During flowering, plants can be more sensitive because the top flowers are closest to the light source.
Common warning signs:
- Bleached or pale tops (lighter than the rest of the plant)
- Leaf edges curling upward (“taco” shape)
- Dry, brittle leaf tips near the top
- Flowers on the top looking faded or less aromatic
Why it happens:
- Light intensity too high for the plant’s stage
- Light placed too close to the canopy
- Poor heat control near the light source
Light burn is different from nutrient burn. Nutrient burn often starts at leaf tips across the plant, while light burn is strongest at the very top.
Heat stress
Heat stress happens when the plant cannot cool itself fast enough. Flowering plants can suffer when temperatures stay high, especially with low humidity or poor airflow.
Common warning signs:
- Leaves drooping during the hottest part of the day
- Edges curling up
- Faster drying of the medium
- Flowers developing a drier look and weaker smell
Why it happens:
- High temperatures for long hours
- Hot spots near lights or near a wall
- Poor ventilation and stagnant air
Heat stress can also make pest problems worse, because some pests reproduce faster in warm conditions.
Humidity problems
Humidity is a major factor during flowering. If humidity is too high, mold risk increases. If it is too low, the plant may lose water too quickly and become stressed.
Common warning signs of high humidity:
- Condensation on surfaces
- Musty smell
- More fungal spotting and mold risk
Common warning signs of low humidity:
- Leaves drying and crisping
- Faster wilting between watering
- Reduced flower expansion in some plants
The main issue is not just the humidity number. It is also how long the plant stays in that condition and how much airflow moves moisture away from leaf and flower surfaces.
Pests during flowering
Pests are common in many flowering crops. Some pests feed on leaves, while others feed on sap or even flowers. Pests can also spread plant diseases.
Common warning signs:
- Tiny dots or “stippling” on leaves
- Webbing (in some mite cases)
- Sticky residue on leaves (honeydew from sap-feeders)
- Chewed edges or holes
- Small insects on leaf undersides
Pests matter during flowering because damage can reduce the plant’s ability to feed developing flowers. Also, dead insects and waste can increase mold risk inside dense flowers.
Hermaphroditism (reproductive stress)
Some plants can develop both male and female reproductive parts under stress. This can lead to unwanted pollination and seed formation, which often lowers flower quality.
Common warning signs:
- Unexpected pollen sacs or “banana-shaped” structures
- Seeds forming inside flowers late in bloom
- Changes that appear after a major stress event
Why it happens:
- Strong stress (light interruptions, heat stress, severe nutrient issues)
- Genetic tendency in some varieties
- Physical damage or unstable conditions
This is often a sign that the plant’s environment or genetics is unstable. It can also affect nearby plants if pollen spreads.
Most flowering problems fit into a few main groups: mold, nutrition stress, light/heat stress, pests, and reproductive stress. Many issues start small and spread fast, especially when flowers are dense and airflow is limited. The safest approach is to watch for early warning signs like unexpected browning, white powdery patches, burnt tips, bleaching at the top, sudden wilting, sticky residue, or unusual flower structures. If you see these signs, it helps to identify the category of the problem first (fungus, pests, stress, or nutrition) before making any changes.
Why Are My Buds Small or Airy?
Small or airy buds are one of the most common problems during flowering. “Airy” means the buds look loose, light, and fluffy instead of thick and firm. This can happen for several reasons. Most of the time, it is not just one cause. It is usually a mix of light issues, genetics, feeding mistakes, stress, or poor growing conditions. Below are the main reasons your buds may not be filling out, plus what they mean in real life.
Insufficient light intensity
Light is the main fuel for bud growth. During flowering, the plant needs strong light to build dense flowers. If the light is too weak, the plant cannot make enough energy. The buds still form, but they do not “pack on” weight. This often shows up as buds that are long and thin, with more space between calyxes (the small tear-shaped parts of the bud). Weak light can happen in a few ways:
- The grow light is not powerful enough for the size of the space.
- The light is too far from the canopy (the top layer of leaves and buds).
- The plant is shaded by other plants, branches, or thick leaves.
- The light is old or not working at full output.
In flowering, the top buds get the most light, so they often look better than lower buds. If only the lower buds are airy, shading is likely the problem. If the whole plant is airy, the light level may be low overall. Strong, even light across the canopy helps buds grow thicker and tighter.
Genetics
Some strains naturally produce lighter buds. Bud shape and density are strongly tied to genetics. Even with perfect care, some plants will grow buds that are less dense. This is common in certain sativa-leaning types that form longer flowers. It is also common in plants grown from random seeds where traits can vary.
Genetics can also affect how a plant responds to stress. Some strains handle heat well. Others get airy buds when temperatures rise. If you keep seeing airy buds with the same strain and the same setup, genetics may be a big factor. In that case, switching to a strain known for dense flowers can make a clear difference.
Poor feeding practices
During flowering, your plant needs the right nutrients at the right time. If feeding is off, buds may stay small. Two common problems are underfeeding and unbalanced feeding.
- Underfeeding: If the plant does not get enough nutrients, it cannot build flower mass. You may also notice pale leaves, slow growth, and weak stems.
- Unbalanced feeding: Too much of one nutrient can block others. For example, too much potassium can reduce the plant’s ability to take up calcium or magnesium. That can lead to poor growth and stress.
Flowering plants usually need less nitrogen than in the vegetative stage, but they still need some. They also need enough phosphorus and potassium to support bud growth. Micronutrients matter too. Calcium and magnesium help with strong cell growth and good plant function. Feeding should match the plant’s stage. Early flower needs support for the stretch and first bud building. Mid to late flower needs stable nutrition so buds can swell.
Temperature stress
High heat is a major reason buds turn airy. When it is too hot, the plant focuses on survival, not flower building. Heat can also make the plant lose water too fast, which can reduce nutrient uptake. Even if you are feeding well, the plant may not use those nutrients when stressed.
Heat stress can show up as leaves curling up at the edges (“taco” leaves), dry leaf tips, or drooping during the hottest part of the day. Buds may look dry, loose, or slow to gain weight. Keeping temperatures stable is important. Big swings between day and night can also stress the plant and slow bud growth.
Improper humidity
Humidity affects how the plant breathes and moves water through its system. If humidity is too high in flowering, the plant may not transpire well, which can slow growth and raise mold risk. If humidity is too low, the plant can dry out too fast and close its leaf pores to protect itself. That can reduce growth and make buds smaller.
In general, humidity should be higher in early flower and lower in late flower. Lower humidity later helps prevent bud rot and supports healthy ripening. Airflow is also part of humidity control. Still, humid air around buds can cause problems even when the room reading looks fine. Good circulation helps remove moist air from the bud zone.
Inadequate root development
Roots are the plant’s foundation. If the root system is weak, the plant cannot feed the buds well. A plant may look “okay” above ground but still fail to produce dense flowers if the roots cannot take in enough water and nutrients.
Root problems often come from:
- Overwatering (roots sit in wet conditions and lose oxygen)
- Poor drainage (soil stays soggy)
- Small containers (roots get cramped and “root bound”)
- Cold root zone (roots slow down in cool conditions)
- Root disease or pests
Healthy roots need oxygen, good drainage, and a stable watering routine. If the roots struggle, bud growth usually slows, and buds can stay airy.
Overcrowding plants
When plants are too close, they compete for light, air, and space. The canopy becomes thick, and lower bud sites get shaded. Airflow drops, humidity rises around buds, and the plant may spend energy stretching to reach light. All of this can reduce bud density.
Overcrowding also makes training and pruning harder. If the grow area becomes a “wall of leaves,” light cannot reach important bud sites. Spacing plants properly and keeping an even canopy helps. Removing some inner growth and improving airflow can also help buds develop better.
Small or airy buds usually come from low light, strain genetics, feeding issues, heat or humidity stress, weak roots, or overcrowding. To fix it, focus on the basics: strong and even light, stable temperatures, correct humidity, balanced feeding, healthy roots, and enough space with good airflow. When these conditions improve, buds usually become denser and heavier by the middle and late flowering weeks.
How to Increase Yield During Flowering
Increasing yield during flowering is mostly about helping the plant use its energy well. In this stage, the plant is building buds, resin, and aroma. Small mistakes can reduce bud size and density. The goal is to keep the canopy healthy, keep light hitting the right areas, and prevent stress that slows bud growth.
Proper canopy management
Canopy management means shaping the top of the plant so light spreads evenly. A flat, even canopy helps every bud site get strong light, not just the tallest tops. If one or two branches grow much higher than the rest, they can block light from the middle and lower parts of the plant. Those shaded buds often stay small and airy.
A simple way to manage the canopy is to keep your plant tops at a similar height. You can do this with gentle bending, tying, or plant supports. You can also rotate plants (if they are in pots) so all sides get light. When the canopy is even, the plant can produce more “top-quality” bud sites, instead of only a few large colas.
Also, keep your canopy “open” enough for air to move through it. Crowded leaves can trap humidity, which raises the risk of mold in late flowering. Good airflow can protect yield because it reduces disease pressure.
Pruning and defoliation timing
Pruning and defoliation can improve yield, but timing matters. Pruning is removing small branches or weak growth. Defoliation is removing some leaves, usually large fan leaves, to improve light and airflow.
If you remove too much at once, the plant can get stressed and slow down bud growth. A safer method is light, planned removal. Many growers remove only the leaves that are clearly blocking important bud sites or stopping airflow. Another common approach is to clean up the lowest growth that will never reach good light. This is sometimes called “lollipopping,” where you remove small lower shoots so the plant focuses energy on the top bud sites.
Try to avoid heavy defoliation late in flowering. In the final weeks, the plant uses its leaves to make energy. Taking too many leaves near harvest can reduce bud swelling and slow ripening. If you do remove leaves late, keep it minimal and only remove leaves that are dying, damaged, or creating a high humidity pocket.
Training techniques (Low Stress Training and SCROG)
Training helps you control shape and light exposure. Two common methods are Low Stress Training (LST) and Screen of Green (SCROG).
Low Stress Training (LST) means gently bending and tying branches to spread the plant wider. This creates more “tops” and keeps them at the same height. When more bud sites sit in strong light, you often get more total yield. LST is best started before flowering or in early flowering, because branches get stiffer as buds grow.
SCROG (Screen of Green) uses a net or screen above the plants. You guide branches under the screen so the canopy becomes flat and wide. SCROG is useful in small indoor spaces because it turns a few plants into an even “field” of bud sites. The key with SCROG is daily attention during the stretch (early flowering). As the plant grows, you keep tucking and spreading branches until the screen is mostly filled. After the stretch ends, you stop bending too much to avoid snapping heavy branches.
Training should always be gentle. If you bend too hard and break a branch, the plant must spend time healing instead of building buds. Use soft ties, move slowly, and support heavy flowering branches with stakes or a trellis when needed.
Optimizing airflow
Airflow protects yield by reducing mold, mildew, and pest problems. It also helps the plant handle heat. Good airflow has two parts: movement inside the canopy and fresh air exchange in the room.
Inside the canopy, use an oscillating fan to move air across leaves and between branches. You do not want a strong wind that makes the plant constantly bend. You want a light, steady movement. Fresh air exchange matters too, especially indoors. Exhaust fans and filters can remove warm, humid air and bring in fresh air.
Good airflow also supports stronger stems. Strong stems hold heavy buds better, which can prevent branches from leaning, folding, or snapping late in flowering.
Maintaining ideal temperature and humidity
Temperature and humidity control is one of the most reliable ways to improve yield. If it is too hot, plants can stop pushing new growth in buds. If humidity is too high, buds may trap moisture and develop bud rot.
A common target range in flowering is about 20–28°C (68–82°F), depending on your strain and lighting. Many growers aim for slightly cooler temperatures in late flowering to protect terpene aroma and reduce mold risk. Humidity usually works best when it starts moderate and then drops as buds get denser. For example, you might aim for around 40–55% relative humidity in mid flowering, then closer to 35–45% in late flowering. These are general ranges, not strict rules. The safer approach is to watch your plants and prevent moisture from staying trapped in thick buds.
Also, avoid large swings between day and night conditions. Big changes can stress plants and slow bud development. Use a thermometer and hygrometer at canopy level so you measure what the plant actually feels.
Carbon dioxide (CO₂) supplementation basics
CO₂ can increase yield, but only when other factors are already strong. CO₂ helps plants use light and nutrients more efficiently. However, it works best in a controlled environment with strong lighting, good feeding, and stable temperature and humidity. If your light is weak or your environment is unstable, adding CO₂ may not help much.
CO₂ is usually used in sealed or semi-sealed grow spaces where you can keep the gas from escaping too fast. Safety is important. Too much CO₂ can be dangerous to people in a small room. If someone uses CO₂, they should follow product instructions and use proper monitoring. Many growers skip CO₂ because they can get good yields by improving light, airflow, and environment first.
To increase yield during flowering, focus on the basics that directly support bud growth: create an even canopy so light spreads well, use careful pruning and defoliation so the plant is not stressed, and apply gentle training like LST or SCROG to increase the number of strong bud sites. Protect your buds with good airflow and stable temperature and humidity, especially in late flowering when buds are thick and mold risk is higher. CO₂ can help in advanced setups, but most yield gains come from strong lighting, smart plant shape, and clean environmental control.
Ideal Environmental Conditions for Flowering
The flowering stage is when cannabis plants build buds, resin, and strong aroma. During this time, the environment matters as much as light and nutrients. If the room is too hot, too humid, or has weak airflow, buds can grow slowly and problems like mold can spread fast. The goal is to keep conditions steady and predictable, especially during the last half of flowering when buds are thick and more likely to trap moisture.
Recommended temperature range
Most flowering plants do best when the temperature stays in a comfortable band.
- Daytime temperature (lights on): Many growers aim for about 22–28°C (72–82°F).
- Night temperature (lights off): A small drop is normal, often around 18–22°C (65–72°F).
Try not to let the day and night temperatures swing too much. Big swings can stress the plant and may slow bud growth. Very high heat can also reduce resin production and cause buds to dry out too fast. If your canopy (top of the plant) feels warmer than the rest of the room, the light may be too close or the airflow may be weak.
Common heat stress signs in flowering:
- Leaves curl upward like a taco shape
- Leaf tips look dry or burnt
- Buds feel “crispy” on the outside
- Aroma becomes weaker or “flat”
If heat is an issue, focus on better exhaust, stronger intake, and keeping the light at a safe distance.
Ideal humidity levels (and how they change by week)
Humidity is one of the biggest causes of flowering problems. When buds get larger, they hold water inside them. If the air is too humid, moisture stays trapped and mold can begin without warning.
A simple way to set humidity is by flowering phase:
- Early flowering (weeks 1–3): 45–55% RH
Plants are still stretching and buds are small. This range supports healthy growth without being too wet. - Mid flowering (weeks 4–6): 40–50% RH
Buds start stacking and thickening. Lower humidity helps prevent mildew and bud rot. - Late flowering (weeks 7+): 35–45% RH
Buds are dense and sticky. This is the highest-risk time for mold, so keep humidity lower.
If you live in a humid area, you may need a dehumidifier during flowering. Also remember that humidity often rises right after lights turn off, because the room cools and holds less moisture. That is a common time for mold to start. A dehumidifier or strong exhaust during lights-off can help.
Air circulation and ventilation
Air movement does two main jobs: it brings fresh air to the plant and it removes warm, wet air from the grow space. You want gentle leaf movement, not a strong wind that dries out the plant.
- Oscillating fans: Use them to move air around the room and across the canopy.
- Exhaust system: Pulls out hot, humid, stale air.
- Intake air: Brings in fresh air to replace what the exhaust removes.
Good airflow also helps keep temperature and humidity even across the whole canopy. Without it, you can have “hot spots” near the light and “wet pockets” inside thick plants. Those wet pockets are where mildew and bud rot can start.
A helpful habit is to check airflow inside the plant. If the center is packed with leaves and you cannot feel any air movement, you may need to thin out some foliage or adjust fan angles.
Preventing mold
Mold is a top flowering concern because it can destroy buds quickly. Bud rot often starts inside the densest part of a cola, where it is hard to see. Prevention is easier than fixing it later.
Key mold prevention steps:
- Keep humidity in the correct range, especially late flowering
- Maintain steady airflow around and through the canopy
- Avoid overwatering and let the medium dry properly between waterings
- Keep the grow area clean: remove dead leaves and plant debris
- Check plants often, especially after humid days or temperature drops
Also, do not let water sit on buds. If you spray anything during flowering, do it carefully and avoid soaking flowers.
Managing odor
Flowering plants can smell strong, especially in mid to late flowering. Odor control is not only about comfort. It can also connect to ventilation, because better exhaust removes odor and humidity at the same time.
Common odor management tools:
- Carbon filter + exhaust fan: Most effective for indoor grows
- Sealed tent or room: Helps keep odor controlled and contained
- Negative pressure: The tent pulls inward slightly, so air goes through the filter instead of leaking out
Avoid using heavy sprays or “masking” products in the grow space. Many of these can stick to buds or irritate plants.
Monitoring tools (thermometer, hygrometer)
You cannot control what you do not measure. The basic tools are simple, but they prevent many problems.
- Thermometer: Tracks temperature.
- Hygrometer: Tracks humidity (RH).
- Min/Max memory feature: Shows the highest and lowest readings since the last reset. This helps you catch nighttime humidity spikes and daytime heat peaks.
- Probe placement: Put sensors near the canopy level, not on the floor. Conditions at the top of the plant are what matter most.
You can also place a second sensor lower in the grow area to see if there is a humidity pocket below the canopy.
Ideal flowering conditions come down to stability: steady temperature, controlled humidity, and strong but gentle airflow. Aim for warm days, slightly cooler nights, and lower humidity as buds get bigger. Good ventilation reduces heat, moisture, and odor at the same time. Finally, use a thermometer and hygrometer at canopy level so you can spot problems early. When the environment stays balanced, buds develop with better density, stronger aroma, and fewer common flowering issues.
Cannabis Flowering Indoors vs Outdoors
Flowering cannabis indoors and flowering cannabis outdoors can both work well, but they are not the same. The main difference is control. Indoor growers can control light, temperature, humidity, and airflow. Outdoor growers rely on the sun and the season, which can change fast. To choose the best option, it helps to understand how each setting affects timing, plant health, and bud quality.
Environmental control differences
Indoors, you set the conditions. You choose the exact light schedule, which matters most for photoperiod plants. When you switch to a 12 hours on / 12 hours off light cycle, you tell the plant to start flowering. You can also keep a steady temperature and humidity level. This makes it easier to prevent stress that can slow bud growth.
Outdoors, nature sets the schedule. Cannabis starts flowering when days get shorter and nights get longer. This happens later in the summer in many places. You cannot stop heat waves, cold nights, or heavy rain. Wind, insects, and nearby plants can also affect your crop. Some outdoor seasons are easy. Others can be very hard.
Seasonal outdoor flowering timelines
Outdoor flowering depends on daylight length. In general, photoperiod cannabis begins flowering when the plant receives long, consistent nights. Many strains start flowering in late summer and finish in early to mid fall. The exact timing changes by region and strain type. Some strains finish faster, while others need more weeks of warm weather.
Autoflower plants are different. They do not need shorter days to flower. They usually start flowering based on age, often a few weeks after sprouting. That makes autoflowers popular outdoors in places with short summers, or for growers who want more than one harvest season.
Risks of rain and mold outdoors
Rain is one of the biggest outdoor flowering risks. As buds get bigger, they become thick and hold moisture. When water sits inside the bud, mold can grow. Bud rot can start deep in the flower where you cannot see it at first. High humidity and cool nights make this more likely.
Outdoor growers can lower this risk by improving airflow, spacing plants apart, and pruning crowded branches. Some people use simple covers during heavy rain, like a clear roof that still allows air to move around the plant. Picking strains with looser bud structure can also help in wet climates. Checking buds often during late flower is important because mold can spread quickly.
Indoor precision advantages
Indoors, you can create a stable flowering space. You can keep the room warm enough for steady growth and cool enough to protect terpenes and resin. You can also control humidity. This is very important during late flowering, when high humidity can cause mold.
Another indoor advantage is lighting. Strong, even light helps buds develop across the whole plant. Indoors, you can keep light at the right distance to avoid light burn while still pushing good bud growth. You also control the dark period. This matters because light leaks during the “night” can confuse photoperiod plants and lead to slow flowering, stress, or unwanted traits.
Indoor growing also helps with pest control. Pests can still show up indoors, but you can reduce the risk by keeping a clean space, using filters, and checking plants often. Outdoors, pests are part of the environment and can be harder to manage.
Yield comparisons
Yield depends on many things, not just indoor or outdoor. Outdoors, plants can grow very large because the sun is powerful and the root space can be huge if planted in the ground. In a good season, outdoor plants can produce heavy harvests.
Indoors, plants are usually smaller, but the harvest can be more consistent. Because you control conditions, you can avoid many weather problems that reduce yield outdoors. Indoor growers can also run multiple harvests per year by controlling the light cycle. Outdoors, most photoperiod plants follow one main season.
A simple way to think about it is this: outdoor yields can be bigger in the best cases, but indoor yields are often more predictable.
Security considerations
Security is a practical issue, especially during flowering when plants smell stronger and are more noticeable. Indoors, plants are hidden and easier to protect. You can control access to the grow area and reduce odor with proper ventilation and filters.
Outdoors, plants can attract attention from neighbors, animals, and thieves. They can also be damaged by strong winds or storms. If someone is growing outdoors, it helps to choose a private location, use natural visual barriers, and protect plants from animals with fencing. Odor outdoors can travel far in late flower, so location matters.
Indoor flowering gives you control over light, climate, and plant stress, which can lead to steady bud development and fewer surprises. Outdoor flowering can produce large plants and strong harvests, but it depends on the season and carries higher risks from rain, mold, pests, and visibility. The best choice comes down to your climate, your space, and how much control you need during the most important stage: flowering.
Autoflower vs Photoperiod Flowering Differences
Cannabis plants fall into two main types when it comes to flowering: autoflower and photoperiod. The biggest difference is what makes them start flowering. That one difference changes how you plan light, time, and care. If you understand these basics, it becomes much easier to avoid common mistakes and get better buds.
Flowering triggers
Photoperiod cannabis starts flowering based on the light schedule. Outdoors, this happens when days get shorter as the season changes. Indoors, growers usually “flip” the plant into flowering by changing the lights to 12 hours on and 12 hours off (often called “12/12”). The dark period matters. Photoperiod plants need long, consistent darkness to stay in flowering. If the dark time keeps getting interrupted, the plant can get confused, slow down, or even produce unwanted growth.
Autoflower cannabis is different. It starts flowering mostly based on age, not the light schedule. Many autoflowers begin flowering a few weeks after sprouting, even if they get long days of light. This comes from genetics linked to Cannabis ruderalis, which evolved in places with short seasons. The plant is designed to finish fast without needing a seasonal light change.
Timeline comparison
Photoperiod plants usually have two separate clocks: the vegetative (veg) time you choose, and the flowering time the strain needs. That means the total grow time depends on you. For example, you might veg for 4 to 8 weeks, then flower for 8 to 10 weeks. Some strains need longer flowering times, especially certain sativa-leaning types.
Autoflowers run on a more fixed schedule. Many finish in about 8 to 12 weeks from seed, depending on the genetics and conditions. You do not “flip” them the same way. They often have a short veg stage, then they move into flowering quickly. Because of this, autos are often chosen by growers who want a faster harvest or who have limited space and time.
Yield potential
In general, photoperiod plants can produce larger yields, especially indoors, because you control how long they stay in veg. Longer veg time usually means a bigger plant with more branches and more bud sites. You can shape the plant and build a wide canopy before flowering begins. This gives the plant more “structure” to hold bigger flowers later.
Autoflowers can still yield well, but they have limits. Since their veg stage is short, they have less time to build a large frame. That often means a smaller plant and fewer bud sites. Great lighting, good airflow, and strong genetics can improve results, but autos usually do not match the largest photoperiod harvests in the same setup.
That said, autos can be efficient. Some growers like that they can run more than one cycle per year outdoors, or stagger plants indoors for frequent harvests. The “best” yield depends on your goals: one big harvest (often photoperiod) or faster repeat harvests (often autoflower).
Light schedule flexibility
Photoperiod plants are less flexible with flowering light schedules. Indoors, once you start flowering, you usually keep a strict 12/12 schedule until harvest. A steady dark period is important. Light leaks from doors, tents, windows, or equipment can cause problems like slow flowering or stress.
Autoflowers are more flexible. Many growers keep autos on 18/6 (18 hours on, 6 off) or even 20/4 through the whole grow. Some use 24 hours of light, though many growers still prefer giving plants a dark break. The key point is that autos do not need 12/12 to flower, so you can keep longer light hours to support growth and bud building.
This flexibility can be helpful if you are growing in a space where you cannot fully control darkness. It is also useful if you want to grow autos and photoperiod plants at the same time. Just remember: photoperiod plants will not flower properly without the right dark period.
Common mistakes with autoflowers
Autoflowers are simple in some ways, but they can be easy to mess up because of their short timeline. Here are common mistakes that lower yields:
- Transplant shock
Autos do not have extra time to recover from stress. If you transplant late or damage roots, the plant may stay small. Many growers start autos in their final pot to avoid this. - Too much stress from training
Hard topping, heavy pruning, or strong bending can slow an auto down. Some gentle low-stress training (LST) may work, but it must be done early and carefully. - Overfeeding
Autos can be sensitive to strong nutrients. Too much fertilizer can cause burned tips and slow growth. Start light and increase only if the plant shows it needs more. - Wrong watering habits
Overwatering is common, especially in large pots. Wet soil with low airflow can reduce oxygen around roots. Let the pot dry enough between waterings so roots can breathe. - Poor lighting or weak intensity
Because autos have less veg time, they need good light early to build size. Weak lighting in the first weeks can lead to small plants and airy buds later. - Trying to “fix” problems too late
Since autos move fast, waiting too long to correct pH, nutrients, or environment can hurt the whole run. Small issues can become big quickly.
Photoperiod plants flower based on the light schedule, so you control when flowering begins and how big the plant gets before the flip. They often produce bigger yields, but they require strict dark periods during flowering. Autoflowers flower based on age, so they are faster and more flexible with light, but they have less time to recover from stress and may stay smaller. If you want maximum control and bigger harvest potential, photoperiod is often the better fit. If you want speed, simplicity, and flexible lighting, autoflowers can be the smarter choice.
Late Flowering Care and Pre-Harvest Preparation
Late flowering is the final stretch before harvest. This is when buds finish swelling, resin builds up, and the plant slows down. Small mistakes here can lead to mold, harsh smoke, or lower quality buds. The goal is simple: keep conditions stable, protect buds, and prepare for a clean harvest and dry.
Final nutrient adjustments
In late flowering, the plant usually needs less nitrogen and more focus on finishing. Many growers reduce “grow” nutrients and stick to a bloom-focused mix if they are feeding. Avoid big changes. Sudden swings in strength can stress the plant and slow ripening. Watch the leaves:
- Some yellowing is normal as the plant uses stored nutrients.
- Dark green leaves with clawing can suggest too much nitrogen.
- Burnt leaf tips can mean the feed is too strong.
If you use bottled nutrients, keep the last weeks simple. The plant is not trying to build more stems and leaves. It is focused on finishing flowers.
Flushing practices explained
Flushing means giving plain water near the end, instead of nutrients. People flush for different reasons, but the main idea is to reduce leftover salts in the medium and help the plant finish naturally. How you flush depends on your setup:
- In soil, flushing often starts 7–14 days before harvest.
- In coco, flushing is usually shorter because nutrients move faster.
- In hydro, changes can happen quickly, so flushing time can be shorter.
If you flush, use pH-correct water. Watch how the plant responds. Leaves may fade faster. That can be normal late in bloom. The key is not to overwater. Wet roots in late flower can raise humidity and increase mold risk.
Reducing humidity in the final weeks
Humidity control is one of the most important jobs in late flowering. Thick buds hold moisture inside, and that moisture can turn into mold. Lower humidity helps protect the harvest. A simple target many growers use is:
- Mid flower: around 45–55% RH
- Late flower: around 40–50% RH (sometimes lower if buds are very dense)
Also keep temperatures steady. Warm, humid air is a common cause of bud rot. Use a dehumidifier if needed, and make sure air moves through the canopy. Do not point a strong fan directly at buds at close range, because it can dry out one spot and stress the plant. Instead, aim for gentle, consistent airflow.
Checking trichomes daily
Trichomes are tiny resin glands. They change as the plant ripens. This is one of the best ways to judge harvest timing. Use a jeweler’s loupe or a small handheld microscope. Look at trichomes on the buds, not the sugar leaves, because leaves can ripen faster.
Common trichome stages:
- Clear: not ready yet, effects tend to feel lighter
- Cloudy/milky: peak potency for many strains
- Amber: more mature, effects often feel heavier
Check more than one bud and more than one spot. The top buds may ripen faster than lower ones. If the plant is uneven, you can harvest in stages (top first, lower later).
Supporting heavy branches
Late flowering buds can get heavy and make branches bend or snap. A broken branch can reduce yield and invite infection. Support keeps buds safe and improves airflow. Good support options include:
- Plant stakes and soft ties
- Trellis netting (SCROG-style support)
- Yo-yo hangers for single heavy colas
Tie gently. Do not pinch stems hard in late flower. The plant has less time to recover from damage.
Preparing the drying are
Drying is part of harvest quality. If the drying space is not ready, buds can dry too fast, get moldy, or smell wrong. Before harvest, set up:
- A dark space (light can degrade quality)
- Gentle airflow (not blowing directly on buds)
- Clean hanging lines or drying racks
- A thermometer and hygrometer
A common drying goal is a slow, steady dry. Many people aim for a cool room with moderate humidity to avoid overdrying. Also plan for odor control if needed, like a carbon filter. Clean the room first. Dust and dirty air can stick to sticky buds.
Late flowering is about stability and protection. Keep feeding simple, avoid big nutrient changes, and prevent stress. If you flush, do it carefully without overwatering. Lower humidity and keep airflow steady to reduce mold risk. Check trichomes daily to choose the right harvest window. Support heavy branches so buds do not break or collapse. Finally, prepare your drying space ahead of time so you can harvest and dry smoothly. A calm, controlled finish is one of the best ways to protect yield and quality.
Conclusion: Mastering the Cannabis Flowering Stage
Flowering is the stage where a cannabis plant shifts from making leaves and stems to making buds. If you want strong, healthy buds, the flowering stage needs steady care from start to finish. The main idea is simple: keep the light cycle correct, keep the environment stable, feed the plant the right way, and watch for problems early. When these pieces stay in balance, the plant can focus its energy on building dense buds with healthy trichomes.
The first key to flowering success is understanding the timeline. Flowering often lasts about 6 to 12 weeks for many photoperiod strains, but the exact length depends on genetics and growing conditions. Some plants finish faster, and some need more time to fully ripen. Early flowering often starts with a “transition” period, where the plant stretches and grows taller. This is normal. It can look like the plant is still in the vegetative stage, but it is preparing its structure to hold buds. After that, bud sites begin to form, and you will see more pistils. As weeks pass, buds grow thicker, resin increases, and the smell becomes stronger. Late flowering is the ripening stage, when trichomes mature and bud size and weight can improve. Knowing this week-by-week pattern helps you avoid panic. For example, small buds in early flowering are normal. Buds usually “stack” and swell more as flowering progresses.
Light control is another major factor. For photoperiod plants, the most common indoor schedule is 12 hours of light and 12 hours of darkness. The darkness period needs to be uninterrupted. Light leaks can confuse the plant and may slow bud development or increase the risk of hermaphroditism in sensitive genetics. Indoors, you can control this with a reliable timer and careful sealing of the grow space. Outdoors, the plant flowers as daylight shortens naturally. Autoflowers are different because they flower mostly based on age, not light schedule, but they still need good light strength to build strong buds. No matter the type, the plant needs enough light intensity to power bud growth. Weak light often leads to airy buds and lower yields.
Bud development also depends on what the plant is building. Buds are made up of calyxes and pistils, and they become coated with trichomes. Trichomes are where many cannabinoids and terpenes collect. As flowering moves along, the plant increases resin production to protect the flowers. This is why late flowering often shows a big jump in “frostiness.” Bud shape and density are affected by genetics, but also by environment and light. Good airflow, correct humidity, and proper spacing help buds form with less risk of mold.
Nutrition during flowering should match the plant’s needs. In general, the plant uses less nitrogen than it did in the vegetative stage, and it needs more phosphorus and potassium to support flower formation. Many growers switch to a bloom-focused feeding plan during early flowering, but it is important not to overfeed. Overfeeding can cause nutrient burn, which often shows as brown or crispy leaf tips and can slow growth. Deficiencies can also appear, especially with calcium and magnesium, depending on water type and growing medium. The goal is steady feeding, not extreme feeding. When the plant is healthy, leaves stay mostly green, bud growth stays consistent, and the plant does not look stressed.
Environmental control ties everything together. Temperature and humidity have a direct impact on bud quality and plant health. High heat can stress plants and reduce bud density. High humidity during mid to late flowering raises the risk of bud rot and powdery mildew, especially when buds are thick. Airflow matters because still air allows moisture to sit on the flowers. A good setup usually includes ventilation and fans to move air across the canopy, plus a way to measure temperature and humidity. Monitoring is not optional in flowering. A small problem can turn into a harvest-ending problem if you miss it for a week.
Common flowering problems should be handled quickly and calmly. Bud rot often starts inside dense buds, where moisture gets trapped. Powdery mildew can spread across leaves and lower bud quality. Light burn can happen when lights are too close or too strong. Heat stress can cause curling leaves and slow growth. Nutrient problems can look similar to each other, so it helps to change only one thing at a time and then observe the plant. Pests can still be an issue in flowering, and prevention is safer than trying to fix a large infestation late in the cycle. Another serious risk is hermaphroditism, where a plant develops male pollen parts due to stress or genetics. This can lead to seeds in buds, which many growers want to avoid.
Many people worry most about small or airy buds. The most common reasons are not enough light, weak genetics for dense buds, poor environment control, and feeding mistakes. Crowded plants can also block light from reaching lower bud sites, which leads to small buds and uneven development. Training and canopy management can help by improving light coverage and airflow. Techniques like gentle bending, net training, and careful defoliation can open up the canopy. However, heavy stress late in flowering can backfire, so timing matters. The goal is to make the plant’s energy use efficient, not to shock the plant.
Finally, harvest timing is where patience pays off. You can watch pistils change color, but trichomes give a clearer signal of ripeness. Trichomes often shift from clear to cloudy and then to amber as they mature. Buds may also feel firmer and look more swollen in the final weeks. Many growers also prepare for harvest by adjusting feeding and controlling humidity more strictly in late flowering. Supporting heavy branches can prevent snapping and keep buds safe. A clean, prepared drying area also matters, because harvest is not the end of the process. A good dry and cure helps protect the quality you worked for during flowering.
When you put all of this together, the flowering stage becomes easier to manage. It is not about chasing perfection. It is about steady conditions, careful observation, and timely fixes. If you follow the plant’s week-by-week needs, keep your light cycle and environment stable, feed with balance, and respond quickly to problems, you give your plant the best chance to finish strong and produce mature, healthy buds.
Research Citations
Peterswald, T. J., Mieog, J. C., Azman Halimi, R., Magner, N. J., Trebilco, A., Kretzschmar, T., & Purdy, S. J. (2023). Moving away from 12:12; the effect of different photoperiods on biomass yield and cannabinoids in medicinal cannabis. Plants, 12(5), 1061. https://doi.org/10.3390/plants12051061
Ahrens, A., Llewellyn, D., & Zheng, Y. (2023). Is twelve hours really the optimum photoperiod for promoting flowering in indoor-grown cultivars of Cannabis sativa? Plants, 12(14), 2605. https://doi.org/10.3390/plants12142605
Grover, E. F., Haiden, S. R., & Berkowitz, G. A. (2025). Examining the “night break” method in Cannabis sativa horticulture: Vegetative daily light integral affects yield of extractable biomass in C. sativa. Plants, 14(19), 3095. https://doi.org/10.3390/plants14193095
Spitzer-Rimon, B., Duchin, S., Bernstein, N., & Kamenetsky, R. (2019). Architecture and florogenesis in female Cannabis sativa plants. Frontiers in Plant Science, 10, 350. https://doi.org/10.3389/fpls.2019.00350
Petit, J., Salentijn, E. M. J., Paulo, M.-J., Denneboom, C., & Trindade, L. M. (2020). Genetic architecture of flowering time and sex determination in hemp (Cannabis sativa L.): A genome-wide association study. Frontiers in Plant Science, 11, 569958. https://doi.org/10.3389/fpls.2020.569958
Steel, L., Welling, M., Ristevski, N., Johnson, K., & Gendall, A. (2023). Comparative genomics of flowering behavior in Cannabis sativa. Frontiers in Plant Science, 14, 1227898. https://doi.org/10.3389/fpls.2023.1227898
Zhang, M., Anderson, S. L., Brym, Z. T., & Pearson, B. J. (2021). Photoperiodic flowering response of essential oil, grain, and fiber hemp (Cannabis sativa L.) cultivars. Frontiers in Plant Science, 12, 694153. https://doi.org/10.3389/fpls.2021.694153
Kusuma, P., Westmoreland, F. M., Zhen, S., & Bugbee, B. (2021). Photons from NIR LEDs can delay flowering in short-day soybean and cannabis: Implications for phytochrome activity. PLOS ONE, 16(7), e0255232. https://doi.org/10.1371/journal.pone.0255232
Stack, G. M., Toth, J. A., Carlson, C. H., Cala, A. R., Marrero-González, M. I., Wilk, R. L., Gentner, D. R., Crawford, J. L., Philippe, G., Rose, J. K. C., Viands, D. R., Smart, C. D., & Smart, L. B. (2021). Season-long characterization of high-cannabinoid hemp (Cannabis sativa L.) reveals variation in cannabinoid accumulation, flowering time, and disease resistance. GCB Bioenergy, 13, 546–561. https://doi.org/10.1111/gcbb.12793
Questions and Answers
Q1: What is the flowering stage of cannabis?
The flowering stage is the period when a cannabis plant stops focusing on leaf and stem growth and starts producing buds. This stage begins when the plant receives longer periods of darkness each day, usually 12 hours of uninterrupted darkness for indoor growing.
Q2: How long does the cannabis flowering stage last?
The flowering stage usually lasts between 6 to 12 weeks, depending on the strain. Indica strains often finish faster, around 6 to 8 weeks, while sativa strains can take 10 to 12 weeks or longer.
Q3: What light schedule is needed for flowering cannabis indoors?
Indoor cannabis plants typically need a 12/12 light schedule to flower. This means 12 hours of light and 12 hours of complete darkness each day. Any light leaks during the dark period can stress the plant and affect bud development.
Q4: How can you tell when cannabis starts flowering?
Cannabis starts flowering when you see small white hairs called pistils forming at the nodes where branches meet the main stem. These early bud sites show that the plant has entered the flowering stage.
Q5: What nutrients are important during flowering? During flowering, cannabis plants need more phosphorus and potassium and less nitrogen compared to the vegetative stage. These nutrients support bud growth, resin production, and overall plant health.
Q6: What temperature and humidity levels are best during flowering?
During flowering, temperatures between 20–26°C (68–78°F) are ideal. Humidity should be lower than in the vegetative stage, usually around 40–50%, to reduce the risk of mold forming on dense buds.
Q7: Do cannabis plants stretch during flowering?
Yes, many cannabis plants stretch during the first two to three weeks of flowering. This means they grow taller quickly. Some strains can double in height during this early flowering period.
Q8: How do you know when cannabis buds are ready to harvest?
Growers check the trichomes, which are small, crystal-like glands on the buds. When most trichomes turn from clear to milky white, and some turn amber, the plant is usually ready to harvest.
Q9: Can you switch back to vegetative growth after flowering starts?
Yes, it is possible to revert a plant back to vegetative growth by changing the light schedule to longer daylight hours. However, this can stress the plant and may affect future growth and yields.
Q10: What common problems happen during cannabis flowering?
Common problems during flowering include mold, bud rot, nutrient deficiencies, and light stress. Proper airflow, correct feeding, and a stable light schedule help prevent these issues.