Yellow cannabis leaves are one of the most common signs that a plant is under stress. The change may begin with one pale leaf near the bottom of the plant. It may also spread across several leaves in a short time. Some leaves turn a solid yellow color, while others develop yellow tips, edges, spots, or areas between the veins. These different patterns can provide useful clues about what is happening inside the plant.
Healthy cannabis leaves are usually green because they contain chlorophyll. Chlorophyll is the substance that allows a plant to collect light and use it to make energy. This process is called photosynthesis. When a leaf loses chlorophyll, its green color begins to fade. The leaf may first look light green before turning yellow. This condition is known as chlorosis.
Chlorosis is a symptom rather than a single disease. It shows that the leaf is no longer producing or keeping enough chlorophyll. Many different problems can cause this change. A plant may be receiving too much water, too little water, or an unbalanced amount of nutrients. The roots may be damaged or unable to take in food from the growing medium. Light, temperature, pests, disease, and natural aging may also cause yellow leaves.
One yellow leaf does not always mean the entire plant is in danger. Older leaves may naturally turn yellow and fall away as the plant grows. This is more common near the end of flowering, when the plant begins using stored nutrients from its older leaves. Seed leaves may also turn yellow after a young plant develops several sets of true leaves. These changes can be part of normal plant growth.
Yellowing becomes more concerning when it spreads quickly, affects young growth, or appears with other symptoms. Drooping, curling, brown spots, burned tips, weak stems, and slow growth may point to a larger problem. A strong smell from the growing medium may suggest unhealthy roots. Tiny marks, webbing, or insects under the leaves may show that pests are feeding on the plant.
The location of the yellow leaves is an important part of diagnosis. Yellowing that begins on older leaves near the base of the plant may suggest a shortage of a mobile nutrient, such as nitrogen or magnesium. The plant can move these nutrients from older leaves to newer growth. Older leaves then lose color first.
Yellowing that begins on young leaves near the top may have a different cause. Iron problems, light stress, damaged roots, or incorrect pH may affect new growth. Leaves directly under a strong grow light may become pale or bleached. New leaves may also turn yellow when the roots cannot absorb certain nutrients, even when those nutrients are present in the growing medium.
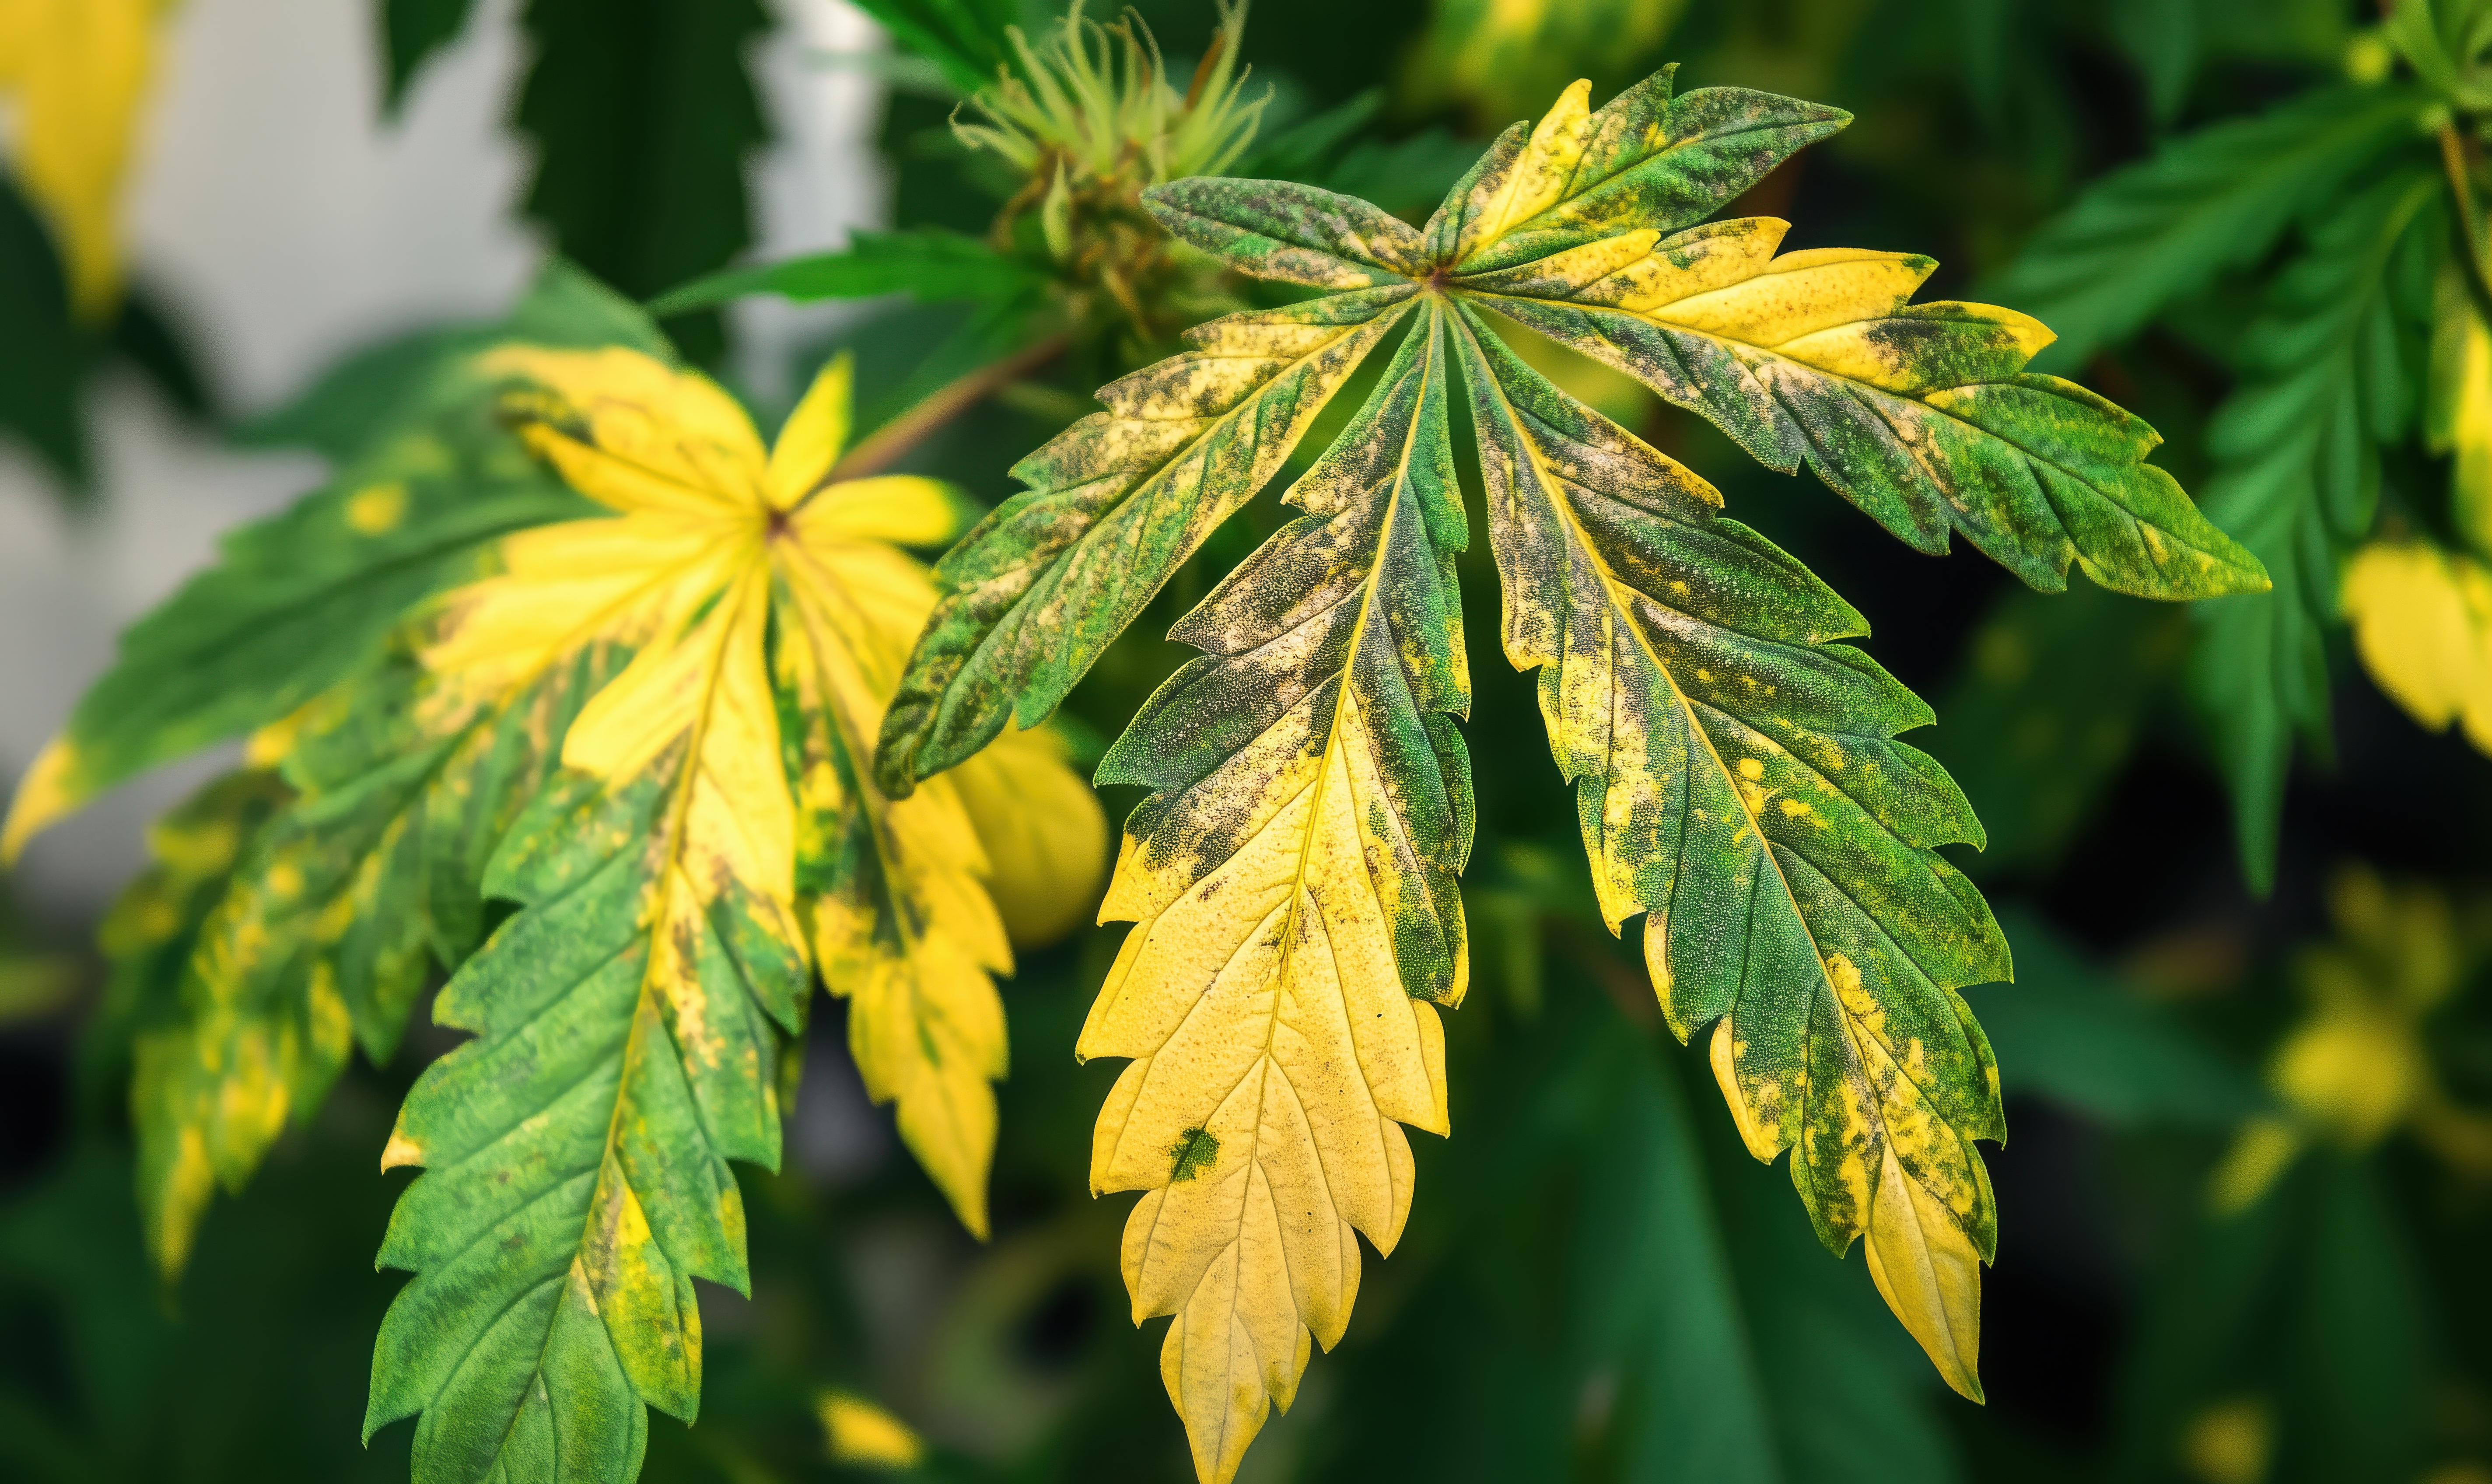
The pattern of yellowing matters as much as its location. Solid yellow leaves may point to a different issue than leaves with green veins and yellow tissue between them. Yellow tips may be an early sign of overfeeding. Yellow and brown edges may relate to potassium problems, heat stress, or salt buildup. Small yellow dots may be caused by insects, while round yellow patches may be linked to disease or physical damage.
Timing also helps explain the cause. A sudden change after feeding may suggest that the nutrient solution was too strong. Yellowing after several days of wet soil may point to overwatering or poor drainage. Damage that appears after moving a light closer may come from excess light or heat. Keeping records of watering, feeding, pH, temperature, and light changes makes these patterns easier to understand.
Watering problems are among the most common causes of yellow cannabis leaves. Roots need both moisture and oxygen. Constantly wet soil can fill the air spaces around the roots with water. The roots may then struggle to breathe and absorb nutrients. Very dry soil can also damage roots and stop the movement of water through the plant.
Nutrient problems are another common cause. Cannabis plants need nitrogen, phosphorus, potassium, magnesium, calcium, iron, sulfur, and other elements. Too little of one nutrient can cause yellowing, but too much fertilizer can also damage the plant. Excess nutrients may burn leaf tips or create salt buildup around the roots.
Incorrect pH can make nutrient problems harder to understand. The root zone must remain within a suitable pH range for nutrients to stay available. A plant may show signs of a deficiency even when fertilizer is present. This is called nutrient lockout. Adding more fertilizer without checking pH may increase salt levels and make the damage worse.
Light, heat, cold, pests, and disease must also be considered. Strong light can bleach upper leaves. High heat can dry leaf edges and increase water loss. Cold conditions can slow root activity. Pests may create pale dots or uneven yellow patches. Fungal and bacterial problems may cause spots, dead tissue, and spreading discoloration.
Treatment should begin only after the most likely cause has been identified. Guessing can lead to several treatments being used at the same time. This may add stress and make the original problem harder to find. A careful check of the leaves, roots, growing medium, pH, feeding history, and environment provides a safer path toward recovery. Healthy new growth and yellowing that stops spreading are the clearest signs that the correction is working.
How to Read Yellowing Patterns on Cannabis Leaves
Yellow cannabis leaves can point to many different plant problems. The color change alone does not provide enough information for a clear diagnosis. A grower must also look at where the yellowing started, how quickly it spread, and whether other symptoms appeared at the same time.
The plant should be inspected as a whole before any treatment begins. Adding fertilizer, changing the watering schedule, or moving the grow light without checking the full symptom pattern may increase plant stress. Careful observation makes it easier to find the likely cause and choose the right response.
Check Where the Yellowing Begins
The location of the first yellow leaves is one of the most useful clues. Some problems begin on older leaves near the bottom of the plant. Other problems affect the newest leaves at the top.
Lower leaves are older and often supply mobile nutrients to new growth. Mobile nutrients can move from one part of the plant to another. When the root system cannot provide enough of these nutrients, the plant may take them from its older leaves. The lower leaves then become pale and yellow.
Nitrogen and magnesium problems often begin in older leaves. A nitrogen shortage may cause the entire lower leaf to become light green before turning yellow. A magnesium problem often causes yellow tissue between the veins while the veins stay green.
Yellowing that begins on new leaves can point to a different group of problems. New growth depends on nutrients that do not move easily through the plant. Iron and sulfur problems may cause the upper leaves to become pale or yellow. Incorrect root-zone pH can also prevent the plant from absorbing these nutrients, even when they are present in the growing medium.
Yellowing near the top of the plant may also come from light or heat stress. This type of damage is often strongest on the leaves located closest to the grow light.
Look at the Shape and Color Pattern
A solid yellow leaf may have a different cause than a leaf with yellow spots or yellow edges. The exact pattern can narrow the list of possible problems.
Solid yellowing across an entire older leaf is often linked to nitrogen deficiency or natural aging. The leaf may first lose its deep green color and then become fully yellow. If this happens during vegetative growth or early flowering, the plant may need closer attention. If it happens only to a few lower leaves near harvest, it may be part of the plant’s natural life cycle.
Yellow tissue between green veins is called interveinal chlorosis. Older leaves with this pattern may have a magnesium problem. New leaves with green veins and yellow tissue may point to iron uptake trouble. Root-zone pH should be checked before extra nutrients are added because poor pH can block nutrient absorption.
Yellow leaf tips are often an early sign of overfeeding. The tips may later become brown, dry, and brittle. The damage can spread along the edges when nutrient levels remain too high. Potassium deficiency can also affect the edges, but it may produce weak stems, brown spots, and damaged leaf margins.
Yellow spots or uneven patches may be caused by pests, leaf diseases, water droplets under strong light, or physical damage. Small pale dots across the surface can be a sign of spider mites or thrips. Larger patches may be linked to fungal disease, chemical spray damage, or severe nutrient trouble.
Examine Other Leaf Symptoms
Yellowing should be studied together with the shape and texture of the leaves. Drooping, curling, dry edges, and brown spots provide extra information.
Soft, heavy-looking leaves that droop while the soil remains wet may suggest overwatering. The roots need both water and oxygen. Constantly wet soil can reduce the oxygen around the roots and limit nutrient uptake. Yellowing may spread because damaged roots cannot support normal plant growth.
Thin, limp leaves in dry soil may point to underwatering. These leaves may recover after correct watering if the stress has not lasted too long. Repeated dry periods can damage roots and cause older leaves to yellow or fall.
Leaves that curl upward at the edges may be reacting to excess heat or strong light. The upper part of the plant may become pale, dry, or bleached. Leaves that curl downward into a claw shape may be receiving too much nitrogen. Dark green leaves, burned tips, and slow growth may appear at the same time.
Brown or rusty spots can appear during calcium, magnesium, potassium, or pH problems. Pests and disease can create similar marks. A close inspection of both sides of each leaf is needed before deciding that the problem comes from nutrition.
Check How Fast the Yellowing Spreads
The speed of the color change can show how serious the condition may be. One older yellow leaf does not always mean the plant is unhealthy. Leaves can age, become shaded, or receive less light as the plant grows.
Yellowing that spreads across several leaves within a short period needs faster attention. Sudden changes may be connected to heavy watering, strong fertilizer, a sharp pH shift, heat stress, root damage, or pest activity.
Slow yellowing that begins at the bottom and moves upward may suggest a continuing nitrogen shortage. Rapid yellowing after feeding may point to nutrient burn or root-zone imbalance. Yellowing that appears after a light has been lowered may be connected to excess light intensity.
A daily plant check can help track the spread. Photos taken from the same angle can show whether the damage is stable or getting worse. New growth should also be observed because it gives the clearest sign of recovery.
Review Recent Changes in the Grow Area
Plant symptoms often appear after a change in care or growing conditions. Recent actions should be reviewed before a diagnosis is made.
A new fertilizer, stronger feeding mix, different water source, or uncalibrated pH meter may affect nutrient uptake. Moving a plant into a larger pot can change how long the growing medium stays wet. A stronger grow light can raise leaf temperature even when the room temperature appears normal.
Changes in ventilation, humidity, or nighttime temperature can also place stress on the plant. Pest problems may begin after new plants, tools, or growing materials are brought into the area.
Several conditions may exist at the same time. Overwatering can damage roots, which may then create signs that look like nutrient deficiency. Incorrect pH can cause several nutrients to become unavailable at once. Treating only the visible yellowing without checking the root cause may not stop the problem.
Yellowing patterns provide important clues about cannabis plant health. Lower-leaf yellowing often points to mobile nutrient problems, root stress, or natural aging. Yellow new growth may be linked to iron, sulfur, pH, light, or heat problems. Yellow tips can suggest excess fertilizer, while yellow spots may come from pests, disease, or nutrient imbalance.
Overwatering, Underwatering, and Root Problems
Watering problems are among the most common reasons cannabis leaves turn yellow. Both too much water and too little water can place stress on the plant. The symptoms may look similar at first, so it is important to check the growing medium, leaves, roots, and watering schedule before making changes.
Healthy roots need a balance of water and oxygen. Water carries nutrients through the plant, while oxygen helps the roots complete important growth processes. When the balance is lost, the roots may stop working well. This can prevent the plant from taking in nutrients, even when fertilizer is present in the growing medium.
How Overwatering Causes Yellow Leaves
Overwatering does not always mean that too much water was added at one time. It often means that the plant is watered too often. The growing medium stays wet for long periods and does not have enough time to dry. This pushes oxygen out of the small spaces around the roots.
Roots need oxygen to absorb water and nutrients. When the root area remains soaked, the roots become weak. Nutrient uptake slows down, and the leaves may begin to lose their green color. Yellowing may appear on the lower leaves first, but it can spread across the plant if the problem continues.
An overwatered cannabis plant often has drooping leaves. The leaves may look thick, swollen, or heavy. They may bend downward even though the growing medium is still wet. Growth may slow, and new leaves may appear small or weak.
The container may also feel heavy for several days after watering. A wet smell may come from the soil or drainage holes. Green algae may appear on the surface when the area stays damp for too long. These signs suggest that the roots are not receiving enough air.
Overwatering is more common in large containers with small plants. A young plant has a small root system and cannot use all the water in a large amount of soil. The center and bottom of the container may remain wet even when the top layer looks dry.
How Underwatering Affects Cannabis Plants
Underwatering happens when the roots do not receive enough moisture. The growing medium may become very dry, and the container may feel much lighter than usual. Without enough water, the plant cannot move nutrients from the roots to the leaves.
The leaves of an underwatered plant often become thin, limp, and weak. They may hang downward from the stems. The leaf edges may curl or feel dry. Yellowing may appear after the plant has remained dry for too long.
A severely dry plant may wilt quickly during warm periods or under strong grow lights. Small containers may dry faster because they hold less water. Plants with large root systems may also use water faster than young plants.
Some growing media become difficult to wet after they dry completely. Water may run down the sides of the pot and leave the center dry. The surface may look wet, but the root ball may still contain dry areas. Slow and even watering can help the medium absorb moisture again.
Underwatered plants may recover soon after receiving enough water. However, repeated dry periods can damage fine roots and slow growth. A plant that moves between very dry and very wet conditions may suffer even more stress.
Poor Drainage and Compacted Growing Medium
Drainage problems can create symptoms that look like overwatering. A plant may receive a normal amount of water, but the extra moisture cannot leave the container. Blocked drainage holes, dense soil, and compacted growing media can trap water around the roots.
Compaction reduces the small air spaces that roots need. The growing medium becomes hard and heavy. Water moves through it slowly, and the roots may have trouble spreading. This can lead to weak growth, drooping leaves, and yellowing.
Containers should have open drainage holes at the bottom. Water should move through the growing medium without collecting for long periods. Pots should not remain in trays filled with runoff water because the growing medium may absorb the water again.
A light and well-aerated growing medium supports better root health. Materials that improve airflow and drainage can help prevent water from remaining around the roots for too long. However, changing the entire growing medium may place extra stress on a weak plant. Any repotting should be done carefully.
Root Rot and Damaged Roots
Root rot can develop when roots remain wet and low in oxygen for a long time. Harmful fungi and other organisms may grow in the damp root zone. Healthy roots are usually firm and light in color. Rotting roots may become brown, dark, soft, or slimy.
A strong or unpleasant smell from the root area can also suggest root rot. The plant may continue to droop even when the watering schedule has been corrected. Leaves may turn yellow, growth may stop, and branches may become weak.
Root damage can also happen for other reasons. Excess fertilizer may burn the roots. Very hot or cold conditions may reduce root function. Small containers can cause roots to circle tightly around the pot. Physical damage during transplanting may also slow nutrient and water uptake.
Root problems often affect the whole plant because the roots support every leaf and stem. Adding more fertilizer will not correct yellowing if damaged roots cannot absorb it. The root environment must improve before normal growth can return.
Correcting Watering and Root Problems
The first step is to check the moisture level below the surface. The top layer may dry while the lower part remains wet. The weight of the container can help show how much water is still present. A recently watered pot feels heavier than one that is ready for water.
An overwatered plant should be allowed to use the moisture already in the growing medium. Watering should not follow a fixed daily schedule because plants use water at different rates. Container size, plant size, temperature, humidity, airflow, and growth stage all affect how quickly the medium dries.
Drainage holes should be checked for blockages. Standing water should be removed from collection trays. Better airflow around the container may also support drying. Strong heat should not be used to dry the roots because fast drying can create more stress.
An underwatered plant should receive water slowly and evenly. The goal is to moisten the root area without flooding it. Water may need to be added in small amounts over several minutes when the growing medium has become very dry.
Repotting may be needed when the growing medium is badly compacted, the container is too small, or serious root damage is present. Dark and soft roots may need to be removed with clean tools. The plant can then be placed in fresh, well-draining growing medium. Repotting is stressful, so it should be used only when simpler corrections are not enough.
Yellow cannabis leaves can result from too much water, too little water, poor drainage, compacted soil, or damaged roots. Overwatered plants often have heavy, drooping leaves and wet growing media. Underwatered plants usually have light containers, dry soil, and thin or limp leaves. Root rot may cause dark roots, bad odors, slow growth, and spreading yellow leaves.
Nutrient Deficiencies That Cause Yellow Leaves
Cannabis plants need a balanced supply of nutrients to grow healthy leaves, stems, roots, and flowers. When one nutrient is missing or cannot be absorbed, the plant may begin to lose its green color. Yellowing caused by a nutrient problem can appear on old leaves, new leaves, leaf edges, or the spaces between the veins.
The location of the first symptoms offers an important clue. Some nutrients can move from older leaves to younger growth when supplies are low. These are called mobile nutrients. Nitrogen, magnesium, and potassium are mobile, so shortages often appear on older and lower leaves first. Other nutrients do not move easily through the plant. These are called immobile nutrients. Iron and sulfur problems usually affect new growth near the top of the plant.
Yellow leaves do not always prove that fertilizer is needed. Incorrect pH, damaged roots, excess watering, or salt buildup can stop the plant from taking in nutrients that are already present. The growing conditions should be checked before more fertilizer is added.
Nitrogen Deficiency
Nitrogen helps cannabis plants produce chlorophyll, which gives leaves their green color. It also supports stem growth, leaf development, and the production of plant proteins. Cannabis needs more nitrogen during the vegetative stage, when it is building new leaves and branches.
A nitrogen shortage usually starts on the oldest leaves near the bottom of the plant. These leaves may first become pale green. They then turn evenly yellow across the whole leaf. The yellowing may slowly move upward if the shortage continues. Older leaves may dry out, curl, and fall from the plant. Growth may also become slow, and new stems may appear thin or weak.
The pattern is important because nitrogen can move through the plant. When the roots cannot supply enough nitrogen, the plant takes it from older leaves and sends it to younger growth. This allows the top of the plant to remain green for a short time.
A mild nitrogen fade near the end of flowering may be part of natural aging. However, strong yellowing during early growth or early flowering may reduce the plant’s ability to produce energy. Before correcting the problem, the grower should check pH, root health, and the recent feeding schedule. Adding too much nitrogen can cause dark green leaves, curled tips, weak stems, and delayed flower development.
Magnesium Deficiency
Magnesium is an important part of the chlorophyll molecule. Without enough magnesium, the plant cannot use light as well as it should. Magnesium is mobile, so signs usually begin on mature leaves in the lower half of the plant.
The main symptom is yellowing between the leaf veins. This condition is called interveinal chlorosis. The veins may stay green while the tissue around them becomes pale or yellow. The leaf may develop a striped or marbled appearance. As the problem becomes worse, small rust-colored or brown spots may form. The edges may dry, curl upward, or feel brittle.
Magnesium problems may develop even when magnesium is present in the growing medium. Incorrect pH can block uptake. High levels of potassium or calcium may also compete with magnesium around the roots. Soft or filtered water may contain very little magnesium, which can increase the risk of a shortage.
Treatment should be based on the full growing setup. The root-zone pH should be tested first. Fertilizer labels should also be checked because many complete nutrient products already contain magnesium. Adding several supplements without checking the current nutrient mix may create an imbalance.
Iron Deficiency
Iron supports chlorophyll production and several processes that help the plant use energy. Unlike nitrogen and magnesium, iron does not move easily from old leaves to new leaves. For this reason, iron deficiency usually appears at the top of the plant.
New leaves may emerge pale yellow or almost white. The small veins may stay green at first, creating a clear pattern between the veins. Older leaves often remain green during the early stage of the problem. New growth may become small, weak, or slow if the deficiency continues.
A true lack of iron is less common than an iron uptake problem. High root-zone pH is a frequent cause because iron becomes harder for roots to absorb when the pH rises outside the suitable range. Overwatering, cold root conditions, poor drainage, and root damage may also reduce iron uptake.
Adding more iron without correcting the root-zone problem may not help. The grower should first test the pH and inspect the condition of the roots. Once the cause is corrected, healthy new growth should begin to appear greener. Leaves that are already fully yellow may not return to their original color.
Potassium Deficiency
Potassium helps control water movement, stem strength, and many internal plant processes. It becomes especially important as cannabis enters flowering. Since potassium is mobile, early signs often appear on older leaves.
A potassium shortage may begin with pale or yellow leaf edges. The tips and margins may later turn brown, dry, or crispy. Rust-colored spots can spread inward from the edges. Some leaves may curl, and stems may become weaker. The plant may also have trouble handling heat, dry air, or other forms of stress.
Potassium deficiency can look similar to nutrient burn because both problems may damage leaf tips and edges. The feeding history can help separate them. Nutrient burn is more likely after a strong feeding and may appear with very dark green leaves. A potassium shortage may develop more slowly and may appear with weak stems or slow flower growth.
Excess calcium, magnesium, or fertilizer salts can limit potassium uptake. Incorrect pH and poor root health may also cause the symptoms. The root zone and nutrient strength should be checked before extra potassium is supplied.
Sulfur and Other Micronutrient Problems
Sulfur supports proteins, enzymes, and new plant tissue. A sulfur shortage often causes pale green or yellow growth near the top of the plant. Unlike a nitrogen deficiency, which starts on older leaves, sulfur symptoms usually affect younger leaves first. New leaves may stay small, and stems may become thin or weak.
Other micronutrients can also cause yellowing. Manganese problems may create yellow areas between veins along with small brown spots. Zinc deficiency may cause pale new leaves, short spaces between branches, and twisted growth. Molybdenum problems are less common but may cause yellowing along the leaf edges.
These deficiencies often look alike. They may also appear together when pH is outside the suitable range. This makes visual diagnosis difficult. Feeding records, pH readings, water quality, and the age of the affected leaves should all be reviewed before treatment begins.
Nutrient deficiencies create different yellowing patterns depending on which nutrient is affected. Nitrogen shortages usually turn older lower leaves evenly yellow. Magnesium deficiency causes yellow areas between green veins on mature leaves. Iron problems affect new leaves near the top, while potassium shortages often damage older leaf tips and edges. Sulfur and other micronutrient problems may cause pale or damaged new growth.
Incorrect pH and Nutrient Lockout
The pH level of the root zone has a strong effect on how well a cannabis plant can absorb nutrients. A plant may receive enough fertilizer but still show yellow leaves if the pH is outside the proper range. This problem is often called nutrient lockout. It can look like a true nutrient deficiency, which may lead to the wrong treatment.
Understanding pH can help prevent wasted fertilizer, damaged roots, and ongoing leaf yellowing. Growers should check the pH before adding extra nutrients because feeding a locked-out plant may make the problem worse.
What Root-Zone pH Means
The pH scale measures how acidic or alkaline a substance is. The scale runs from 0 to 14. A pH of 7 is neutral. Numbers below 7 are acidic, while numbers above 7 are alkaline.
Cannabis roots can absorb nutrients best within a certain pH range. The ideal range depends on the growing method. Plants grown in soil often do well when the root-zone pH is around 6.0 to 7.0. Plants grown in coco coir or hydroponic systems often need a lower range, usually around 5.5 to 6.5.
These ranges allow the roots to take in important nutrients such as nitrogen, phosphorus, potassium, magnesium, calcium, and iron. When the pH moves too far outside the proper range, some nutrients become harder for the plant to absorb.
A small pH change may not cause immediate damage. However, a pH problem that continues for several days can lead to yellow leaves, slow growth, weak stems, leaf spots, or damaged edges.
How Incorrect pH Causes Yellow Leaves
Incorrect pH does not always mean that nutrients are missing from the growing medium. The nutrients may already be present, but the roots may not be able to use them.
For example, iron becomes less available when the pH is too high. This may cause new leaves to turn yellow while the veins remain green. Magnesium uptake may also become limited, which can cause yellowing between the veins of older leaves.
A very low pH can also create problems. Some nutrients may become too available and reach harmful levels. Other nutrients may become difficult to absorb. This creates an imbalance inside the plant.
Yellowing caused by pH problems may appear in several areas at the same time. Older leaves may lose color while new leaves become pale or twisted. Brown spots may also appear. Since several nutrients can be affected, the symptoms may not match one clear deficiency.
Understanding Nutrient Lockout
Nutrient lockout happens when the roots cannot absorb nutrients that are already available in the growing medium. Incorrect pH is one common cause, but it is not the only cause.
A high level of fertilizer salts can also lead to nutrient lockout. These salts collect in soil, coco coir, or hydroponic systems over time. Salt buildup may change the pH around the roots and make it harder for the plant to take in water.
Damaged or unhealthy roots may also cause lockout. Roots need oxygen, moisture, and stable conditions to work well. Overwatering, poor drainage, root disease, or very cold temperatures can reduce nutrient uptake.
Nutrient lockout may cause yellow leaves, slow growth, burnt tips, curling, and weak flower development. The plant may look hungry even after it has been fed. Adding more fertilizer at this stage may increase salt buildup and place more pressure on the roots.
Testing Water and Nutrient Solution
Regular testing can help find a pH problem before serious damage develops. The water should be tested before nutrients are added. This gives a starting point and shows whether the water is naturally acidic or alkaline.
The nutrient solution should be tested again after all products have been mixed. Fertilizers and supplements can change the pH. The final reading is more useful than the starting reading because it shows what will enter the growing medium.
Nutrients should be mixed in the order recommended by the manufacturer. Each product should be mixed fully before another product is added. Concentrated products should not be mixed directly because they may react with each other and form substances that the roots cannot absorb.
The pH should be adjusted only after the full nutrient solution has been prepared. A pH-adjusting product can be added in small amounts. The solution should then be mixed and tested again.
Checking Runoff and the Root Zone
Runoff is the liquid that drains from the bottom of the container after watering. Testing runoff may help show what is happening around the roots. A runoff reading that is far different from the input solution may point to salt buildup or an unstable root-zone pH.
Runoff results should be treated as one part of the diagnosis. They can vary depending on the growing medium, pot size, watering method, and the amount of runoff collected.
Hydroponic systems allow direct testing of the water around the roots. The pH may change each day as plants use water and nutrients. Small changes are normal. Large or fast changes may signal a root problem, an unbalanced nutrient solution, or poor water quality.
Soil pH can be harder to measure. A soil test kit, slurry test, or quality soil meter may provide more useful information. Growers should follow the instructions for the chosen testing method.
Salt Buildup and Excess Fertilizer
Repeated feeding can leave unused mineral salts in the growing medium. This is more likely when the plant receives strong nutrient solutions, frequent feeding, or very little runoff.
Salt buildup can raise the concentration of minerals around the roots. This may make it difficult for roots to absorb water. Leaves may turn yellow, develop burnt tips, or curl downward. The plant may also wilt even when the growing medium is moist.
The electrical conductivity, often called EC, can help measure the strength of dissolved salts in a nutrient solution. A high EC reading in the root zone may suggest that too much fertilizer has collected.
When salt buildup is confirmed, the growing medium may need to be rinsed with properly adjusted water. This process should be done carefully because heavy flushing can leave the roots too wet. The container must have good drainage, and the medium should be allowed to dry to a healthy level afterward.
Correcting pH Safely
A pH problem should be corrected slowly. A sudden change can stress the roots and make nutrient uptake less stable.
The first step is to confirm the pH with a reliable meter or test kit. The next step is to check whether the meter is clean and calibrated. A damaged or poorly calibrated meter may give false readings and lead to unnecessary treatment.
The water or nutrient solution can then be adjusted toward the correct range. Small amounts of pH-up or pH-down solution should be used. Adding too much can cause the pH to swing in the opposite direction.
The root zone should not be treated with several strong products at the same time. The plant needs time to respond. New growth should be watched for signs of improvement. Old yellow leaves may not turn green again, even after the problem has been corrected.
Preventing Future pH Problems
Prevention starts with regular testing and simple records. Writing down the pH, feeding strength, watering date, and plant response can make patterns easier to see.
Meters should be cleaned and calibrated on a regular schedule. Storage instructions should also be followed because some meter probes can become damaged if they dry out.
The growing medium should provide good drainage and enough air around the roots. Water quality should also be checked. Hard water may contain high levels of minerals that affect pH and nutrient balance.
Large changes in fertilizer strength should be avoided. Plants usually respond better to steady care than sudden changes. Feeding amounts should match the growth stage, plant size, growing medium, and environmental conditions.
Incorrect pH can cause cannabis leaves to turn yellow even when enough nutrients are present. The wrong pH limits nutrient uptake and may lead to nutrient lockout. Salt buildup, damaged roots, poor drainage, and excess fertilizer can make the problem worse.
Testing the water, nutrient solution, runoff, and root zone can help identify the cause. Meters must be clean and calibrated for accurate results. Corrections should be made slowly, and extra fertilizer should not be added until the root-zone condition is understood.
Healthy new growth is the best sign that the plant is recovering. Old yellow leaves may remain damaged, but stable pH, balanced feeding, good drainage, and regular testing can help prevent the yellowing from spreading.
Nutrient Burn and Overfeeding
Cannabis plants need nutrients to build roots, stems, leaves, and flowers. However, giving a plant more fertilizer than it can use may damage its roots and leaves. This problem is often called nutrient burn. It usually starts when mineral salts from fertilizer collect around the roots. The high salt level makes it harder for the plant to absorb water. As the problem grows worse, leaf tips and edges begin to dry out.
Nutrient burn can happen during any stage of growth. Seedlings and young plants are at greater risk because their roots are still small and sensitive. Mature plants may handle stronger feeding, but they can still become damaged when nutrient levels rise too quickly. Early action can stop the damage from spreading and protect healthy new growth.
How Nutrient Burn Differs From a Nutrient Deficiency
Nutrient burn and nutrient deficiency may both cause yellow or brown leaves. This can make them hard to tell apart. However, the location and pattern of the damage often provide useful clues.
Nutrient burn usually begins at the very tips of the leaves. The tips may turn pale yellow before becoming brown, dry, or crispy. The damage may then move inward along the leaf edges. Leaves may also become very dark green before the burned areas appear. This dark color can be a sign that the plant is receiving more nitrogen than it needs.
A nutrient deficiency often follows a different pattern. Nitrogen deficiency usually causes whole lower leaves to become pale green and then yellow. Magnesium deficiency may cause yellow areas between green veins. Iron deficiency often affects the newest leaves first. A deficiency may spread across larger areas of the leaf instead of beginning only at the tips.
The plant’s feeding history should also be reviewed. Yellow tips that appear soon after a stronger feeding are more likely to be caused by excess nutrients. Yellowing that develops after a long period of weak feeding may point to a shortage. Watering habits, pH, root health, and plant age must also be considered before deciding on a treatment.
Early Signs of Excess Fertilizer
The first sign of nutrient burn is often a small yellow area at the end of one or more leaves. At this stage, the rest of the leaf may still look healthy. The yellow tip may be easy to ignore, but it shows that the nutrient level is close to or above what the plant can handle.
As the condition becomes worse, the yellow tips turn brown and brittle. Brown areas may spread down the sides of the leaves. Some leaves may curl upward or downward. Growth may slow because damaged roots cannot take in water and nutrients in a balanced way.
Very dark green leaves can also signal overfeeding, especially when they are thick or shiny. Too much nitrogen may cause the leaf tips to point downward. This shape is often described as clawing. The stems may remain soft, and flower development may slow when too much nitrogen is provided during the flowering stage.
Severe overfeeding may cause widespread yellowing, leaf drop, root damage, and stunted growth. A plant in this condition may appear thirsty even when the growing medium is wet. The roots may struggle to absorb water because of the high salt level around them.
Why Fertilizer Salts Damage Cannabis Roots
Many cannabis fertilizers contain mineral salts that dissolve in water. These minerals provide nitrogen, phosphorus, potassium, calcium, magnesium, and other elements. The roots absorb the dissolved nutrients as the plant uses water.
Problems begin when more nutrients are added than the plant can absorb. The unused salts remain in the soil, coco coir, or another growing medium. Each new feeding may add more salts to the root zone. Water may evaporate or be absorbed, while the minerals stay behind.
A high salt level changes how water moves around the roots. Instead of water moving easily into the plant, the roots may lose access to it. This creates a form of water stress. The leaf tips are often damaged first because they are at the ends of the plant’s water and nutrient pathways.
Salt buildup may also change the pH around the roots. Once the root-zone pH moves outside a useful range, certain nutrients become harder for the plant to absorb. A plant may then show signs of both overfeeding and nutrient deficiency at the same time. Adding more fertilizer in this situation usually makes the problem worse.
Common Causes of Nutrient Burn
Mixing a nutrient solution that is too strong is one of the most common causes of nutrient burn. Fertilizer labels may provide a general feeding amount, but different cannabis plants may not need the same strength. Young plants, small plants, and plants under weak light often use fewer nutrients than large plants growing under strong light.
Feeding too often can also cause salt buildup. A plant may receive a safe amount during one feeding, but repeated fertilizer use without enough plain water may increase the nutrient level in the root zone. This problem is more likely when drainage is poor or when water cannot flow out of the container.
Using several additives at the same time may create an overly strong solution. Base nutrients, bloom boosters, calcium and magnesium products, root supplements, and other additives all contribute to the total mineral level. Each product may seem mild when used alone, but the full mixture may be too strong.
Seedlings are especially easy to overfeed. Many growing mixes already contain enough nutrients for early growth. Adding strong fertilizer before the young plant has developed several sets of true leaves may burn its small root system.
Water quality can also affect nutrient strength. Hard water may already contain high levels of dissolved minerals. Fertilizer added to hard water may produce a stronger solution than expected. Measuring only the amount of fertilizer without checking the total mineral content may lead to overfeeding.
Using EC or TDS Readings
Electrical conductivity, often called EC, measures how well a nutrient solution conducts electricity. Water with more dissolved mineral salts usually has a higher EC reading. Total dissolved solids, or TDS, estimates the amount of dissolved material and is often shown in parts per million.
These readings can help track nutrient strength. They do not show which nutrients are present, but they can reveal whether the total concentration is too high. A sudden increase in the root-zone or runoff reading may suggest salt buildup.
Meters should be kept clean and calibrated according to the manufacturer’s instructions. Different TDS meters may use different conversion scales, so EC readings are often easier to compare. Plant size, growth stage, water quality, growing medium, and environmental conditions should still be considered. A number that works for one plant may be too strong for another.
How to Help an Overfed Plant Recover
The first step is to stop strong feeding. The next watering should use a milder nutrient solution or properly adjusted water, depending on the growing medium and the seriousness of the problem. The root-zone pH should be checked because poor pH may be adding to the symptoms.
When salt buildup is severe, the growing medium may need to be rinsed carefully. Water should be allowed to drain freely through the container so dissolved salts can leave the root zone. The plant should not be left standing in runoff water. Poor drainage may create a second problem by reducing oxygen around the roots.
After the root zone has been corrected, the plant needs time to recover. Damaged leaf tips will not become green again. Recovery should be judged by the appearance of new growth and whether the damage stops spreading. Feeding can begin again at a lower strength once the plant shows stable growth.
Several major changes should not be made at the same time. Strong flushing, heavy pruning, repotting, and sudden light changes may place too much stress on the plant. A slow and measured correction makes it easier to see whether the treatment is working.
Nutrient burn happens when cannabis plants receive more fertilizer than they can safely use. It often begins with yellow leaf tips that later become brown and crispy. Dark green leaves, clawing, slow growth, and burned edges may appear as the condition becomes worse. Common causes include strong nutrient mixtures, frequent feeding, salt buildup, hard water, and using too many additives together.
A careful review of feeding strength, pH, drainage, EC or TDS readings, and recent plant changes can help confirm the cause. Treatment should focus on reducing nutrient strength and restoring a balanced root zone. Old damage will remain visible, but healthy new leaves and stopped symptom spread are signs that the plant is recovering.
Light, Heat, Cold, and Environmental Stress
Cannabis plants need stable growing conditions to produce healthy green leaves. Sudden changes in light, temperature, humidity, or airflow can place stress on the plant. Yellow leaves may appear when the plant cannot adjust fast enough to these changes.
Environmental stress often looks like a nutrient problem. A grower may add more fertilizer after seeing pale leaves, even when the real cause is too much light or heat. Extra fertilizer may then create a second problem. The best approach is to check the growing environment before changing the feeding plan.
How Excess Light Causes Yellow Leaves
Cannabis plants use light to make energy through photosynthesis. However, more light does not always lead to faster growth. A grow light placed too close to the canopy can damage the upper leaves.
Light stress usually begins at the top of the plant because these leaves are closest to the light source. The affected leaves may turn pale green, yellow, or almost white. This loss of color is often called light bleaching. Leaves directly below the strongest part of the lamp may show the most damage.
The edges of light-stressed leaves may curl upward. Some leaves may feel dry or thin. Brown spots can appear if the problem continues. Flowers near the light may also lose color or develop poorly.
Light damage can be confused with a nutrient deficiency. The location of the symptoms is an important clue. Nutrient problems may begin on the lower leaves or spread across the whole plant. Light stress is often strongest on the upper growth and directly under the lamp.
The light distance should be checked against the lamp maker’s guidance. The correct distance depends on the type and strength of the grow light. A high-powered lamp usually needs more space between the fixture and the plant canopy.
The grow light may need to be raised, dimmed, or moved. Changes should be made in small steps. A sudden major drop in light may slow plant growth. New leaves should be observed for several days to see whether the yellowing stops.
Heat Stress and High Leaf Temperature
High temperatures increase the amount of water lost through the leaves. The roots must absorb enough water to replace this loss. When water loss becomes too fast, the plant may wilt, curl, or develop yellow leaves.
Heat stress often affects leaves near the top of the plant. These leaves may bend upward at the edges, creating a shape that looks like a canoe or taco. Leaf tips may become dry, yellow, or brown. The growing medium may also dry faster than normal.
Room temperature does not always show how hot the leaves are. Strong grow lights can raise leaf temperature above the temperature of the surrounding air. Placing a hand at canopy level can give a basic idea of the heat near the plant, but a suitable thermometer gives a more reliable result.
Airflow can help remove warm air from around the leaves. Exhaust fans can also move hot air out of an indoor growing area. However, strong fans should not blow directly at one part of the plant for long periods. Constant strong wind can dry leaves and damage their edges.
Plants should also have access to enough water during warm conditions. This does not mean the growing medium should remain wet all the time. The watering schedule may need to change as temperature, plant size, and water use increase.
Cold Stress and Sudden Temperature Changes
Cold conditions can also cause cannabis leaves to turn yellow. Low temperatures slow many processes inside the plant. The roots may absorb water and nutrients more slowly, even when enough nutrients are present in the growing medium.
Cold roots are a common concern when pots sit directly on a cold floor. The leaves may droop, growth may slow, and nutrient deficiency symptoms may appear. The plant may show purple stems or dark leaf colors along with yellowing, although plant genetics can also affect color.
Large temperature changes between the light and dark periods can increase stress. A plant may struggle when it moves from a very warm daytime temperature to a cold nighttime temperature. Keeping the daily temperature range steady helps the plant use water and nutrients at a more even rate.
Cold air from windows, doors, vents, or air-conditioning systems may affect only one side of the growing area. Plants near these cold areas may show damage before the others. A thermometer placed near the canopy and another near the root zone can help identify these differences.
Humidity Problems
Humidity describes the amount of moisture in the air. Very low humidity causes leaves to lose water quickly. The plant may respond by curling its leaves or slowing growth. Leaf tips and edges may become dry or yellow.
Very high humidity creates a different set of problems. Water loss from the leaves slows down, which may reduce the movement of water and nutrients through the plant. High humidity can also support mold and fungal growth, mainly when airflow is poor.
Humidity needs may change during the plant’s life cycle. Young plants often prefer more moisture in the air because their root systems are still small. Mature plants can often handle lower humidity. Flowering plants usually need better moisture control to reduce the risk of mold around dense flowers.
A humidity meter can provide a clearer picture of the growing area. The reading should be taken near the plant canopy because humidity may differ across the room. A humidifier, dehumidifier, ventilation system, or adjusted watering schedule may help keep conditions more stable.
Poor Air Circulation
Air circulation supports healthy leaf function and helps control heat and moisture. Still air can create warm, damp areas around the plant. These small areas may allow pests or diseases to develop.
Fans should move air gently through and above the canopy. Leaves may move slightly, but they should not shake hard or remain pushed in one direction. Wind damage may cause dry edges, curled leaves, and uneven yellowing.
Crowded plants may block airflow. Leaves that press against each other can trap moisture. Proper spacing and careful plant training can help air move through the growing area.
How to Correct Environmental Stress
Only one or two changes should be made at a time. The light distance, temperature, humidity, and airflow should be recorded before adjustments are made. This creates a clear starting point and makes it easier to understand which change helps the plant.
Damaged leaves may not return to their original green color. Recovery should be judged by the condition of new growth. Healthy new leaves, stronger stems, and stopped yellowing are signs that the plant is improving.
Yellow cannabis leaves can result from excess light, high heat, cold roots, unstable temperatures, poor humidity control, or weak airflow. Light stress usually affects the top leaves closest to the lamp, while temperature and humidity problems may affect several parts of the plant. Checking the canopy, root zone, and surrounding air can help separate environmental stress from a nutrient problem. Small, gradual changes are safer than changing every growing condition at once. Stable light, temperature, humidity, and airflow give the plant a better chance to maintain healthy green growth.
Pests, Diseases, and Leaf Damage
Yellow cannabis leaves are not always caused by watering, nutrients, or pH problems. Pests and plant diseases can also damage leaf tissue and reduce the amount of chlorophyll in the leaves. Chlorophyll gives leaves their green color and helps the plant turn light into energy. When insects feed on the plant or a disease attacks the tissue, yellow spots, pale areas, curling, and dead patches may appear.
Pest and disease damage can spread quickly if it is not found early. A close inspection of the leaves, stems, growing medium, and nearby plants can help identify the cause. The pattern of damage is often different from a nutrient deficiency. Nutrient problems may create even yellowing across part of the plant. Pest damage is often uneven and may include tiny dots, silver marks, sticky areas, holes, or webbing.
Spider Mites
Spider mites are very small pests that feed on plant fluids. They often live on the lower surface of cannabis leaves, where they may be hard to see without a magnifying glass. Early damage usually appears as many tiny yellow or white dots on the leaf surface. This pattern is known as stippling.
As the number of mites increases, the leaves may turn pale, dry out, and fall from the plant. Fine webbing may appear between leaves, stems, and flowers during a serious infestation. The webbing is one of the clearest signs that spider mites are present.
Spider mites grow quickly in warm, dry conditions. Plants should be inspected often when temperatures are high and humidity is low. The underside of each leaf should be checked because this is where mites and their eggs are usually found. Affected plants should be separated from healthy plants to limit the spread.
Thrips
Thrips are thin insects that scrape the surface of leaves and feed on plant tissue. Their damage often looks like silver, pale yellow, or white streaks. Small black spots may also appear near the damaged areas. These dark spots are waste left by the insects.
Thrips may damage both young and old leaves. New growth can become twisted or weak if the problem continues. Adult thrips can move between plants, so nearby plants should also be inspected. Sticky traps may help show whether flying adults are present, but the leaves still need to be checked for young thrips.
Thrip damage can look like light stress or a nutrient problem at first. The main difference is that thrip marks are often irregular. They may form short lines or rough patches instead of an even yellow pattern.
Aphids and Whiteflies
Aphids are soft-bodied insects that gather on stems, leaf undersides, and new growth. They remove plant sap and weaken the plant over time. Damaged leaves may become yellow, curled, or distorted. Aphids also release a sticky substance called honeydew. This material can collect on leaves and may support the growth of dark mold.
Whiteflies are small, pale insects that also feed on plant sap. They usually rest under the leaves. When an affected plant is moved, adult whiteflies may fly into the air. Their feeding can cause pale spots, yellow leaves, weak growth, and early leaf drop.
Both pests can reproduce quickly. New plants should be checked before they enter the growing area. Tools, hands, and clothing can also carry pests from one plant to another. Keeping the area clean reduces the chance of a large infestation.
Fungus Gnats and Root Damage
Adult fungus gnats look like small dark flies around the soil or growing medium. The adults are often more annoying than harmful, but their larvae can damage young roots. The larvae live in wet organic matter and feed on fungi, decaying material, and fine root tissue.
Root damage makes it harder for the plant to absorb water and nutrients. This can lead to yellow leaves, weak growth, and drooping. The symptoms may look like a nutrient deficiency because damaged roots cannot take in enough minerals.
Fungus gnats are common in growing media that stay wet for too long. Improving drainage and allowing the upper part of the medium to dry between waterings can make the area less suitable for them. Yellow sticky traps may help monitor adult gnats, but root-zone conditions must also be corrected.
Fungal and Bacterial Diseases
Fungal diseases can cause yellow spots, brown patches, powdery growth, or dying leaf tissue. Some fungal problems begin as small marks that slowly grow larger. Other infections may spread across a leaf within a short period.
Leaf spot diseases may produce round or uneven marks with yellow borders. Powdery mildew often appears as white or gray powder on the leaf surface. Severe infections can reduce photosynthesis and weaken the plant.
Bacterial diseases may also cause wet-looking spots, yellow areas, or rapid tissue death. These problems can spread through water splashes, dirty tools, infected plant material, and direct contact between plants. High humidity and poor airflow can make some diseases spread faster.
A plant with possible disease symptoms should be separated from other plants. Damaged leaves should be handled with care so spores or bacteria are not spread through the grow space.
Viral Symptoms
Plant viruses are less common than watering or nutrient problems, but they may cause serious damage. Possible signs include yellow patterns, twisted leaves, unusual growth, weak stems, and slow development. Some viruses create a patchy or mosaic pattern with light and dark green areas.
Viral symptoms can be difficult to identify because they may look like nutrient stress, pest damage, or genetic variation. A virus may spread through infected cuttings, insects, hands, or tools. There is usually no simple treatment that removes a virus from an infected plant.
Good sanitation is an important form of prevention. Cutting tools should be cleaned between plants. Unhealthy plant material should not be used for propagation.
Inspecting the Plant for Pests and Disease
A careful inspection should begin with the leaves showing the first signs of yellowing. Both the upper and lower surfaces should be checked under bright light. A magnifying glass can help reveal mites, eggs, larvae, or feeding marks.
Stems, branches, and new growth should also be examined. Sticky residue may suggest aphids, whiteflies, or scale insects. Webbing may suggest spider mites. Silver streaks may point to thrips. Small flying insects near wet soil may indicate fungus gnats.
The growing medium should be checked for excess moisture, mold, insects, and unpleasant odors. Nearby plants must also be inspected because many pests move easily through an indoor or outdoor growing area.
Basic Control and Prevention
An affected plant should be isolated as soon as possible. Separation lowers the risk of pests or diseases reaching healthy plants. Leaves that are fully dead or heavily infected may be removed with clean tools. Large amounts of healthy leaf tissue should not be removed from an already stressed plant.
The growing area should be cleaned, including trays, containers, floors, fans, and tools. Dead leaves and spilled growing material should be removed. Airflow should be improved, but strong fans should not blow directly onto weak plants.
Treatment must match the pest or disease and the plant’s stage of growth. A product that may be suitable during vegetative growth may not be suitable near developing flowers. Product labels and local rules should always be followed. Treatments should not leave unsafe residue on plant material.
Regular inspections offer the best protection. Finding a few insects or small spots early is much easier to manage than a widespread problem.
Pests and diseases can cause cannabis leaves to turn yellow, develop spots, curl, dry out, or fall early. Spider mites often cause fine yellow dots and webbing, while thrips leave silver streaks and dark waste marks. Aphids and whiteflies may cause sticky leaves and distorted growth. Fungus gnat larvae can damage roots and create symptoms that look like a nutrient problem.
Fungal, bacterial, and viral diseases may also produce yellow areas and unusual leaf patterns. Careful inspection of leaf undersides, stems, roots, and nearby plants helps identify the cause. Early isolation, clean tools, steady airflow, proper watering, and regular plant checks can reduce damage and prevent the problem from spreading.
Yellow Leaves During Seedling, Vegetative, and Flowering Stages
Yellow cannabis leaves do not always mean the same thing. The plant’s growth stage can help explain whether the change is normal or a sign of stress. A young seedling has different needs from a mature plant in the vegetative stage. A flowering plant also uses water and nutrients in a different way.
Growers should consider the age of the plant, the location of the yellow leaves, and how quickly the problem is spreading. One yellow leaf may not require treatment. Several yellow leaves that appear within a short period may point to a problem with water, nutrients, pH, roots, light, or temperature.
Yellow Leaves During the Seedling Stage
Cannabis seedlings are small and sensitive. Their roots are still developing, so they cannot handle the same amount of water or fertilizer as larger plants. Too much water is one of the most common reasons seedling leaves turn yellow.
A wet growing medium contains less oxygen. Young roots need oxygen to grow and absorb nutrients. When soil stays wet for too long, the roots may become weak. The seedling may droop, stop growing, and develop pale or yellow leaves. Watering should be based on the moisture level of the growing medium rather than a fixed daily schedule.
Poor drainage can make overwatering worse. Seedling containers should have open drainage holes. The growing medium should also be light enough to allow water and air to move through it. Heavy or compacted soil may hold too much moisture around the roots.
Strong fertilizer can also damage seedlings. Most seedlings have enough stored energy to support their first stage of growth. Rich soil or a strong nutrient solution may burn young roots. Early signs may include yellow leaf tips, brown edges, curling, or slow growth. Nutrients should be introduced carefully and at a low strength when the seedling is ready.
Incorrect pH may cause yellowing even when nutrients are present. A poor root-zone pH can prevent the plant from absorbing certain elements. Adding more fertilizer may not solve the problem if pH is the true cause.
The first round leaves on a seedling are called cotyledons. These leaves supply stored energy during early growth. Cotyledons often turn yellow and fall off after the first sets of true leaves develop. This change is usually normal. Yellowing becomes more concerning when true leaves are also affected, growth has stopped, or the stem looks weak.
Yellow Leaves During the Vegetative Stage
Cannabis plants produce most of their stems, branches, and leaves during vegetative growth. Nitrogen is important at this stage because it supports green leaf tissue and plant development. A nitrogen shortage often causes older leaves near the bottom of the plant to turn pale green and then yellow.
Nitrogen can move from older leaves to younger growth. The plant may take nitrogen from its lower leaves when the roots cannot supply enough. Yellowing usually moves upward if the shortage continues. Lower leaves may dry out and fall from the plant. Growth may also become slow, thin, or weak.
Yellow leaves during vegetative growth are not always caused by low nitrogen. Overwatering, damaged roots, incorrect pH, or salt buildup can produce similar symptoms. A grower should check the root zone and recent feeding routine before adding more nutrients.
Fast vegetative growth also increases the plant’s need for water and root space. A plant that has outgrown its container may become root-bound. Roots may circle the container and form a tight mass. This condition can reduce water and nutrient uptake. The plant may need frequent watering, yet it may still show yellow leaves or slow growth.
Light stress can affect vegetative plants as well. Leaves closest to an intense grow light may become pale, yellow, dry, or curled. Damage focused on the top of the plant is more likely to involve light or heat than a mobile nutrient shortage. Lower-leaf yellowing is more often linked to nitrogen, watering, or root problems.
Problems during vegetative growth should be corrected before flowering begins. A weak plant may have trouble supporting flower production. Changes should still be made gradually because sudden shifts in feeding, watering, or light can create additional stress.
Yellow Leaves During the Flowering Stage
Cannabis plants change their growth pattern when flowering begins. Energy moves toward flower production, and nutrient needs also change. The plant still requires nitrogen, but it usually needs less than it did during strong vegetative growth. Potassium and phosphorus needs may become more important, depending on the growing medium and feeding program.
Yellowing during early or middle flowering may require attention. A plant that loses many healthy leaves too soon may have less green tissue available for photosynthesis. Reduced photosynthesis can limit the energy used for flower development.
Lower leaves that turn yellow early in flowering may point to a nitrogen shortage. Yellow or brown leaf edges may suggest a potassium problem, nutrient burn, or salt buildup. Yellowing between green veins may be linked to magnesium or another nutrient uptake issue. These patterns should be compared with pH readings, watering habits, and the position of damaged leaves.
Heavy feeding during flowering may also cause yellow leaves. Nutrient burn often begins at the leaf tips. The tips may turn yellow, brown, and dry. Leaves may become very dark green before showing burned edges. Adding more fertilizer to a stressed plant can increase root damage.
Natural fading may occur near the end of flowering. Older fan leaves can turn yellow as the plant uses stored nutrients. This process is often called senescence. Late-stage fading usually starts on older leaves and develops slowly. Flowers may continue to mature while the leaves lose color.
Natural fading should not be used to explain every yellow leaf. Sudden yellowing, severe drooping, spreading spots, bad odors, pests, or dying new growth may signal a real problem. A healthy late-flowering fade should be gradual rather than rapid and damaging.
The meaning of yellow cannabis leaves depends partly on the plant’s growth stage. Seedlings often turn yellow because of too much water, strong nutrients, poor drainage, or incorrect pH. Yellow cotyledons may be normal after true leaves develop.
Vegetative plants may show yellow lower leaves when nitrogen is low, roots are crowded, or the growing medium stays too wet. Flowering plants can develop yellow leaves because of changing nutrient needs, root-zone problems, excess fertilizer, or natural aging near harvest.
Step-by-Step Diagnosis of Yellow Cannabis Leaves
Yellow cannabis leaves can have many causes. Watering mistakes, nutrient problems, poor soil drainage, pests, heat, and incorrect pH can all produce similar signs. For this reason, treatment should not begin with a guess. Adding fertilizer or water without checking the plant may make the problem worse.
A careful diagnosis looks at where the yellowing started, how fast it is spreading, and what other symptoms are present. Recent changes in feeding, watering, lighting, or temperature should also be reviewed. The following steps can help identify the most likely cause.
Step 1: Locate the First Yellow Leaves
The location of the first yellow leaves provides an important clue. Yellowing that begins on older leaves near the bottom of the plant often points to a shortage of a mobile nutrient. Mobile nutrients can move from old leaves to new growth when the plant does not have enough. Nitrogen and magnesium are common examples.
Nitrogen deficiency often causes lower leaves to become pale green before turning fully yellow. Magnesium deficiency may cause yellow areas between green leaf veins. These symptoms usually begin on older leaves because the plant moves available nutrients toward younger growth.
Yellowing that starts near the top may have a different cause. New leaves that turn yellow while the veins stay green may show an iron uptake problem. Pale or bleached leaves directly below a grow light may be caused by excess light or heat. Checking the location of the damage helps reduce the number of possible causes.
Step 2: Check the Growing Medium
The growing medium should be inspected before more water or nutrients are added. Soil or another medium that stays wet for too long may reduce the amount of oxygen around the roots. Healthy roots need oxygen to absorb water and nutrients.
A constantly wet medium may point to overwatering, poor drainage, compacted soil, or an oversized container. Other signs may include drooping leaves, slow growth, soft stems, and an unpleasant smell near the root zone.
A medium that becomes very dry may cause the plant to wilt. Leaves may look thin, weak, or curled before they begin to yellow. The surface of the soil should not be the only area checked. The upper layer may feel dry while the lower part of the container remains wet.
Drainage holes should also be checked. Water should be able to leave the container freely. Blocked holes or dense soil may trap water and damage the roots.
Step 3: Review the Watering Schedule
The watering schedule should match the plant’s size, container, growing medium, and environment. Watering on a fixed daily schedule can cause problems because the plant does not use the same amount of water each day.
Small plants usually need less water than large plants. Cool or humid conditions may also slow water use. Hot temperatures, strong airflow, and larger plants can make the growing medium dry faster.
Overwatered plants often have heavy, drooping leaves even though the medium is wet. Underwatered plants may also droop, but their leaves often feel thin and the container may feel very light. The condition of the growing medium helps separate these two problems.
Water should normally be added only when the root zone has dried enough to allow fresh oxygen to enter. The exact timing depends on the growing system. Careful observation is more useful than following a strict calendar.
Step 4: Test pH and Nutrient Strength
Incorrect pH can prevent roots from taking in nutrients. This problem is called nutrient lockout. Nutrients may be present in the soil or feeding solution, but the plant may not be able to use them.
The pH of the water should be checked before feeding. It should also be tested after nutrients are mixed because fertilizer can change the reading. Runoff or root-zone measurements may provide more information about conditions around the roots.
Testing equipment must be clean and properly calibrated. A damaged or poorly calibrated meter can produce incorrect readings. This may lead to unnecessary pH adjustments and further plant stress.
Nutrient strength should also be reviewed. A very strong feeding solution can damage roots and cause yellow or brown tips. A very weak solution may not provide enough nutrition during active growth. Electrical conductivity or total dissolved solids meters can help measure nutrient strength when they are used correctly.
Step 5: Review Feeding Records
Recent feeding records can show whether yellowing began after a change in nutrients. Important details include the type of fertilizer, the amount used, the feeding frequency, and any added supplements.
A plant that has not received enough nitrogen during vegetative growth may develop yellow lower leaves. A plant that receives too much fertilizer may show burned tips, dark green leaves, and downward curling.
Several products used together can also create an excessive nutrient level. Different supplements may contain the same minerals. This can lead to salt buildup even when each product is used near its label rate.
Fertilizer should not be increased simply because leaves are yellow. The pattern must first match a likely deficiency. Root damage, overwatering, and incorrect pH can all create deficiency-like symptoms.
Step 6: Inspect the Environment
Light, temperature, humidity, and airflow can affect leaf color. Upper leaves that become pale, dry, or yellow may be too close to a strong light. Heat stress may also cause leaf edges to curl upward.
Very cold conditions can slow root activity. The plant may then struggle to absorb nutrients even when enough fertilizer is present. Large changes between daytime and nighttime temperatures can add stress.
Humidity that stays too high may slow water movement and increase disease risk. Very low humidity may cause rapid water loss. Air should move gently through the growing area, but strong fans should not blow directly on one part of the plant for long periods.
Environmental readings should be checked at plant level. The temperature near the leaves may be different from the temperature near a wall or floor.
Step 7: Look for Pests and Disease
Both sides of each leaf should be inspected closely. Many pests hide under leaves or near leaf stems. Spider mites may cause tiny pale dots and fine webbing. Thrips may leave silver marks or uneven yellow patches. Aphids and whiteflies can weaken leaves by feeding on plant sap.
The growing medium should also be checked. Fungus gnat larvae may damage young roots when populations become large. Root damage can reduce nutrient uptake and lead to yellow growth.
Yellow spots with dark centers, spreading patches, or soft areas may suggest a disease. Plants with possible pest or disease problems should be separated from healthy plants when possible. This helps reduce the risk of spreading the issue.
Step 8: Consider the Growth Stage
The plant’s age and growth stage affect how yellow leaves should be understood. Seedlings may develop yellow cotyledons after true leaves have formed. This can be part of normal development. However, yellow true leaves, weak stems, or stalled growth may point to overwatering, strong fertilizer, or poor root conditions.
During vegetative growth, fast-spreading yellowing is usually a warning sign. Healthy leaves are needed to support new stems and branches.
Some fading can occur late in flowering as the plant reaches the end of its life cycle. Early yellowing during flowering should still be checked because it may be caused by watering problems, nutrient imbalance, or root stress.
Step 9: Change One Main Factor at a Time
Several treatments should not be applied at once. Changing the pH, adding fertilizer, moving the light, and watering heavily on the same day can create more stress. It also becomes difficult to identify which change helped or harmed the plant.
The most likely cause should be corrected first. The plant should then be observed for several days. Fully yellow leaves may not turn green again. The main signs of improvement are healthy new growth and yellowing that no longer spreads.
Diagnosing yellow cannabis leaves requires careful observation. The first step is to identify where the yellowing began and what pattern it follows. The growing medium, watering schedule, pH, feeding records, environment, pests, and growth stage should then be checked.
Treatment should match the confirmed problem. Adding extra fertilizer without checking the roots and pH may make the condition worse. Slow, controlled changes provide clearer results and reduce added stress. Healthy new growth and stable leaf color are the best signs that the plant is recovering.
How to Fix Yellow Leaves and Prevent Future Problems
Yellow cannabis leaves can appear for many reasons. The plant may be receiving too much water, too little water, excess fertilizer, or the wrong nutrient balance. Poor pH, weak roots, strong light, heat, pests, and disease may also cause yellowing. Treatment should match the actual cause. Applying several treatments at once can place more stress on the plant and make the problem harder to identify.
A fully yellow leaf will rarely become green again. The main goal is to stop the damage from spreading and support healthy new growth. New leaves are often the best sign of recovery. Healthy new growth should have an even green color, a normal shape, and steady development.
Correct Watering Problems
Watering problems are among the most common causes of yellow cannabis leaves. Overwatered plants often have heavy, drooping leaves and wet soil that takes a long time to dry. Roots need both water and oxygen. Soil that stays wet for too long can push oxygen out of the root zone. Weak roots cannot absorb nutrients well, even when enough fertilizer is present.
An overwatered plant should not receive more water until the growing medium has dried to a safe level. The top layer may feel dry while the lower part of the pot remains wet. Lifting the pot can help show how much water it still holds. A wet pot feels much heavier than a dry one.
Drainage holes should remain open and clear. Compacted soil may need to be loosened or replaced with a lighter growing mix. Serious root problems may require repotting. Dark, soft, or bad-smelling roots may point to root rot.
Underwatered plants may have dry soil, thin leaves, curled edges, and rapid wilting. Water should be added slowly so the growing medium can absorb it evenly. Pouring a large amount into very dry soil may cause water to run down the sides without reaching the root ball. A steady watering routine can prevent repeated stress.
Correct pH and Nutrient Lockout
Incorrect pH can stop cannabis roots from absorbing certain nutrients. This problem is known as nutrient lockout. The nutrients may be present in the soil or feeding solution, but the roots cannot use them well.
The pH of the water and mixed nutrient solution should be tested before feeding. Testing the runoff may also provide useful information about conditions near the roots. A pH meter must be clean and calibrated to give reliable results.
Large and sudden pH changes can shock the roots. Adjustments should be made in small steps. Adding extra fertilizer before checking pH can make the problem worse. Salt levels may rise around the roots, leading to more yellowing and burned leaf tips.
Salt buildup may happen after repeated feeding, especially when strong nutrient solutions are used. A grower should review recent feeding records and check the strength of the nutrient solution. Correct pH and balanced nutrient levels often allow the plant to begin taking in food again.
Treat a Confirmed Nutrient Deficiency
A nutrient deficiency should be treated only after the symptoms have been checked carefully. Yellow lower leaves may suggest nitrogen deficiency. Yellowing between green veins on older leaves may point to magnesium deficiency. Pale or yellow new growth may be linked to iron problems. Yellow or brown leaf edges can appear when potassium is low.
The correct nutrient should be added at a safe strength. A strong feeding will not repair the plant faster. It may burn the roots and create a second problem. Starting with a mild dose allows the plant to respond without facing another sudden change.
Growth stage must also be considered. Cannabis plants need more nitrogen during vegetative growth. Nitrogen needs often decrease during flowering. Some yellowing near the end of flowering can be part of natural aging. Heavy nitrogen feeding at this stage may delay normal development and create dark, weak leaves.
Improvement may take several days. Damaged leaves may remain yellow, but new growth should look healthier. The spread of yellowing should also slow or stop.
Reduce Excess Fertilizer
Excess fertilizer can cause yellow or brown tips, curled leaves, dark green growth, and slow development. This condition is often called nutrient burn. Strong fertilizer salts make it harder for roots to absorb water.
Feeding should be reduced when nutrient burn is suspected. The next feeding may need a weaker solution or plain, correctly balanced water, depending on the growing medium and the level of salt buildup. More fertilizer should not be added to correct yellowing until overfeeding has been ruled out.
Several additives used together can raise nutrient strength more than expected. Each product may appear mild on its own, but the combined mixture can become too strong. Seedlings and young plants are especially sensitive. A simple feeding plan is often easier to control than a large mix of supplements.
Adjust Light and Temperature
Strong light can bleach upper leaves and make them appear pale yellow. Damage is usually greatest near the lamp. Leaf edges may curl upward, and the leaves may feel dry or thin.
The light may need to be raised or dimmed. Changes should be gradual. A large and sudden drop in light can slow growth. The plant should be checked over the next several days to see whether new damage appears.
High temperatures can also cause yellowing, dry edges, and curled leaves. Good airflow helps remove hot air around the canopy. Fans should move air gently without blowing hard on one part of the plant.
Cold conditions may slow root activity and reduce nutrient uptake. Stable temperatures are better than large changes between day and night. Humidity should also remain suitable for the plant’s growth stage. Very dry air increases water loss, while very high humidity may raise the risk of mold and disease.
Control Pests and Disease
Yellow spots, silver marks, sticky residue, webbing, or damaged leaf surfaces may point to pests. Both sides of each leaf should be checked. Stems, branches, and the top of the growing medium also need close inspection.
Affected plants should be separated from healthy plants when possible. Isolation helps reduce the spread of insects or disease. Heavily damaged or infected leaves may be removed using clean tools.
Treatment must be suitable for the pest and the plant’s growth stage. Some sprays should not be applied to developing flowers. The growing area should also be cleaned because pests may hide on pots, tools, trays, and nearby surfaces.
Fungal or bacterial problems may improve when damaged material is removed and airflow is increased. High humidity and crowded leaves can keep plant surfaces wet for too long. Cleaner conditions and steady air movement can lower the risk of repeated infection.
Decide Whether to Remove Yellow Leaves
A partly yellow leaf may still produce energy for the plant. Removing too many leaves can reduce photosynthesis and add stress. Leaves should not be removed only because they look imperfect.
A fully dead, dry, or diseased leaf may be removed. Leaves that fall away with very little pressure are no longer helping the plant. Damaged leaves that touch wet soil may also be removed to reduce the risk of mold.
Clean scissors should be used for any cutting. Tools should be cleaned before and after use, especially when disease or pests may be present. Large amounts of pruning should be avoided while the plant is already stressed.
Build a Prevention Routine
Regular observation is the best way to prevent serious yellowing. Plants should be checked often for changes in color, shape, growth speed, and leaf position. Early symptoms are usually easier to correct than widespread damage.
A simple grow record can track watering dates, nutrient amounts, pH readings, temperature, humidity, and light changes. These notes make it easier to connect a symptom with a recent change.
Watering should follow the condition of the growing medium instead of a strict daily schedule. Nutrients should be measured carefully. pH meters should be calibrated, and the grow area should remain clean. New plants should be inspected before being placed near established plants.
Only one main correction should be made at a time when possible. The plant then needs enough time to respond. Healthy new leaves and steady growth show that the correction is working.
Yellow cannabis leaves can often be corrected when the cause is identified early. Treatment may involve changing the watering routine, improving drainage, correcting pH, adjusting nutrients, reducing fertilizer, moving lights, controlling temperature, or treating pests and disease. Old yellow leaves may not recover, so progress should be judged through healthy new growth and slower symptom spread. Careful records, regular plant checks, clean equipment, balanced feeding, and stable growing conditions can help prevent yellow leaves from returning.
Conclusion: Restoring Healthy Cannabis Growth
Yellow cannabis leaves are a sign that the plant is going through a change or facing stress. Some yellowing is natural, especially when old leaves reach the end of their life. However, fast or widespread yellowing may point to a problem that needs attention. The best way to respond is to study the pattern before making changes. The location, color, and condition of the leaves can provide useful clues about what is happening inside the plant.
Yellowing that starts on the lower leaves often points to a problem with a mobile nutrient. Nitrogen deficiency is one of the most common causes. The plant can move nitrogen from older leaves to new growth, so the lower leaves become pale and yellow first. Magnesium deficiency can also begin on older leaves, but it often causes yellow areas between green veins. Yellowing that starts on the newest leaves may be linked to iron, sulfur, root stress, or incorrect pH. Upper leaves may also turn pale when grow lights are too close or too strong.
Yellow leaf tips and edges can suggest a different type of problem. Burned or yellow tips may appear when the plant receives too much fertilizer. Potassium deficiency may also cause yellow or brown edges. Dry heat, low humidity, and poor watering habits can create similar damage. These symptoms may look alike, so growers should avoid choosing a treatment based on one leaf alone.
Water and root health should be checked early in the diagnosis process. Overwatering is a common reason cannabis leaves become yellow and droopy. Roots need both water and oxygen. When the growing medium stays wet for too long, the roots may not receive enough air. This can slow nutrient uptake and weaken the plant. Poor drainage, compacted soil, blocked holes, and pots that are too large can increase this risk. Underwatering can also cause yellowing, but the leaves often look thin, dry, or wilted. The growing medium may pull away from the sides of the pot when it becomes very dry.
Nutrients are another important part of healthy cannabis growth. Cannabis plants need nitrogen, phosphorus, potassium, calcium, magnesium, sulfur, iron, and other elements. These nutrients must be present in the correct amounts. Too little can cause weak growth and color changes. Too much can damage the roots and prevent the plant from using water correctly. Adding more fertilizer is not always the right answer. A plant can show deficiency symptoms even when nutrients are present in the growing medium.
Incorrect pH is often the reason available nutrients cannot enter the roots. This condition is commonly called nutrient lockout. When the pH is outside the suitable range, the plant may struggle to absorb certain elements. Adding extra nutrients during lockout can increase salt buildup and make the root zone worse. Testing the water, nutrient solution, and root zone can help show whether pH is part of the problem. Meters should be kept clean and calibrated so the results are reliable.
The growing environment should also remain steady. Strong lights, high heat, cold roots, poor airflow, and large changes in humidity can all place stress on cannabis plants. Light damage often affects the upper leaves closest to the grow lamp. Heat stress may cause leaf edges to curl upward, dry out, or turn yellow. Cold conditions can slow root activity and nutrient uptake. Changes to lights, temperature, and airflow should be made in small steps. Sudden adjustments may create more stress.
Pests and plant diseases must also be considered when yellowing appears as spots, patches, or small faded marks. Spider mites, thrips, aphids, whiteflies, and fungus gnats can damage leaves or roots. Their feeding may cause yellow dots, silver marks, curling, or slow growth. Fungal and bacterial problems may create dark spots surrounded by yellow tissue. Careful inspection of the leaf tops, undersides, stems, and growing medium can help find signs that are easy to miss.
The plant’s age and growth stage also affect leaf color. Seedlings may develop yellow leaves when they receive too much water or strong fertilizer. The first small seed leaves, known as cotyledons, normally turn yellow and fall after the true leaves develop. During vegetative growth, spreading yellow leaves may reduce the plant’s ability to produce energy. Yellowing during early or middle flowering may point to a nutrient, pH, root, or watering problem. Some fading near the end of flowering can be part of the plant’s natural life cycle.
A careful diagnosis should focus on several areas. Check where the yellowing started, how fast it is spreading, and whether the leaves have spots, burned tips, or green veins. Review watering habits, feeding records, light changes, and recent temperature shifts. Test pH and nutrient strength when possible. Inspect the plant for pests and root problems. These steps provide a clearer picture and reduce the risk of using the wrong treatment.
Only one main change should be made at a time when possible. Changing the watering schedule, fertilizer amount, pH, light height, and temperature on the same day can make the result difficult to understand. Small and controlled corrections make it easier to see what helps the plant. Fully yellow leaves may not become green again, so recovery should be judged by the condition of new growth. Healthy new leaves and slower yellowing are good signs.
Regular care can prevent many yellow leaf problems. Use a growing medium with proper drainage, allow the root zone to dry at a suitable rate, and feed according to the plant’s age and condition. Keep clear records of watering, nutrients, and pH. Maintain steady light, temperature, humidity, and airflow. Inspect plants often so small changes are found early. Healthy cannabis growth depends on balanced nutrition, strong roots, correct watering, and a stable environment. When yellow leaves appear, careful observation and gradual action offer the safest path toward recovery.
Research Citations
Cockson, P., Landis, H., Smith, T., Hicks, K., & Whipker, B. E. (2019). Characterization of nutrient disorders of Cannabis sativa. Applied Sciences, 9(20), 4432. https://doi.org/10.3390/app9204432
Llewellyn, D., Golem, S., Jones, A. M. P., & Zheng, Y. (2023). Foliar symptomology, nutrient content, yield, and secondary metabolite variability of cannabis grown hydroponically with different single-element nutrient deficiencies. Plants, 12(3), 422. https://doi.org/10.3390/plants12030422
Massuela, D. C., Munz, S., Hartung, J., Nkebiwe, P. M., & Graeff-Hönninger, S. (2023). Cannabis Hunger Games: Nutrient stress induction in flowering stage: Impact of organic and mineral fertilizer levels on biomass, cannabidiol yield, and nutrient use efficiency. Frontiers in Plant Science, 14, 1233232. https://doi.org/10.3389/fpls.2023.1233232
Morad, D., & Bernstein, N. (2023). Response of medical cannabis to magnesium supply at the vegetative growth phase. Plants, 12(14), 2676. https://doi.org/10.3390/plants12142676
Punja, Z. K. (2021). Emerging diseases of Cannabis sativa and sustainable management. Pest Management Science, 77(9), 3857–3870. https://doi.org/10.1002/ps.6307
Punja, Z. K., & Rodriguez, G. (2018). Fusarium and Pythium species infecting roots of hydroponically grown marijuana (Cannabis sativa L.) plants. Canadian Journal of Plant Pathology, 40(4), 498–513. https://doi.org/10.1080/07060661.2018.1535466
Saloner, A., & Bernstein, N. (2020). Response of medical cannabis (Cannabis sativa L.) to nitrogen supply under long photoperiod. Frontiers in Plant Science, 11, 572293. https://doi.org/10.3389/fpls.2020.572293
Saloner, A., & Bernstein, N. (2022). Nitrogen source matters: High NH₄/NO₃ ratio reduces cannabinoids, terpenoids, and yield in medical cannabis. Frontiers in Plant Science, 13, 830224. https://doi.org/10.3389/fpls.2022.830224
Saloner, A., Sacks, M. M., & Bernstein, N. (2019). Response of medical cannabis (Cannabis sativa L.) genotypes to K supply under long photoperiod. Frontiers in Plant Science, 10, 1369. https://doi.org/10.3389/fpls.2019.01369
Shiponi, S., & Bernstein, N. (2021). The highs and lows of P supply in medical cannabis: Effects on cannabinoids, the ionome, and morpho-physiology. Frontiers in Plant Science, 12, 657323. https://doi.org/10.3389/fpls.2021.657323
Questions and Answers
Q1: Why do cannabis leaves turn yellow?
Cannabis leaves may turn yellow because of nutrient problems, incorrect watering, poor soil pH, heat stress, pests, disease, or natural aging.
Q2: Does yellowing cannabis leaves mean a nitrogen deficiency?
Yellowing that begins on older, lower leaves often points to a nitrogen deficiency. The yellow color may spread upward if the problem continues.
Q3: Can overwatering cause cannabis leaves to turn yellow?
Yes. Too much water reduces oxygen around the roots, which makes it harder for the plant to absorb nutrients. The leaves may become yellow, soft, and droopy.
Q4: Can underwatering make cannabis leaves yellow?
Yes. A plant that stays dry for too long may develop yellow, thin, or brittle leaves. The soil may pull away from the sides of the container.
Q5: How does soil pH affect yellow cannabis leaves?
Incorrect pH can block nutrient uptake even when nutrients are present. Cannabis grown in soil usually absorbs nutrients best when the root-zone pH is around 6.0 to 7.0.
Q6: Why are the lower cannabis leaves turning yellow first?
Lower leaves often turn yellow because of nitrogen deficiency, low light, overwatering, or natural aging. A few lower leaves may also fade as the plant grows.
Q7: Why are new cannabis leaves turning yellow?
Yellowing on new growth may suggest an iron, sulfur, or micronutrient problem. High root-zone pH can also prevent the plant from absorbing these nutrients.
Q8: Can too much fertilizer cause yellow leaves?
Yes. Excess fertilizer can damage roots and cause yellow or brown leaf tips. Severe nutrient burn may also make leaves curl, dry out, or develop crispy edges.
Q9: Can pests cause cannabis leaves to turn yellow?
Yes. Spider mites, aphids, thrips, and other pests can damage leaf tissue and create yellow spots or patches. Checking the undersides of leaves can help reveal insects, eggs, or webbing.
Q10: Should yellow cannabis leaves be removed?
Fully yellow, dry, or badly damaged leaves may be removed because they no longer support healthy growth. Partly green leaves should usually remain until the cause of the yellowing has been corrected.